Home Blog Page 6

Best Coffee in Hanoi – Vietnamese Egg Coffee

0
Best Coffee in Hanoi - Vietnamese Egg Coffee

Hanoi is renowned for its coffee scene, especially with Vietnamese Coffee being one of the most distinctive coffee flavours on the planet. Ask any Hanoi coffee lover about the best coffee in Hanoi, and there’s a good chance that Vietnamese Egg Coffee will come up. After all, this coffee is nothing short of legendary.

Note: This post may contain affiliate links. Please read our disclosure policy for more information.

The Search for the Best Coffee in Hanoi

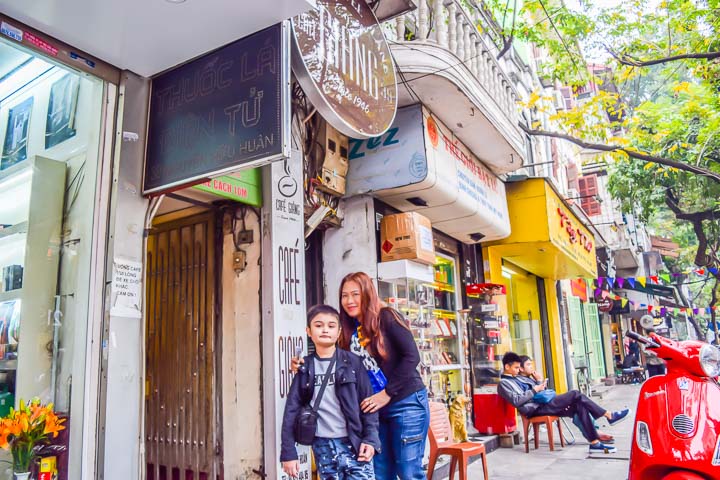
In the Old Quarter of Hanoi at our awesome Hanoi Bella Rosa Suites Hotel, the reception staff told us we simply HAVE TO TRY an authentic EGG COFFEE. They informed us the place to find the best Vietnamese Egg Coffee is Giang Coffee. So off we went hunting for this famous cafe/coffee shop.

It turned out to be rather elusive, mainly due to the lack of signs in English. The address we were given was 39 Nguyen Huu Huan Street, Hoan Kiem – Hanoi. Easy right?

Hanoi Old Quarter street scene and Best Coffee in Hanoi - Vietnamese Egg Coffee
In search of Giang Cafe in the Old Quarter of Hanoi

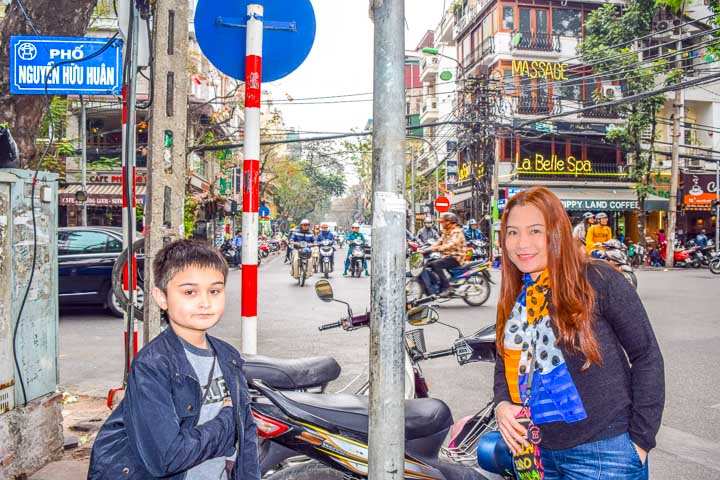
We found the street no problem. First, we walked right past the cafe and didn’t see it. We were armed with a map, street address and all the information we needed but still missed it. We asked directions to a non-English speaking local, and he pointed back the way we came.

As it turned out there is no actual storefront, just a door with a sign on a busy street. We felt better, no wonder we didn’t see it the first time! The Giang website says “Giang Café” is humbly hidden on a small lane on Nguyen Huu Huan Street in the city’s old quarter. They got that right!

Best Coffee in Hanoi - Vietnamese Egg Coffee
The entrance to Giang Cafe

Giang Coffee, est. 1947

As it turned out this place has been open some 70 years. I went in and much to my disappointment I saw a few guys moving tables around, but no customers! Oh well, not open yet I figured. Standing out the front considering my options a European traveller came along and asked us about Giang.

Don’t think it’s open?” I said. He went in to check for himself, came out 5 minutes later and said “it’s open and it’s pretty cool. Follow the staircase up“. Sure enough, we went in and found the staircase, which took us up to a windowless room on the first floor. It was open after all! The best Vietnamese coffee was beckoning us, so we went in.
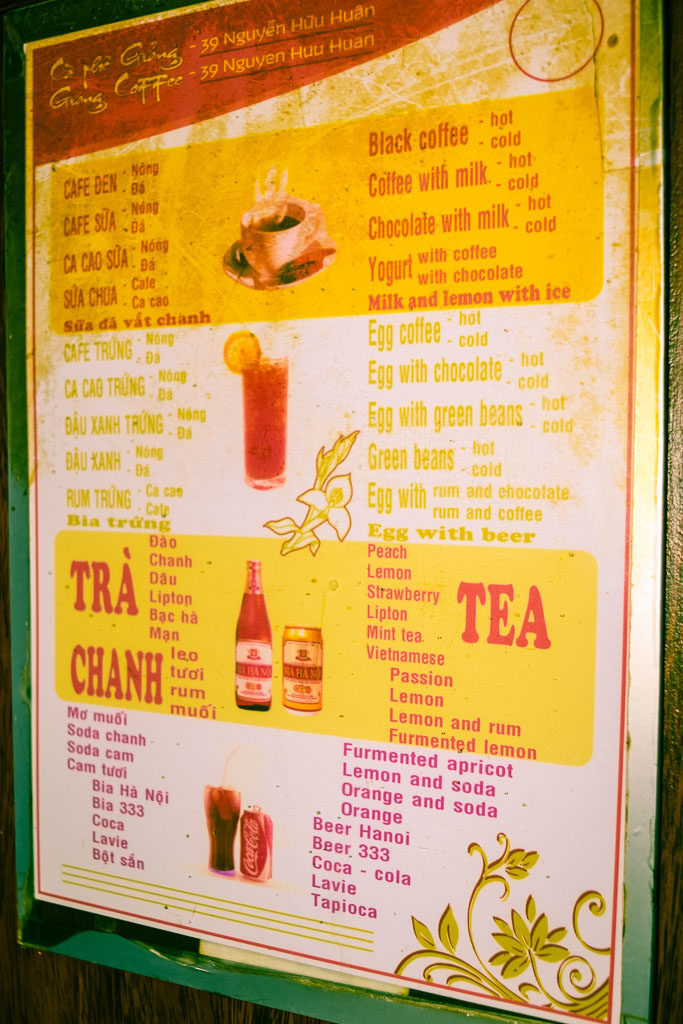
Giang Coffee Menu

We found the menu on the wall. No table menu, no prices, no food, hardly any variety, just an old poster on the wall showing tea, coffee, and EGG COFFEE. Rule number one in overseas travel, always agree on the price before agreeing to a service or a meal. So I asked the waiter (about 3 times) what’s the price.

The waiter appeared to be a little offended, and eventually replied “25,000 dong per coffee“. That sounded fair so we ordered. Actually, we later saw some coffee shops in tourist areas selling coffee for 60-80,000 dong, so 25,000 dong was very fair.

Best Coffee in Hanoi - Vietnamese Egg Coffee
The menu on the wall in Giang Cafe

The other interesting thing about this coffee shop was the little tables and chairs that everyone sits on. It is a true Vietnamese style that the chairs are only about 18 inches high and the table is about 2 foot high.

Very cute, it reminds me of those little kindergarten cubby houses back in Australia where everything is a miniature size for the little kiddies. But here was a room full of grown-ups, sitting on mini-tables drinking grown-up super-strong coffee.

Hanoi Old Quarter Giang Coffee Best Coffee in Hanoi - Vietnamese Egg Coffee
Enjoying Giang Coffee on little chairs

The Legendary Egg Yolk Coffee

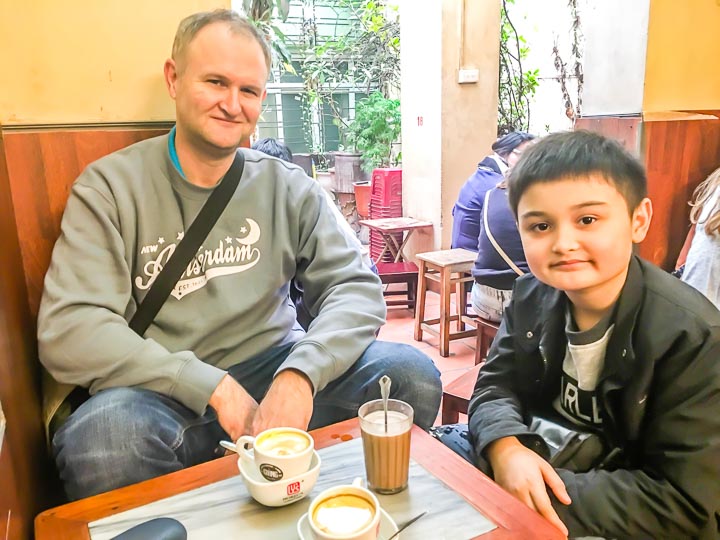
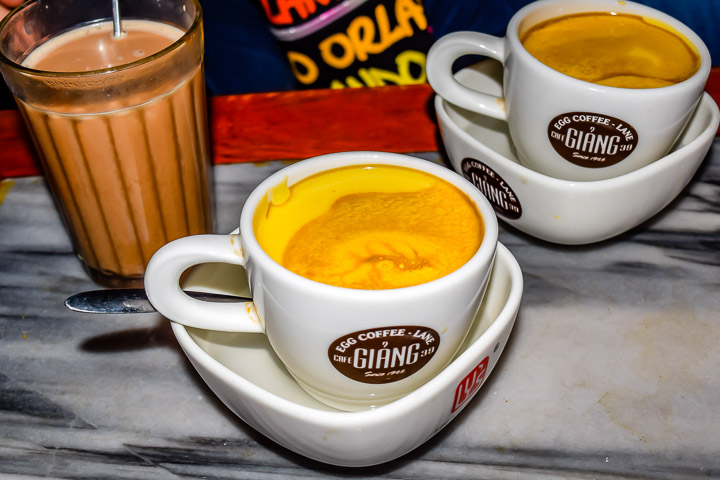
Out came the egg coffee. In fact, there were 2 of them, one for my wife and one for me. And a hot chocolate for my son. At first, we were challenged on how to start drinking. The top looked solid, and when you shake the cup it stayed firm. We decided to start spooning out the top, it was like a thick yogurt in texture but very eggy and tasty.

Then below an extremely strong Vietnamese coffee, thanks to the Robusta species of the Vietnamese coffee bean. POW. This is a delightful mix of sweet and strong coffee taste. Sweet yet bitter. Delicate yet pungent. Packs a punch, there’s no doubt about it. Would I have another? Absolutely YES!

Giang cafe Best Coffee in Hanoi - Vietnamese Egg Coffee
Egg Coffee at Giang Cafe

What is Egg Coffee Anyway?

From the Giang Cafe website: Giang Café was founded by Mr Nguyen Giang in 1946. Although the café has been relocated twice, its egg coffee recipe is almost the same as in its early days, with its chief ingredients being chicken egg yolk, Vietnamese coffee powder, sweetened condensed milk, butter and cheese.

The coffee is brewed in a small cup with a filter before the addition of a well-whisked mixture of the yolk and other ingredients. The cup is placed in a bowl of hot water to keep its temperature.
“My father developed the recipe in days when milk was scarce in Vietnam. He used egg yolks to replace milk” says Mr.Nguyen the owner.

Check out this video review of Egg Coffee Hanoi At Giang Cafe.

Normal Vietnamese Coffee

Next (make that next day, one cup per day is enough for me), we set off to find an authentic Vietnamese Coffee, minus the egg. After all, every Hanoi travel guide will tell you that this coffee is not to be missed.

A lovely rooftop restaurant, a delightfully mild day. Outcome the coffee in a bowl of warm boiling water to keep the cup warm. In the top, the coffee was brewing and dripping into the drinking cup below. A small jug of condensed milk accompanied this brew.

Best Coffee in Hanoi Vietnamese Coffee
Vietnamese Coffee

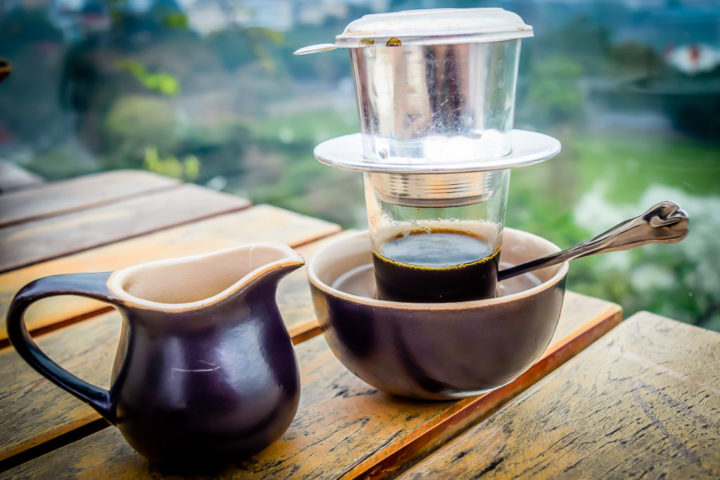
Mixed them together to form a fairly sweet mix and POW, what an awesome sweet strong and flavoursome brew. I do love Vietnamese coffee because it has a bitter bite but in a tastefully delicious way. Vietnamese coffee beans are undoubtedly my favourite kind.

Slightly stronger than the Vietnamese Egg yolk coffee, very much stronger than coffees I normally brew myself. Yes, I am always looking forward to my daily cup of Vietnamese coffee. 9 out of 10 from me.

Vietnamese Egg Coffee Recipe

Would you like to know how to make egg coffee? With the below Mokabees egg coffee recipe, Vietnamese egg coffee is not as difficult as you may have thought. Treat your coffee-loving friends to a homemade brew of the best coffee in Hanoi!

Tools of the Trade

Here are the vital ingredients for making your very own Vietnamese Egg Coffee.

Try a Hanoi Food Tour

If you’d like to take an inexpensive 3 Hour Hanoi Food Tour by Foot, click below for more details.

Whether you prefer a guided tour or a self-guided tour, exploring the hidden culinary treats of Hanoi’s Old Quarter is a must. Just make sure you include the best Vietnamese coffee, egg yolk coffee at Giang Coffee.

Would you like a free copy of our Ultimate Bucket List?

Not sure where to travel to next? We have created the Ultimate Bucket List to help you plan your next trip. 1170 awesome travel destinations in 167 countries. And we want you to have it for FREE.

Send Me the Ultimate Bucket List

Awesome Smartphone Clamp – The Piggy Back

2
Piggyback adjustable iphone clamp

Are you looking for the best flexible smartphone holder to replace your old tripod? One that you can attach to practically anything using an adjustable clamp? Check out this Piggy Back clamp on a Kickstarter campaign. It’s an impressive new GoPro and smartphone clamp – the Piggy Back.

What is the PiggyBack?

You know those adjustable clamps you have in your shed? Well, the PiggyBack is an ingenious device which utilises your adjustable clamp to hold your Smart Phone or GoPro nice and steady. It’s a bit like a tripod, only more flexible.

The PiggyBack is a support system for cameras, iPhones and GoPros built around a typical hardware store beam-clamp. A chap by the name of Erik Haugaard is looking for support on his Kickstarter campaign to get it up and running.

Here is the link to the kick starter campaign: https://www.kickstarter.com/projects/erikh/the-piggyback?ref=project_build

On this link, you can see demonstrations showing how flexible this phone clamp / GoPro clamp is. It does lots of things that other camera clamps cannot, and I can’t wait to get my hands on one.

smartphone clamp piggyback

Make a Pledge, Support the Piggy Back

The PiggyBack clamp is a fresh design, very innovative and versatile. I love flexible phone mounts and have quite a few of my own. And this mount is so versatile that it will adapt to whatever size claps you keep in your garage. Ideal for using your GoPro or iPhone as a vlogging camera. Because now you can clamp your video camera on to practically anything.

Best of all, the adjustable clamps from the hardware are probably my favourite tools. I’ve got quite a few of these universal clamps in my garage so that the PiggyBack will be perfect for me.

adjustable clamp and piggyback

Get Behind the Piggy Back

I recommend you get behind the Piggy Back. It looks like an excellent design for me (and you). Note that I don’t have any financial connection to this company; I love what they are doing with the idea. Here are some applications which the PiggyBack will be perfect for:

  • If you are looking for the best phone mount for your video or action camera.
  • You are looking for an iPhone clamp to make stop motion videos.
  • If you are looking top photograph products in a studio setting.
  • You are a Vlogger and want a GoPro or iPhone clamp to use in a wide range of positions.
  • You want another option to your smartphone tripod mount which you currently use for videos.

Maybe it’s not perfect for travel videos. Not sure if I want to carry an adjustable hardware clamp in my suitcase! But it’s great for practically everything else.

car phone holder piggyback

The Best Smartphone Clamp?

The “Boing” PiggyBack looks super versatile, and may well be your favourite smartphone clamp or GoPro clamp one day. All we need to do is get behind Erik and his company “Boing Designs” to get this excellent design into production. All we need to do is pledge the Kick Starter campaign. Let’s do it!

The Best GoPro External Microphone Solution

0
GoPro external mic

The GoPro Hero7 Black is a vast improvement over previous GoPro’s when it comes to audio. But it’s still not great. If you want to shoot video with seriously good GoPro sound, then you’re going to need an external microphone. Here’s the best GoPro external microphone solution for you.

Note: This post may contain affiliate links. Please read our disclosure policy for more information.

The Ultimate GoPro Vlogging Rig

Let me introduce you to the ultimate GoPro Vlogging Rig. For this you will need the following equipment:

  1. GoPro Action Camera
  2. The mounting frame (the case which comes with your GoPro
  3. GorillaPod (small)
  4. Rode VideoMicro external microphone
  5. Dead cat for your Rode VideoMicro external microphone
  6. GoPro Audio Adaptor
  7. Elastic Hair Tie

This rig is versatile and will enable you to do some pro vlogger YouTube-worthy clips. And your audio will be sensational, even in windy conditions!

GoPro External microphone
The Finished Rig

How to Build Your GoPro Pro Audio Rig

Building your Pro Audio rig is so simple it will take you about 5 minutes. And it will cost you not much more than 100 dollars, above the cost your camera that is. Here’s how to do it with a GoPro Hero5, Hero6 or Hero7.

  1. Put Your GoPro into the mounting frame (comes with the GoPro).
  2. Attach the mounting frame to the Gorilla Pod using the GoPro thumbscrew (comes with the GoPro)
  3. Attach the Dead Cat to the VideoMicro external microphone.
  4. Use the elastic hair tie to attach the VideoMicro to one of the Gorilla Pod legs.
  5. Remove the little door which hides the external microphone port. Put it somewhere safe where it won’t get lost.
  6. Plug the GoPro external mic adaptor into the GoPro.
  7. Plug the 3.5mm Rode microphone jack into the GoPro external mic adaptor.

GoPro External Microphone Adaptor

These adaptors are a little bulky and kind of expensive. I recommend you purchase a genuine adaptor from GoPro. I tried buying GoPro Hero7 adaptors from China for 1/10th of the price of a genuine adaptor, and they sent me the old GoPro Hero4 adaptors instead. These don’t fit the Hero5, Hero6 or Hero7 because they have a different size plug, and won’t fit the GoPro Audio-in port.

As you would expect from GoPro, the genuine GoPro microphone adaptors are seriously rugged. Just like the camera, you are paying for the best quality on the market. And when it comes to pro-quality sound, you should not be taking shortcuts.

Here’s a video to show you what the GoPro External Mic Adaptor looks (and sounds) like.

Why Use a Dead Cat

The dead cat is a windshield, which all the Pros use. It’s designed to minimise the noise when you’re shooting video in windy conditions. But it’s actually suitable for just walking around in a light wind.

Basically, you end up with studio-quality audio, even when you’re outside in the wind. Believe me, it will improve your GoPro audio immensely.

Is GoPro Waterproof?

The downside with this rig is that you lose the waterproof rating of your GoPro camera. As soon as you remove the little door that houses the microphone port, your GoPro becomes non-waterproof. That’s why you have to be super careful not to lose that small sealed door.

How Good is the Sound of the GoPro External Microphone

Let me say that Rode is the best on the market, without paying ridiculous prices. Not only do Rode have a vast range of options, but these are also what Pro Vloggers use all the time They are moderately priced yet Pro quality.

No joke, you will have sound just as good as the best YouTubers with this rig. These little fellas really are the best GoPro external mic on the market. And they’re super compact, just like your GoPro. Don’t just take my word for it, check out this review by RichardTech.

GoPro External Microphone Options

Another great thing about this rig is the versatility. It’s so easy to change that you can simply do so ‘out on the road’. Very handy is you’re using your GoPro for travel videos.

Walking Commentary

If you want to commentate your video while walking along, it’s simple. Just flip the flexible leg of the Gorilla Pod 180 degrees, and the Rode VideoMicro external microphone will be pointed directly at you. The result will be a fantastic studio-quality sound, with your voice as the main attraction.

Lapel Microphone

A great option with this rig is to use a Rode SmartLav+ as your GoPro microphone. This is a tiny lapel style microphone, the type that you clip onto your shirt collar. If you are planning to do all the talking during your video, this will give you the best GoPro Audio possible.

Once again, this is what Pro YouTubers use all the time, you will definitely have pro-quality audio. The downside? You will be attached to your action camera via a wire. And once again your GoPro will not be waterproof.

Easy GoPro Audio Improvements

Improving your GoPro sound quality does not need to be complicated. These methods are simple, reasonably inexpensive, and a lot of fun. And you will have a fantastic external GoPro microphone sound quality, every bit as good as Casey Neistat.

Parts For Your GoPro Audio Rig

Here are all the items described in the above GoPro external mic rig.

Would you like a free copy of our Ultimate Bucket List?

Not sure where to travel to next? We have created the Ultimate Bucket List to help you plan your next trip. 1170 awesome travel destinations in 167 countries. And we want you to have it for FREE.

Top 10 Santorini Tips

0
Santorini Tips Blue Domed Church
Scenic Santorini

Let me tell you a secret about Santorini. I didn’t even want to go. You see, I’m a big fan of tropical jungles and beaches. When I saw the treeless terrain of Santorini in the photos, I imagined it to be rather dull and not very scenic.

I was utterly blown away after one day in Santorini. It was the exact opposite of what I expected and made it straight to the top of my ‘most scenic places’ list. The views along the Caldera are simply stunning. We had a good look around and found lots of cool stuff to do. Here are our top 10 Santorini Tips.

Santorini Tips Blue Domed Church
Scenic Santorini

Note: This post may contain affiliate links. Please read our disclosure policy for more information.

Fly from Athens to Santorini

If you’re wondering how to get to Santorini, we say flying is the best option. Athens Airport is excellent; it’s modern and efficient. And the flight is super fast, taking not much more than an hour.

You do need to shop around and book in advance as they can get a little expensive, but at least you don’t have to spend a full day on a ferry. Meaning you can maximise your time on Santorini.

Santorini Tips flight
Flying into Santorini

Be Prepared for Stairs

In my opinion, one of the best activities in Santorini is merely exploring the labyrinth of tiny laneways. These are plentiful in both Fira and Oia. You will find many fantastic viewing points and see many incredible sights along the way. But be warned. The tracks are steep, and the stairs are many.

Depending on your fitness, it might be a good idea to be in good shape before visiting Santorini. May I suggest a few trips to the gym to work out on the cross trainer and stair climber?

Santorini Tips stairs
The most common sight in Santorini – Stairs!

Airport Speed

When we returned to the airport to fly from Santorini to Athens, we were considering allowing 2.5 hours, like usual. As it was, we had to leave a couple of hours earlier due to check out time. Good thing because it took us almost 4 hours to get through the Santorini airport.

First, there was a line up outside the airport for an hour. Then the long claustrophobic 1.5-hour line to get inside the terminal. Then another 20-minute line at the ticket counter. Take my advice, leave early!

Santorini Tips airport
Outside the small Santorini Airport

Buses are Cheap

Not only are buses affordable, but they are also excellent. Buses generally cost around 2 Euros per trip. They stop near most of the major attractions on the island, all leaving from the central bus station in Fira. That’s a great reason to stay in Fira if you’re planning on using public transport.

If you are on a tight budget, you can skip the expensive Santorini day tours. These can easily top 250 Euros for a day. Instead, you can take 2 Euro buses all over the island, and save yourself a small fortune.

fira to oia bus
Getting off the bus at Oia bus station

Food is Expensive

Let me clarify this statement. Restaurants along the Caldera rim are costly. And with good reason. The views are breathtaking. Don’t get me wrong, and you won’t regret stopping off at one of these pricey restaurants. But unless you have money to burn, you should probably figure out some other option during your stay.

Santorini Tips lunch
Nice but pricey lunch

Find a Supermarket Early

Supermarkets are a great option for making your stay on Santorini way less expensive. Supermarkets are our travel hack, no matter where we go. The first or second day, locate the closest supermarket using Google Maps.

Put on an empty backpack and buy enough food for a few tasty home-cooked meals. Oh, and a large bottle of drinking water.

Santorini Tips dining
An economical way to dine out

Supermarkets Sell Alcohol

The supermarkets tend to have expansive and well-stocked alcohol departments. Perfect for buying a bottle of local wine to accompany you through a stunning Santorini sunset.

Cruise Boats are Plentiful

We visited in peak season, and the cheaper cruise boats were still very easy to purchase tickets. There are many, many of these operating out of both Fira and Oia.

Sunset cruises are a different story. These attract a higher price tag and are the most popular of all Santorini cruises. You probably should book those a couple of days in advance to avoid disappointment — especially the semi-private catamaran cruises.

Santorini Tips boats
Cruise boats of every size

Stay on the Caldera Side

The caldera side is the western side of this crescent-shaped island. It’s no surprise that the best sunsets are on this side of the island. It’s also the side of the Caldera. The buildings on this site are a couple of hundred metres above sea level on top of the caldera cliff. So the views are stunning. But you will pay more here.

Santorini Tips
Breakfast on the Caldera side

Catch a Caldera Sunset

The old castle in Oia is the most popular place in town to catch a sunset. The viewing platform here is one of the busiest of all Santorini tourist attractions. Little wonder, because you can find almost 270-degree panoramic views from here if you choose the best viewing platform. But this spot gets crazy busy each sunset. Caldera sunsets are at the top of the list of all Santorini must-see attractions.

Santorini Tips Castle
One of the views at the Castle

Our sunsets were all viewed at Fira, where it is far less busy. The evenings are equally stunning, but you will not have the massive crowds.

Santorini Tips sunset
Gorgeous sunsets over the Caldera in Fira

Catch a Sunset Cruise

You should not miss a Santorini day cruise. But if you want the most romantic, most unforgettable sunset, then you had better book a sunset cruise. Meandering through the caldera islands, I couldn’t think of a better way to part with your holiday money. They are aren’t necessarily cheap but should be well within reach of most Santorini visitors.

Best sunsets in Santorini
Cruising into the Santorini Sunset

So Much To Do in Santorini

We say forget about trying to see Santorini in a day. You will need at least 3 days to appreciate this magnificent island fully. You will never get around all the best places to visit in Santorini in a day. Take your time, savour the ambience, and enjoy Santorini!

Santorini Tips
Santorini Happiness

Would you like a free copy of our Ultimate Bucket List?

Not sure where to travel to next? We have created the Ultimate Bucket List to help you plan your next trip. 1170 awesome travel destinations in 167 countries. And we want you to have it for FREE.

San Simeon Elephant Seals

0
San Simeon Elephant Seals

Southern California wildlife was the highlight of our amazing California  Road Trip. We never in our wildest dreams expected to see such an abundance of wonderful wildlife in Southern California! And one of our wildlife highlights was seeing the San Simeon Seals. Right after our visit to Hearst Castle we stopped off at the San Simeon Elephant Seal rookery to find much more than we ever imagined!

Note: This post may contain affiliate links. Please read our disclosure policy for more information.

San Simeon big Elephant Seal
Here are the fellows we’re looking for

San Simeon the Town

To get from Hearst Castle to the Elephant Seal Rookery you first travel through the tiny coastal town of San Simeon. San Simeon is on the famous Highway 1, exactly half-way between San Francisco and Los Angeles.

San Simeon is known for being a pristine beach hotspot, so we made sure we took a detour to check out the local pier and beach area.

San Simeon jetty
Pulling into the San Simeon beach car park

This is a spectacularly beautiful beach which looks quite sheltered and safe to swim in, evident by the dozens of happy swimmers. Although sheltered, there was a very strong afternoon sea-breeze during our visit.

After a stroll out along the pier, we started heading North along Highway 1 to look for the famous San Simeon Elephant Seals.

San Simeon main swimming beach
The main beach at San Simeon

6 Miles of San Simeon Seals

The main Elephant Seal Rookery located 4 miles North of San Simeon on Highway 1. We discovered quite by chance that the Piedras Blancas elephant seal rookery is actually spread out over about a 6 mile stretch of coastline.

As a part of our sight-seeing road trip we had a habit stopping at almost road side stop and vista points. You just never know when you’re going to see something unexpected and amazing on Highway 1.

We stopped at one roadside stop just a couple of miles North of San Simeon to find a tiny car park atop the cliffs. From the car park scrambled for about 50 yards North along the top of the cliff and couldn’t believe our eyes. We found the colony of Northern Elephant Seals!

San Simeon little Elephant Seal rookery
What an unexpected surprise!

This part of the colony was not on the tourist map because we were the only tourists there. No signs, no other indication that seals were down below. They were the first Elephant Seals we had ever seen in the wild, and we could not believe our eyes.

Piedras Blancas Elephant Seal Rookery

Back in the car, just a little further North along Highway 1 we saw the Elephant Seal Rookery signs. We turned into the main carpark and were met with dozens of cars, and hordes of tourists. After all, the Piedras Blancas Elephant Seal colony is famous, and is a must-see attraction that no passing tourist can resist.

San Simeon beautiful beaches full of seals
The main seal colony

About 17,000 Northern Elephant seals are reported inhabit this secluded cove. The walk from the car-park to the Elephant Seal colony is short, flat, and very accessible. The seals on the beach are within 20 yards from the trail so you get a really close look at these creatures.

And entertaining they are, a non-stop spectacle of fighting, playing, chasing and generally annoying the heck out of each other. And you get to hear the unforgettable Elephant Seal symphony of gargles, grunts, snorts, belches, bleats, whimpers, squeaks, squeals, and trumpeting!

thousands of Elephant Seals at San Simeon
Clarc on the boardwalk

Not only do you get to see the seals up close, there are also many information boards on display. Here you can learn lots of interesting facts about elephant seals and their annual breeding cycle.

This colony is many times bigger than the previous one we saw, however we were glad to have stopped at both because the first one felt more private; more like a discovery than a major tourist attraction.

San Simeon Elephant Seal Rookery sign
We got to learn lots of facts about elephant seals

There’s actually not much else to do at the seal colony but … er… watch Elephant Seals! We did spot a few cute little rabbits here and there, but basically when you’ve had enough of watching the Elephant Seal antics it’s time to continue driving.

San Simeon Rabbit at the Elephant Seal Rookery
Friends of the Elephant Seals!

Map of Elephant Seal Rookeries

Here is a map of the San Simeon elephant seal rookery locations.

  1. Spot number 1 is the ‘secret spot’, which has a small and basic car park.
  2. Spot number 2 is the official Elephant Seal Vista Point, complete with huge car park and dozens of eager tourists.

Friends of the Elephant Seal

Here’s something guaranteed to blow your mind! It’s the live webcam of the Piedras Blancas elephant seals, provided by the wonderful Friends of the Elephant Seal website. Check it out on the below link.

https://www.elephantseal.org/view.htm

Piedras Lancas Light Station

About 1.5 miles North of the Elephant Seal colony we drove past Piedras Lancas Light Station, built in 1875. It’s the only Light Station we saw in California, and it’s a very distinct landmark, well worthy of a few happy snaps.

As we kept driving North we passed several more pristine beaches, beckoning us to come down for a beachwalk. However, we were looking forward to seeing the famous BIG SUR!

Highway 1 near San Simeon
Back on the road again, heading North past San Simeon

Big Sur

Before we got to Big Sur we found the road was blocked at Ragged Point. There was a bridge out and some landslides making the road impassable. We were advised to take the inland route, which would take us about 4 hours to get to our next stop in Monterey. Big Sur would have to wait.

We were so happy to find these magnificent animals. They are particularly special because they were almost hunted to extinction, and only recently made a big come-back in numbers. They are truly wild animals, who can be seen in their natural habitat near San Simeon. This is another must-see destination on your California Road Trip!

They can be seen all year round so don’t worry too much about ‘the best time to see’ these San Simeon Elephant Seals. Don’t worry, the California Seal population is alive and well.

San Simeon Beach

Sign at San Simeon Pier

The Best Santorini 3 Day Itinerary

0
P109 3 day santorini itinerary

Are you planning a trip to Santorini in Greece for a few days, and want to make the most of your visit? This majestic Greek Island has some genuinely must-see attractions, and you don’t want to miss any of them. Let us show you the best 3-day itinerary in Santorini.

Note: This post may contain affiliate links. Please read our disclosure policy for more information.

How Expensive is Santorini?

I come from Australia, which is one of the most expensive countries on the planet. And many of the prices on Santorini made me blush because Santorini prices were considerably more than what we pay in Australia. The cost of a simple restaurant lunch can be ridiculously expensive. You can quickly drop 60 Euros for 3 people for a simple lunch.

Accommodation can be wildly expensive. We went for the best accommodation we could find at hugely discounted rates, and it cost us 1,579 Euros for 3 nights. You can, of course, find cheaper accommodation in a less exclusive location. In my opinion, Fira is the best place to stay in Santorini, as it’s generally less expensive than Oia.

3 day santorini itinerary
No complaints about our accommodation

Day tours around Santorini are expensive too, typically costing about 250-300 Euros for a half-day hour private tour. Thank goodness for the public bus system.

3 Day Santorini Itinerary

So this 3-day itinerary will give you 2 options – High End for those with a big budget, and Low End for those with a more modest budget.

Day 1 in Santorini

You should try to arrive on the Island as early as you can. It’s a relatively small island, so getting from the airport to your hotel should only take around half to one hour. Especially if you pre-arrange your airport transfer. I strongly recommend doing this.

Arriving nice and early will leave you plenty of time for some exploring on your first day. Depending on where you stay, the first day should be used to ‘get lost’. Go for a wander around your town, whether it be Fira or Oia.

These towns are a labyrinth of gorgeous hillside alleyways and lanes. Exploring these is one of the best things you can do in Santorini. Find the best place to catch the sunset.

P109 3 day santorini itinerary 100
Exploring Fira is well worth the effort

Low End

While you are exploring, find a supermarket and stock up on a picnic pack. Google Maps will certainly point you in the right direction. Perhaps a bottle of wine and some crackers will hit the spot. Then proceed to your chosen place to watch the sunset and enjoy.

High End

There are literally hundreds of excellent restaurants scattered along the Caldera cliff face in both Fira and Oia. Find yourself a perfect restaurant, and make sure you are there an hour before sunset. If you can, book ahead during the afternoon to secure a lovely table along the front with premium views. Then enjoy one of the prettiest sunsets you’re ever likely to see.

3 day santorini itinerary
A typical caldera dining spot

Day 2 in Santorini

This is the day to get adventurous. Have a look around the Island and see some of the best sights.

Low End

Familiarise yourself with the Santorini public bus system. The fares are typically around 2 Euros per person per route. If you are staying in Fira, you’re in luck, because this is the central bus station and the public transport hub of the Island. You can get a bus to all the best Santorini attractions from here.

Your main choices are:

  • Oia – the location of the famous blue-domed churches. And one of the best sunset viewing places on the Island.
  • Akrotiri – An ancient settlement buried 500 years ago by a volcanic eruption. It’s also near the famous red beach.
  • Perissa / Perivolos – A beachside settlement near the famous black beach.
  • Kamari – Home of a seaside village loaded with dining options and the famous Kamari beach.
  • Pyrgos – The former capital of Santorini. Now a preserved medieval settlement.
fira to oia bus
Getting off the bus at Oia bus station

Hitting the best beaches in Santorini by bus is definitely one of the coolest things you could do during your stay. Or you might like to get a bit more historic and visit one of the old settlements. It’s all possible on the cheap with the public transport system on Santorini.

High End

You can avoid the public buses by taking a private tour, which will take you to any of the above attractions and more. Santorini tours usually visit the volcano and the local wineries, and basically, anywhere else you would like to go on this beautiful Island.

Book ahead on one of the sites like Get Your Guide. Or you could go to one of the local travel agencies, they are easy to find in Fira and Oia. Or just book your Santorini tours through the front desk of your accommodation.

Day 3

Time to go sailing! It’s easy to book a fantastic Santorini Cruise. Fira and Oia have loads of tour agencies in the main town centres, or you can just book through your accommodation font desk. This is one of the most popular of all the Santorini activities, so you will have no problem finding plenty of available Santorini boat trips.

Low End

Yes, there are some relatively cheap boat cruises available. These are large boats shared by lots of like-minded people. They will generally take you to one or two of the local beaches, and possible the hot springs out on one of the islands. Bring your bathers and be prepared for a fun day.

High End

Book a more exclusive sunset wine and dinner cruise on one of the luxury catamaran yachts. These are very popular, it would be wise to book ahead to avoid disappointment. They generally stop at more attractions than the low-end boats, and sunset cruises are of course the best ones to go for.

Treasured memories in Santorini

3 Days in Santorini

3 days in Santorini is a perfect amount of time, but it goes by so fast. There is actually quite a lot to do and see. And it is so beautiful that doing absolutely nothing is also a great option. We do hope you enjoy your time on Santorini, and like most visitors, you will be dreaming of the day you can return to this majestic Island.

Would you like a free copy of our Ultimate Bucket List?

Not sure where to travel to next? We have created the Ultimate Bucket List to help you plan your next trip. 1170 awesome travel destinations in 167 countries. And we want you to have it for FREE.

Send Me the Ultimate Bucket List

The Best Accommodation in Fira Santorini

0
Best accommodation in Fira Santorini

On our family holiday to the majestic Greek Island of Santorini, we really had a difficult time figuring out where to stay in Santorini. Prices can easily top $2,000 per night on this majestic Greek Island, and we didn’t want to break the budget.

What we discovered blew our minds but not our budget. We truly believe we found the best accommodation in Fira Santorini. Come with us, and we’ll tell you all about it.

Note: This post may contain affiliate links. Please read our disclosure policy for more information.

best sunset in Santorini
Sunset from Asma Suites Fira

Should You Stay In Fira or Oia

The hardest decision for us was whether to stay in Fira or Oia, the two most significant towns in Santorini. Oia is the largest of the two, and it can become quite busy at times. Oia is small and suffers from enormous volumes of daily cruise boat visitors.

But Oia is where those famous blue domes and windmills are located. Indeed, Oia seems to be featured in all those beautiful postcards with that classic Santorini view.

should I stay in oia or Fira Santorini
The famous blue domes of Oia

Where Are The Best Sunsets in Santorini?

Another critical thing we researched was the best sunsets in Santorini. We’ve seen so many beautiful Santorini sunset photos, and we didn’t want to miss out.

As it turns out, the sunsets in Oia and Fira are equally as stunning, both overlooking the Caldera. So don’t worry, you’re going to catch amazing sunsets in either Fira or Oia.

Best sunsets in Santorini
The sunset from our accommodation in Fira

Cost of Fira vs Oia Accommodation

Overall the cost of caldera rim accommodation seems to be more in Oia than in Fira. Perhaps because Oia is substantially smaller and more exclusive.

Maybe Oia is more expensive because the famous postcards are all taken in Oia. Whatever the reason, we decided that the best accommodation is in Fira, because you can get pretty much the same standard Caldera facing accommodation for substantially cheaper.

Things to do in Fira Santorini
This is Fira, 1 minute walk from our accommodation

Using Fira as a Hub

Another main advantage of choosing Fira for accommodation is the fact that it is basically in the centre of the island. That is, it’s in the centre of the volcano, which is where you would want to be for the best scenery. Being the central hub means that all the attractions are within easy reach of Fira. Especially when it comes to the public transport system.

The Fira bus station is the central bus station on Santorini, and all bus routes radiate out from Fira, like the spokes of a wheel. That includes Oia, which is basically at the end of the (bus) line on the northern point of the island.

Cheap Accommodation in Santorini

We looked at some reasonably affordable Santorini accommodation, back from the edge of the Caldera. I would say this is suitable if you have an international drivers license and organise a hire car or quad bike in advance. Apart from that, it is rather difficult and expensive to move around Santorini, so this accommodation may not be so practical.

The other people whom this would suit are those on a tight budget. A piece of advice, though. You should familiarise yourself with the Santorini bus system and make sure that your accommodation is located within 10 minutes walk from a bus stop. It’s hot, hilly and crowded. Walking is not entirely a comfortable experience in Santorini.

The Best Accommodation in Fira, Santorini

We chose Asma Suites. We decided that this accommodation was as reasonable as any of the competition. In fact, it was far better than most. It has all the same features as a lot of accommodation which cost double the price of Asma Suites.

best Santorini caldera view hotel
The view from our private balcony

How Expensive is Santorini Accommodation?

This was the most expensive accommodation we’ve ever booked, but we still feel that we got a bargain. This accommodation was mindblowing, it was luxury to high-level honeymoon quality.

We stayed for 3 nights, and the total cost was 1,579 Euros or 2,581 AUD. This was a 37 square metre, 3-bed suite, aptly named the Sun Suite. The price included airport pickup and breakfasts. We just booked it straight from the Booking.com website.

best fira acccomodation Asma Suites
A private path to Asma Suites

10 Things we Love About Asma Suites

Sensational Caldera Views

When it comes to Fira hotels with caldera view, this place is as good as it gets. Our Sun Suite was right on the edge of the Caldera, with a classic Santorini view. There was just one more suite between us and the ocean, but it was at a lower elevation and did not spoil our view.

We had uninterrupted views of the Caldera, the islands and the sunset. We spent many hours just watching the sea, watching all the boats and admiring the stunning sunset.

Best caldera views Santorini
Asma Suites is right on the edge

The Private Jacuzzi

Each suite at the Asma Suites has a private Jacuzzi. These are outside on the balcony with stunning views of the Caldera. And the Jacuzzi was very private. Over 3 days and several jacuzzis, we were never interrupted by any other visitors. And that’s why this is one of the best hotels in Fira.

Santorini jacuzzi
Our favourite Jacuzzi EVER

Top Class Breakfasts

A quality breakfast in this quality location is priceless. Ours were all hand prepared each morning, served on our private balcony at a time chosen by us. It was superb, delicious and very memorable.

accommodation in Fira Santorini breakfasts
One of our lovely breakfasts

Friendly Staff

The Asma Suites is a family-owned business. I’m not sure if the staff who attended during our stay were family or not. But they sure showed a level of care and attention to make us think they were the owners. Their presentation and manners were impeccable. They offered some of the most impressive services that I’ve ever experienced.

Amazing Location

The location is right in the heart of town, this Fira accommodation is simply stunning. It’s probably 3-4 minutes walk down the hill from the main cathedral in town, and what I would call the main town square.

Less than 1-minute walk from the Asma Suites is one of the best vantage points in Fira for a postcard photograph and stunning sunset view.

Best views in Santorini
The main town square of Fira

Genuine Santorini Cave Hotel

The interior of the room was the classic cave style. Yes, this is an authentic Santorini cave hotel that you see on all the hotel websites. In fact, it was converted from cave type housing not so long ago.

I’ve never stayed in one of these before, and while it was a little bit of a novelty, it made for a beautiful experience. Have you ever stayed in a cave before? Now I can say that we have.

Cave hotel in Fira Santorini
Welcome to our cave

Supermarket Nearby

It’s only about 10 minutes walk to the supermarket. Perfect for grabbing some wine and cheese to enjoy those stunning caldera sunsets. Along the way there’s a lot of cafes, restaurants and souvenir shops, which are well worth a look.

Getting Lost in Fira

When it comes to things to do in Fira, getting lost is one of the most popular activities. There is a maze of tiny streets and laneways you can traverse for free. And they all have spectacular Santorini views of the Caldera.

And right out the front is a perfect laneway to start getting lost. There are loads of tourists doing exactly the same thing, just exploring the labyrinth of laneways.

things to do in Fira Santorini
Getting lost just near Asma Suites

Extremely Private

Like most high caldera accommodation in Fira, the Asma Suites has a locked front gate. Each guest was issued a key. Once through the gate, you make your way down a little winding pathway to the accommodation. This is superb for privacy, as you literally never see anybody else, except fellow guests. And seeing them is quite rare as well.

private hotel in Fira
The locked gate ensures complete privacy

Perfect Cleanliness

Maybe it was the white walls and grey concrete floors. Perhaps it was the classiness of this place. But it was spotlessly clean. Not a speck of dust, dirt or grime.

Asma Suites Santorini
Asma Suites was spotless

Heading to Santorini

If you are planning to visit Santorini for a once in a lifetime, I do suggest you splash out and stay in the best accommodation in Fira Santorini, the Asma Suites. You will feel like a movie star, a millionaire, and a newlywed. You will be glad you splashed out, this place gets 10 out of 10 from us.

Would you like a free copy of our Ultimate Bucket List?

Not sure where to travel to next? We have created the Ultimate Bucket List to help you plan your next trip. 1170 awesome travel destinations in 167 countries. And we want you to have it for FREE.

best accommodation in Santorini
More views of our room

How to Turn Off GoPro Cameras

0
How to turn off gopro

Can you guess how many different ways there are to turn off a GoPro? On a Hero7 Black, there are five different ways to turn it off. Read on to learn how to turn off GoPro cameras, depending on which model you have.

Note: This post may contain affiliate links. Please read our disclosure policy for more information.

Use The Auto Power Off Feature

The easiest way to turn off your GoPro is to use the Auto Power Off feature. The Auto Power Off setting determines how long your GoPro must be in idle before it turns off automatically. This an excellent feature for preserving your battery life.

To modify your auto shutdown time on a GoPro Hero7 use this sequence:

  1. Access the GoPro dashboard by swiping down from the top of the rear screen.
  2. Tap > Preferences >General > Auto Power Off
  3. Select your preferred option – 5 minutes, 15 minutes, 30 minutes or never.

I recommend you set it to 15 minutes because 5 minutes can become annoying. It pays to have spare batteries when using 15 minutes.

How to Turn off GoPro Hero7 Black

Using the Mode Button

To turn the GoPro camera off, press the mode button on the side. Ok, so there are a few GoPro button, but which one is the Mode Button? 

The mode button is on the right hand side, if the rear screen is facing you. 

Relevant To GoPro Models:

  • GoPro Hero7 Black
  • Hero7 Grey
  • Hero7 White
  • GoPro Hero6 Black
  • Hero5 Black
  • Hero 2018

Using the Shutter Button

GoPro Cameras have a feature called QuikCapture. This is the fastest and easiest way to turn on and off your GoPro, and the best way to preserve your battery. That’s a bonus if your out shooting travel videos.

When your camera is turned off, press the shutter button for about 3 seconds, and the camera will turn on and start recording. It will record in whatever mode the camera was in last time you turned it off (video, photo or time lapse). Then to turn it off, press the shutter button again.

QuikCapture is on by default, or you can turn it off if you want from the dashboard. I can’t think of any reasons why you would want to turn it off, so I recommend you just leave QuickCapture on.

Because QuikCapture turns the camera off as soon as you stop recording, it’s an excellent way to preserve your battery life as long as possible.

How to Turn Off GoPro Using Voice Command

Your GoPro can even turn on if you tell it. Just say ‘GoPro Turn On”, and it will turn on. To turn off the GoPro simply say “GoPro Turn Off”. No need to memorize the GoPro buttons with this feature! That is 100% hands-free.

The catch is, you must have previously activated the “Wake on Voice” feature. This only works on GoPro Hero7 Black and GoPro Hero6 Black.

Activating Wake on Voice Feature

After you have turned your GoPro on, follow this sequence.

  1. Access the GoPro dashboard by swiping down from the top of the rear screen.
  2. Tap the icon of a man’s head to turn on Voice Control.
  3. Once the Voice Control menu appears, tap Preferences >Voice Control >Wake on Voice.

A couple of things to note. 

  1. Wake on Voice only works for 8 hours after your GoPro is turned off.
  2. Voice Control is affected by your distance from the camera. Best to be nice and close.
  3. Voice Control is affected by external noises like wind or waves. You might have to get a bit closer and louder if there is background noise.

Which GoPro Models Have Wake on Voice Feature?

Wake on Voice is not on every GoPro. Here are the models which have this feature.

  • GoPro Hero7 Black
  • GoPro Hero6 Black

Any other GoPro and you will need to use the old fashioned method of turning on the camera.

How to Turn Off Using Remo

Remo is a voice-activated remote control for GoPro, which you can strap to yourself for easy usage. The great things about Remo are that it enhances your voice control in a noisy environment, like wind or waves. You can also use it to turn on or off your GoPro Camera.

Which GoPro Models Use Remo to Turn On/Off

Here are the models which can turn on/off using the Remo device.

  • HERO7 Black
  • HERO6 Black
  • Fusion
  • HERO5 Black
  • HERO5 Session

How to Turn Off GoPro Session

GoPro Sessions are those tiny cubes with no touch screen. They are not very intuitive, and you will need some GoPro Session instructions to figure out these cute little cameras.

To turn on GoPro Session simply press the shutter button to begin capturing either video or photos. After you finish, press the shutter button again and the GoPro Session will power off.

Relevant to GoPro Models:

  • GoPro Hero Session
  • Hero5 Session
  • Hero4 Session

How to Turn Off GoPro Hero4

Press the Power/Mode button once. This GoPro button is located on the front, just below the lens.

Relevant to GoPro Models:

  • GoPro Hero4 Black
  • Hero4 Silver
  • HeroPlus
  • HeroPlus LCD
  • Hero3+ Black
  • Hero3 Black
  • Hero3+ Silver
  • Hero3 Silver
  • Hero3 White
  • Hero 2014.

How To Be Versatile

GoPro cameras have mastered the art of versatility. Imagine having 5 different ways to turn off your camera! My favorite way is using the Auto Shutdown method. What’s your favorite way to turn off your GoPro?

Would you like a free copy of our Ultimate Bucket List?

Not sure where to travel to next? We have created the Ultimate Bucket List to help you plan your next trip. 1170 awesome travel destinations in 167 countries. And we want you to have it for FREE.


How To Turn On GoPro Cameras

0
How to turn on gopro

Can you guess how many different ways there are to turn on a GoPro? The answer is… it depends on what model you have. On a Hero7 Black, there are four ways to turn it on. Read on to learn how to turn on GoPro cameras, depending on which model you have.

Note: This post may contain affiliate links. Please read our disclosure policy for more information.

Before Turning Your GoPro On

Let’s start with a couple of GoPro tips for beginners. These are some standard things you need to check before turning your GoPro on, and they apply to all GoPro models. 

  1. Make sure the battery is fully charged.
  2. Make sure there’s a micro SD card installed, preferably with at least 8GB of empty space on it.

How to Turn on GoPro Hero7 Black

Using the Mode Button

Ok so now we’re good to go. We’ve got a fully charged battery and an SDmicro memory card installed. Now to turn the GoPro on, press the mode button on the side. Ok, so there are a few GoPro buttons… which one is the Mode Button? 

The mode button is on the right hand side, if the rear screen is facing you. 

You Know Your GoPro is On When…

The rear touch screen should illuminate once you turn on the GoPro. The status screen on the front should also start showing some information.

Relevant To GoPro Models:

  • GoPro Hero7 Black
  • Hero7 Grey
  • Hero7 White
  • GoPro Hero6 Black
  • Hero5 Black
  • Hero 2018

Using the Shutter Button

GoPro Cameras have a feature called QuikCapture. This is the fastest and easiest way to turn on your GoPro, and the best way to preserve your battery. That’s a bonus if your out shooting travel videos.

When you camera is turned off, simply press the shutter button for about 3 seconds and the camera will turn on and start recording. It will record in whatever mode the camera was in last time you turned it off (video, photo or time lapse). 

QuikCapture is on by default, or you can turn it off if you want from the dashboard. I can’t think of any reasons why you would want to turn it off, so I recommend you just leave QuickCapture on.

Because QuikCapture turns the camera off as soon as you stop recording, it’s an excellent way to preserve your battery life as long as possible.

How to Turn On GoPro Using Voice Command

Your GoPro can even turn on if you tell it. Just say ‘GoPro Turn On”, and it will turn on. True Story. No need to memorize the GoPro buttons with this feature! That is 100% hands-free.

The catch is, you must have previously activated the “Wake on Voice” feature. This only works on GoPro Hero7 Black and GoPro Hero6 Black.

Activating Wake on Voice Feature

After you have turned your GoPro on, follow this sequence.

  1. Access the GoPro dashboard by swiping down from the top of the rear screen.
  2. Tap the icon of a man’s head to turn on Voice Control.
  3. Once the Voice Control menu appears, tap Preferences >Voice Control >Wake on Voice.

A couple of things to note. 

  1. Wake on Voice only works for 8 hours after your GoPro is turned off.
  2. Voice Control is affected by your distance from the camera. Best to be nice and close.
  3. Voice Control is affected by external noises like wind or waves. You might have to get a bit closer and louder if there is background noise.
  4. You can turn GoPro off just as easily by saying “GoPro Turn Off”.

Which GoPro Models Have Wake on Voice Feature?

Wake on Voice is not on every GoPro. Here are the models which have this feature.

  • GoPro Hero7 Black
  • GoPro Hero6 Black

Any other GoPro and you will need to use the old fashioned method of turning on the camera.

How to Turn On Using Remo

Remo is a voice-activated remote control for GoPro, which you can strap to yourself for easy usage. The great things about Remo are that it enhances your voice control in a noisy environment, like wind or waves. You can also use it to turn on your GoPro Camera.

Which GoPro Models Use Remo to Turn On

Here are the models which can turn on using the Remo device.

  • HERO7 Black
  • HERO6 Black
  • Fusion
  • HERO5 Black
  • HERO5 Session

How to Turn On GoPro Session

GoPro Sessions are those tiny cubes with no touch screen. They are not very intuitive, and you will need some GoPro Session instructions to figure out these cute little cameras.

To turn on GoPro Session simply press the shutter button to begin capturing either video or photos. After you finish, press the shutter button again and the GoPro Session will power off.

You Know Your GoPro Session is On When…

Camera beeps several times, and camera status light blinks whilst the camera is recording.

Relevant to GoPro Models:

  • GoPro Hero Session
  • Hero5 Session
  • Hero4 Session

How to Turn On GoPro Hero4

Press the Power/Mode button once. This GoPro button is located on the front, just below the lens.

You Know Your GoPro is Hero4 On When…

The camera status lights will then flash 3 times, and 3 beeps will sound. The camera status screen will start displaying information.

Relevant to GoPro Models:

  • GoPro Hero4 Black
  • Hero4 Silver
  • HeroPlus
  • HeroPlus LCD
  • Hero3+ Black
  • Hero3 Black
  • Hero3+ Silver
  • Hero3 Silver
  • Hero3 White
  • Hero 2014.

How To Be Versatile

GoPro cameras have mastered the art of versatility. Imagine having 3 different ways to turn on your camera! My favorite way is using the QuikCapture method. What’s your favorite way to turn on your GoPro?

Would you like a free copy of our Ultimate Bucket List?

Not sure where to travel to next? We have created the Ultimate Bucket List to help you plan your next trip. 1170 awesome travel destinations in 167 countries. And we want you to have it for FREE.


21 Essential Tips for GoPro for Beginners

0
GoPro for Beginners

GoPro cameras are such an awesome little bundle of technology. They are amazingly simple to use, just point and shoot. Yet they are such a complex camera, with so much technology and processing going on behind the scenes. You can easily take your GoPro videos to the next level by learning a few simple GoPro tips. Here’s a quick summary of 21 important tips for GoPro for beginners.

Note: This post may contain affiliate links. Please read our disclosure policy for more information.

GoPro Accessories

1. Spare Battery

In case you’re wondering how long a GoPro battery lasts, the answer is… not very long. I normally capture in 1080P resolution at 30 frames per second and find that I can record about 5 GB of video per battery. That’s about 15 minutes of video, made up of lots of shorter clips.

You need to carry a spare battery. This is the most important of all GoPro tips for beginners.

So how may spare batteries should you carry? Personally, I carry 4 spare batteries, which can usually get me through 2 solid days of GoPro travel video recording. For the average GoPro user, I would suggest 2 spare batteries as a minimum. That should comfortably get you through at least a couple of days.

2. Charging a GoPro

Do you know there are at least 8 different ways you can charge your GoPro camera? If you don’t believe me, then read this article. By far the best and fastest way is to purchase a genuine dual battery charger. It’s very light and compact and great for fitting into your carry bag.

Why Buy a GoPro how to charge gopro
Charging 3 batteries at once

Tip: Check this article to learn 7 ways to charge a GoPro.

3. GoPro Memory cards

This is not negotiable; you cannot use a GoPro without a micro SD memory card since the camera has no inbuilt memory. But there are 3 important things you need to know about memory cards. 

  1. Make sure you have a memory card with ample capacity. I normally use 32GB cards and find that they can hold 2 solid days of 1080P / 30 fps video. It varies but generally, I get about 3 minutes of 1080P/30fps video per Gigabyte. So a 32GB card could potentially hold 90 minutes of footage.
  2. Make sure you have a fast micro SD memory card. In case you didn’t know, memory cards are rated to different speeds. Make sure you get a class 10, which means that it can write at speeds of 10 MB per second. SD-HC, SD-XC-I or SD-XC-II are all fine with the GoPro. And if you want, get a faster one. It will definitely help if you plan on recording in 4K.
  3. It’s a good idea to carry a spare micro SD card, particularly if you opt for a 32 GB. And particularly if you are recording GoPro travel videos, where you may have long intervals between downloading footage onto a computer or iPad. Alternatively, you could opt for a massive 256 GB card, they’re so cheap now. That’s basically 8 times more space than I need!

4. How Waterproof is GoPro

From GoPro Hero5 onwards, these wonderful little cameras are waterproof without a case. That is, waterproof up to 10m / 30’ depth. Prior to the Hero 5 you needed to put them in a special waterproof case to make them waterproof up to 40m. 

To learn what depth each different GoPro model is waterproof to read this article. Don’t worry; if you want to go deeper you can still buy GoPro waterproof cases to take them even deeper, specifically targeted for SCUBA diving.

How waterproof is your GoPro

Tip: Read this article to find out how waterproof is each GoPro model .

5. Better GoPro Audio Quality

The GoPro Hero7 Black is leaps and bounds better audio quality than the previous models. However, it is still not fantastic. There are times when you may want to improve your GoPro audio quality, especially if you are using your GoPro for YouTube. 

To improve your GoPro Audio you need to purchase 2 accessories. Firstly, get a GoPro audio adaptor. Secondly, get a Rode VideoMicro microphone. These will vastly improve your GoPro audio quality, taking them to pro-quality. Alternatively, you could use a Rode SmartLav+ lavalier microphone (the type which pins to your shirt). Either of these 2 Rode microphones are perfect for using GoPro for YouTube.

6. GoPro Accessories

The range of GoPro accessories on the market is staggering. The challenge for people new to GoPro’s are which accessories to start with. There are a few which we would highly recommend for a GoPro starter kit:

  • 3-way grip – A versatile pole which can transform into a selfie stick, a tripod or a simple grip.
  • Floating Handgrip – GoPro’s don’t float, so it’s important to have it attached to a floating device if you go swimming.
  • Spare Battery – I recommend getting 2 or 3 spares.
  • Battery Charger – Charge those spare batteries quickly.
  • Accessory Case – to keep all your valuable GoPro accessories in one place.
  • Joby GorillaPod – a pro-quality, versatile tripod which can bend to attach to anything.

7. Mounting a GoPro

There are so many ways to mount your GoPro because there are so many different GoPro camera uses.

Surfboard, bicycle, car, drone, helmet… they all have a special mount to attach your GoPro. You can purchase a variety of genuine mounts on the GoPro products page. The head mount and the chesty are probably the 2 most useful mounts, which can be mounted directly onto your person.

8. Get a Tripod

GoPros are notoriously difficult to hold level, and still due to their miniature size. So it is important to have a reliable tripod for this purpose. And a good quality tripod is essential if you’re planning to use GoPro for YouTube videos.

The Joby GorillaPod is the industry standard, they are not expensive and virtually indestructible. In addition to being a great tripod they also double up as a handgrip whilst you are walking around with your GoPro. GorillaPods are great for taking timelapse photography too!

9. Get a GoPro Gimbal

For me, a gimbal is an essential part of my GoPro kit. I use a FeiyuTech G5 gimbal which is made especially for GoPros, and it does a wonderful job. Even with the GoPro Hero7 Black, which is marketed as the Gimbal Killer due to its incredible image stabilization? Even still, the gimbal is useful with the GoPro Hero7 Black to keep the image level and the panning smooth. And my FeiyuTech G5 gimbal is light and compact enough to take on holidays for GoPro travel videos.

10. Menu Swipe Gestures

Navigating your way through the GoPro main screen menus takes a bit of getting used to. It’s an essential skill to learn on your GoPro for beginners, and after a while, it becomes second nature. For the GoPro Hero7 it’s as easy as this:

  • Swipe down from the top edge of the screen – opens the dashboard when you are in landscape mode, which is the settings and preferences menu
  • Swipe left or right from the edge of the screen – switch between video, photo and time-lapse mode.
  • Swipe up from the bottom of the screen – opens the media gallery to playback your footage.
  • Press and hold – adjust the exposure setting.

Closing menus is as simple as swiping in the opposite direction.

GoPro Looping
3 Different Modes

11. Best GoPro Settings

GoPros can record in various resolutions including 720, 1080P, and even 4K. They can record in various frame rates including 24, 30 and 60. And they can record in different field of vision including linear, wide and super wide.

The best GoPro settings which you should start with are as follows. Resolution = 1080P, frame rate = 30 fps, Field of View = Linear. These are what most vloggers and experienced GoPro users normally stick to. Feel free to experiment with this according to your personal taste.

12. Time Lapse & Time Warp

Time Lapse is a fairly standard feature on video cameras, which you will find on most quality video cameras these days. It’s a great way to condense a 40minute sunset into a 2-minute video.

GoPro’s have time-lapse, but then take it one step further with the GoPro Hero7 Black. That’s when GoPro introduced the Time Warp mode. Time Warp is time-lapse on steroids; it uses amazing image stabilization to give amazingly stable results time lapse whilst walking.

Time Warp is accessed from the same menu as timelapse, and is used in much the same, and is undoubtedly one of the best GoPro tips.

13. GoPro Looping

Looping is a clever feature to continually record the same scene continuously, so as to preserve memory space and not fill up your micro SD card. It’s great if you want to catch only the moment that you want, like the moment a marlin bursts through the water to take your bait. Looping is easy to set up and works best when your GoPro is mounted firmly on a tripod or other mount

Tip: Read this article to learn all about GoPro Looping.

14. Protune

Protune gives you full control over your GoPro video settings like color control, ISO limit, exposure, microphone settings and more. Yet it is simple to use. The catch is, it’s only really very experienced photographers who will benefit from this clever feature.

For beginners, I recommend you leave Protune alone and just leave the GoPro video settings in auto mode. It’s plenty smart enough to take perfect footage.

Protune settings on hero5
ProTune Settings on the Hero5 Black

Tip: Read this article to master GoPro ProTune settings.

15. GoPro Passwords

Finding and resetting your password can be a major headache when you don’t know how to do it. Your password is also necessary for pairing to the GoPro app via Wi-Fi. This is particularly true for older GoPros, as the newer models are quite easy to find. Read this article to get the full lowdown on finding and resetting passwords.

Tip: Read this article to master your GoPro password.

16. Using Wi-Fi with GoPro

One of the best things about GoPros is the ability to download footage to your smartphone or tablet via Wi-Fi. This would normally be done through the proprietary GoPro app, which is free and very simple to use. I usually download all my video via Wi-Fi to my iPad, it’s simple and mostly seamless.

17. Updating GoPro Firmware

It pays to update your firmware from time to time on your GoPro. Occasionally they release a new version, which may be to add features or to remove bugs. All you need to do is click the update firmware option when you’re connected to the GoPro app, and it’s all taken care of. Once connected to Wi-Fi, just select Update Firmware from the app and it’s done.

updating gopro firmware

18. GoPro App

The GoPro App is awesome. Not only does it allow you to control your GoPro remotely it also allows you to have a bigger screen to view your frame live. The app allows you to download all your video from the GoPro camera via Wi-Fi.

You can update most of the GoPro settings from this app, and you can even update the firmware. When you’re done you can view all of your footage in playback mode.

19. Quik App

The GoPro Quik app is one of those apps that automatically edits and produces awesome video clips for you. This is a perfect companion app for GoPro for beginners and pro’s alike. Quik feeds off the footage downloaded into the GoPro App and allows you to instantly share your footage in any popular aspect ratio or format. It’s specifically designed to share quickly on social media, and it works amazingly well. Perfect for Instagram Stories or IGTV.

20. GoPro Voice Control

Imagine you have your GoPro action camera mounted to the front of your surfboard. How do you turn it on? By voice commands of course. Just by saying “GoPro Start Recording” your GoPro will begin recording for you. And “GoPro Stop Recording” to stop recording. There are quite a few other commands as well. You can toggle this feature on or off from the GoPro dashboard (refer gestures above).

21. How to Edit GoPro Videos

Once you have all your footage safely onto your tablet or computer, you will then need to edit and produce your videos. Whilst the Quik app is great for quickly producing video and adding heaps of effects, there are times when you want more control. Perhaps you want to show all the footage together in one move. Here are your best options for how to edit GoPro videos:

  • Top End: Final Cut Pro X (Apple) or Adobe Premiere Elements are the benchmark pro-editing systems. Both are not cheap, but it’s what pro YouTubers would normally use. These apps will give you full control and then some.
  • Mid-Range: LumoFusion: This is an amazing app which works especially well on iPads. You can have a high level of control as you edit your footage right there on your iPad. It costs a little, but its well worth it.
  • Low Range: iMovie (Apple) is a great option for starting out. It’s free, easy to use, and doesn’t take long to produce a nice looking video.

The Sky is the Limit

There are so many GoPro tips and tricks to take your GoPro video to the next level and beyond. Follow us for more great tips, as we will be publishing a library of tips, tricks and GoPro tutorial lessons to help you on your way to GoPro mastery. Happy videoing!

GoPro for Beginners

Would you like a free copy of our Ultimate Bucket List?

Not sure where to travel to next? We have created the Ultimate Bucket List to help you plan your next trip. 1170 awesome travel destinations in 167 countries. And we want you to have it for FREE.


WEATHER

Melbourne
clear sky
19.8 ° C
19.8 °
19.8 °
76 %
3.3kmh
0 %
Fri
25 °
Sat
25 °
Sun
24 °
Mon
25 °
Tue
26 °

POPULAR ARTICLES