
GoPro cameras are such an awesome little bundle of technology. They are amazingly simple to use, just point and shoot. Yet they are such a complex camera, with so much technology and processing going on behind the scenes. You can easily take your GoPro videos to the next level by learning a few simple GoPro tips. Here’s a quick summary of 21 important tips for GoPro for beginners.
Note: This post may contain affiliate links. Please read our disclosure policy for more information.
1. Spare Battery
In case you’re wondering how long a GoPro battery lasts, the answer is… not very long. I normally capture in 1080P resolution at 30 frames per second and find that I can record about 5 GB of video per battery. That’s about 15 minutes of video, made up of lots of shorter clips.
You need to carry a spare battery. This is the most important of all GoPro tips for beginners.
So how may spare batteries should you carry? Personally, I carry 4 spare batteries, which can usually get me through 2 solid days of GoPro travel video recording. For the average GoPro user, I would suggest 2 spare batteries as a minimum. That should comfortably get you through at least a couple of days.
2. Charging a GoPro
Do you know there are at least 8 different ways you can charge your GoPro camera? If you don’t believe me, then read this article. By far the best and fastest way is to purchase a genuine dual battery charger. It’s very light and compact and great for fitting into your carry bag.
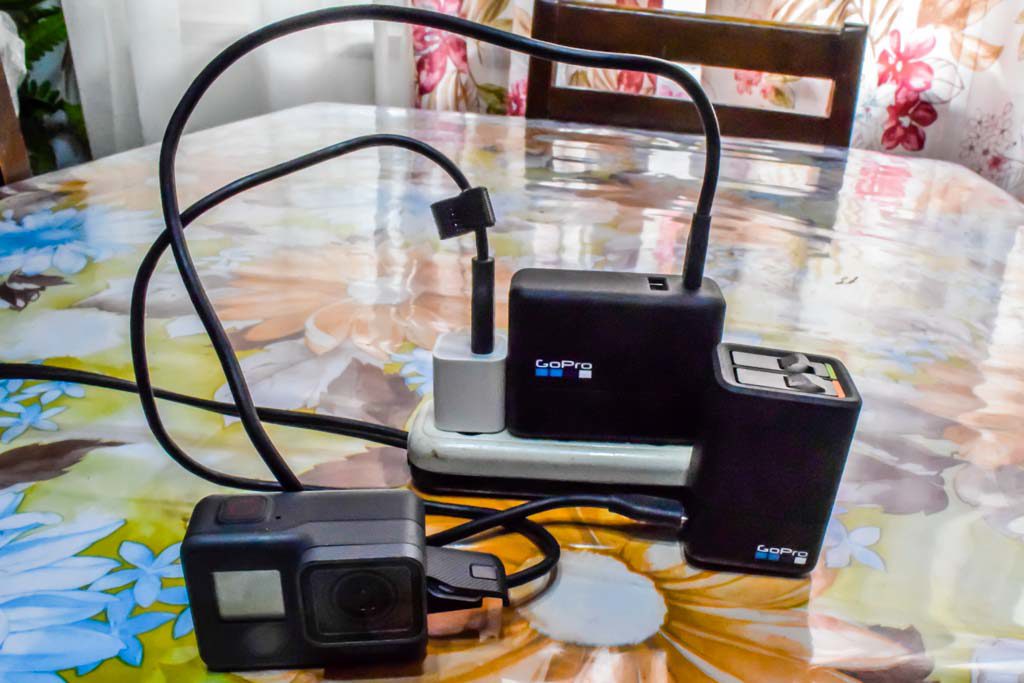
Tip: Check this article to learn 7 ways to charge a GoPro.
3. GoPro Memory cards
This is not negotiable; you cannot use a GoPro without a micro SD memory card since the camera has no inbuilt memory. But there are 3 important things you need to know about memory cards.
- Make sure you have a memory card with ample capacity. I normally use 32GB cards and find that they can hold 2 solid days of 1080P / 30 fps video. It varies but generally, I get about 3 minutes of 1080P/30fps video per Gigabyte. So a 32GB card could potentially hold 90 minutes of footage.
- Make sure you have a fast micro SD memory card. In case you didn’t know, memory cards are rated to different speeds. Make sure you get a class 10, which means that it can write at speeds of 10 MB per second. SD-HC, SD-XC-I or SD-XC-II are all fine with the GoPro. And if you want, get a faster one. It will definitely help if you plan on recording in 4K.
- It’s a good idea to carry a spare micro SD card, particularly if you opt for a 32 GB. And particularly if you are recording GoPro travel videos, where you may have long intervals between downloading footage onto a computer or iPad. Alternatively, you could opt for a massive 256 GB card, they’re so cheap now. That’s basically 8 times more space than I need!
4. How Waterproof is GoPro
From GoPro Hero5 onwards, these wonderful little cameras are waterproof without a case. That is, waterproof up to 10m / 30’ depth. Prior to the Hero
To learn what depth each different GoPro model is waterproof to read this article. Don’t worry; if you want to go deeper you can still buy GoPro waterproof cases to take them even deeper, specifically targeted for SCUBA diving.
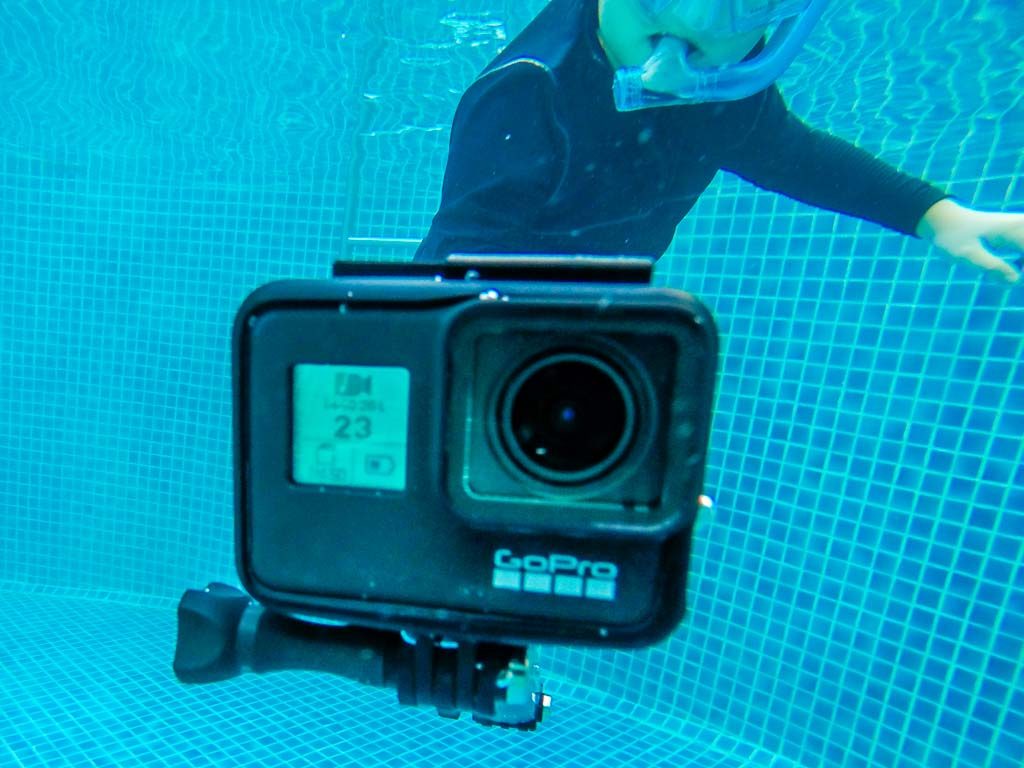
Tip: Read this article to find out how waterproof is each GoPro model .
5. Better GoPro Audio Quality
The GoPro Hero7 Black is leaps and bounds better audio quality than the previous models. However, it is still not fantastic. There are times when you may want to improve your GoPro audio quality, especially if you are using your GoPro for YouTube.
To improve your GoPro Audio you need to purchase 2 accessories. Firstly, get a GoPro audio adaptor. Secondly, get a Rode VideoMicro microphone. These will vastly improve your GoPro audio quality, taking them to pro-quality. Alternatively, you could use a Rode SmartLav+ lavalier microphone (the type which pins to your shirt). Either of these 2 Rode microphones
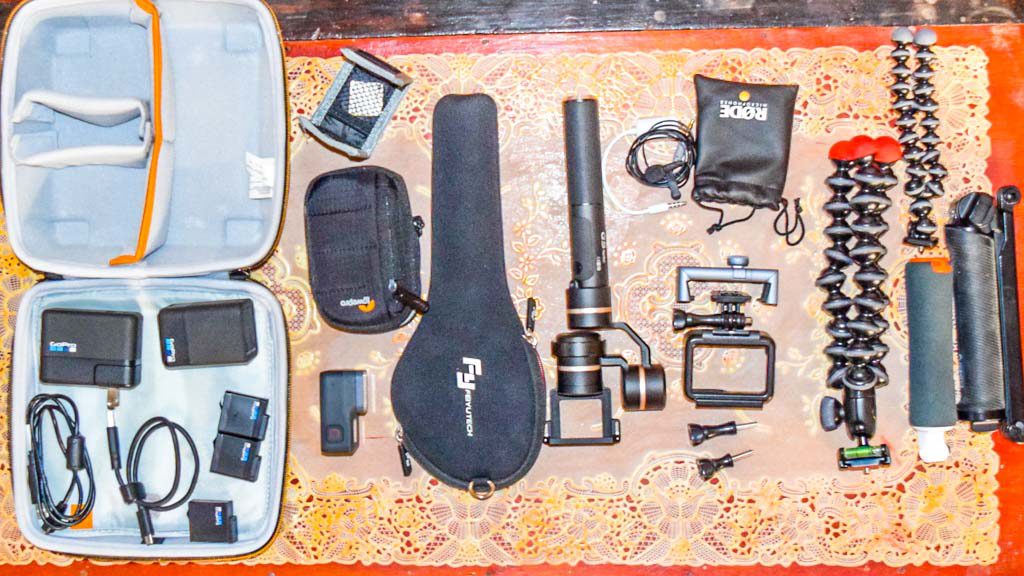
6. GoPro Accessories
The range of GoPro accessories on the market is staggering. The challenge for people new to GoPro’s are which accessories to start with. There are a few which we would highly recommend for a GoPro starter kit:
- 3-way grip – A versatile pole which can transform into a selfie stick, a tripod or a simple grip.
- Floating Handgrip – GoPro’s don’t float, so it’s important to have it attached to a floating device if you go swimming.
- Spare Battery – I recommend getting 2 or 3 spares.
- Battery Charger – Charge those spare batteries quickly.
- Accessory Case – to keep all your valuable GoPro accessories in one place.
- Joby GorillaPod – a pro-quality, versatile tripod which can bend to attach to anything.
7. Mounting a GoPro
There are so many ways to mount your GoPro because there are so many different GoPro
Surfboard, bicycle, car, drone, helmet… they all have a special mount to attach your GoPro. You can purchase a variety of genuine mounts on the GoPro products page. The head mount and the chesty are probably the 2 most useful mounts, which can be mounted directly onto your person.
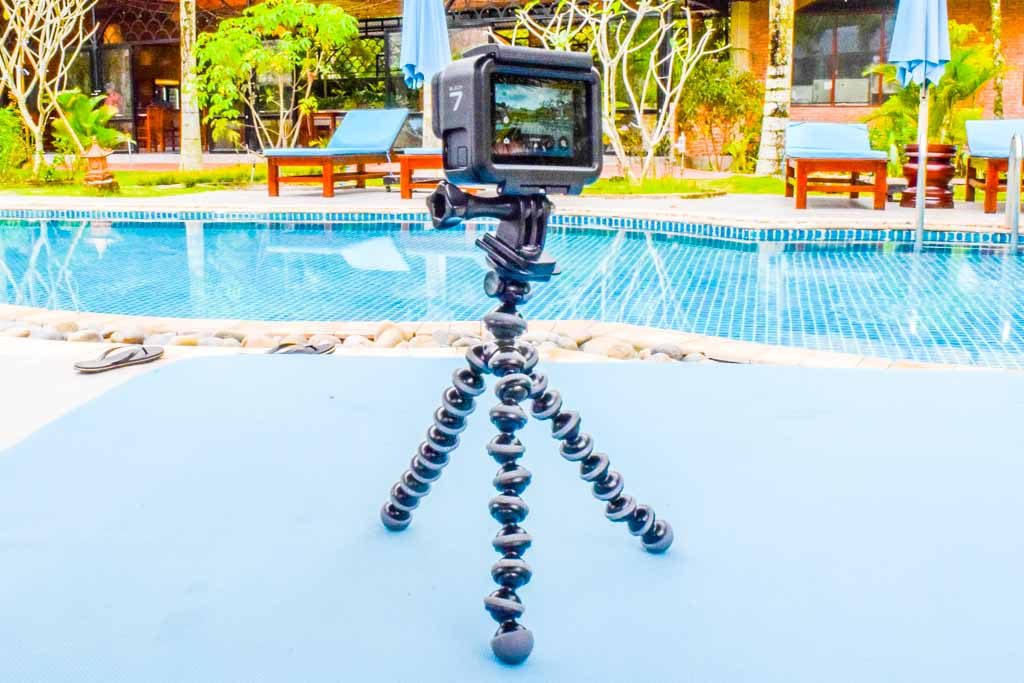
8. Get a Tripod
GoPros are notoriously difficult to hold level, and still due to their miniature size. So it is important to have a reliable tripod for this purpose. And a good quality tripod is essential if you’re planning to use GoPro for YouTube videos.
The Joby GorillaPod is the industry standard, they are not expensive and virtually indestructible. In addition to being a great tripod they also double up as a handgrip whilst you are walking around with your GoPro. GorillaPods are great for taking time
9. Get a GoPro Gimbal
For me, a gimbal is an essential part of my GoPro kit. I use a FeiyuTech G5 gimbal which is made especially for GoPros, and it does a wonderful job. Even with the GoPro Hero7 Black, which is marketed as the Gimbal Killer due to its incredible image stabilization? Even still, the gimbal is useful with the GoPro Hero7 Black to keep the image level and the panning smooth. And my FeiyuTech G5 gimbal is light and compact enough to take on holidays for GoPro travel videos.
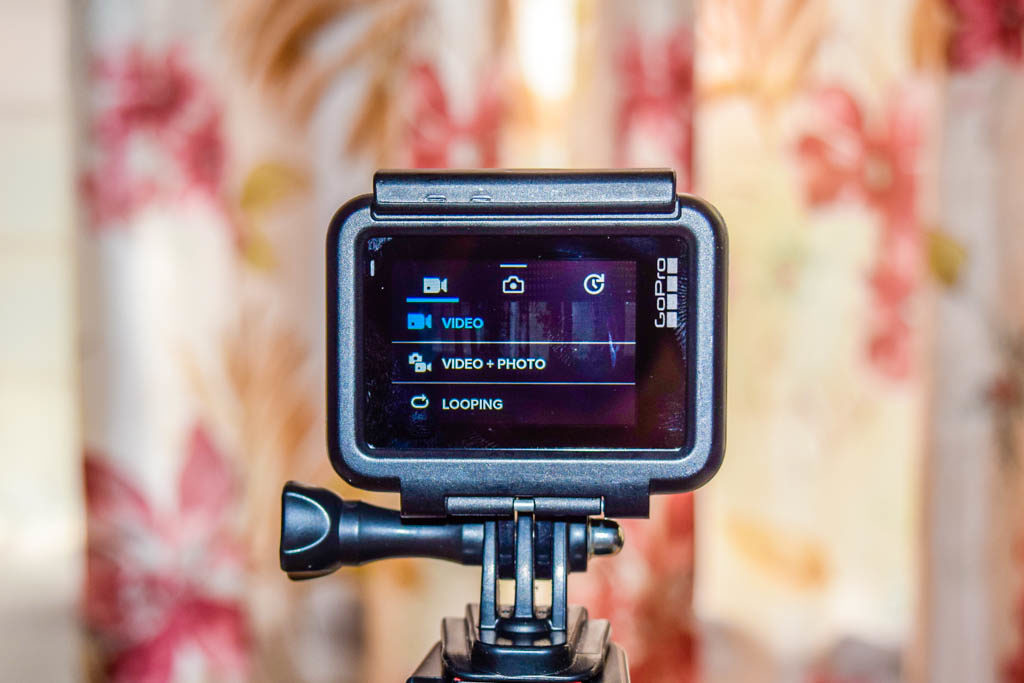
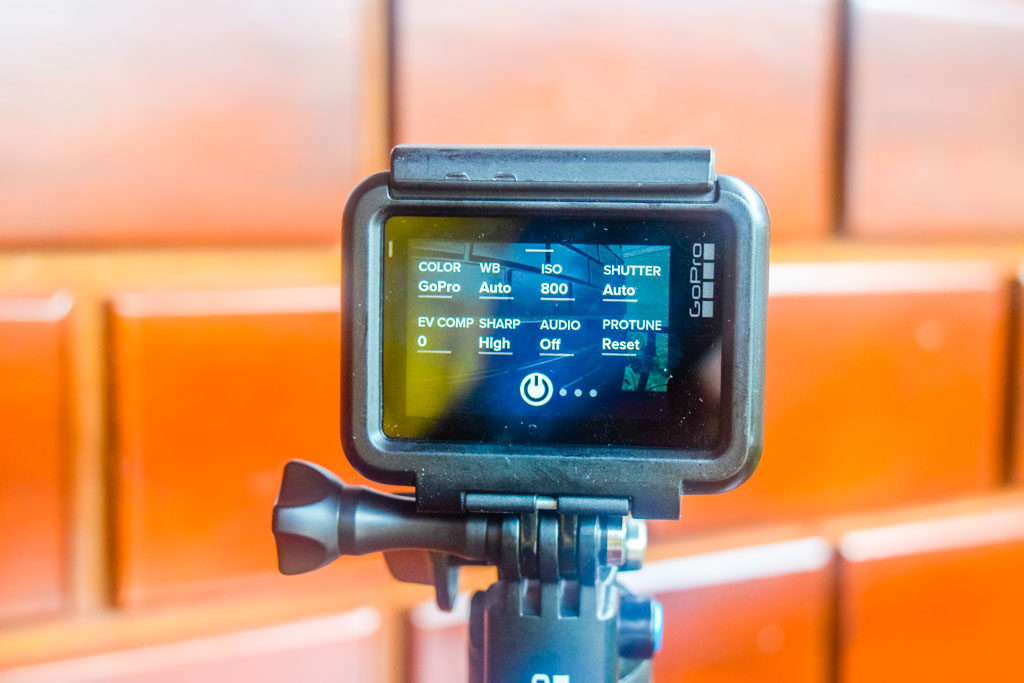
10. Menu Swipe Gestures
Navigating your way through the GoPro main screen menus takes a bit of getting used to. It’s an essential skill to learn on your GoPro for beginners, and after a while, it becomes second nature. For the GoPro Hero7 it’s as easy as this:
- Swipe down from the top edge of the screen – opens the dashboard when you are in landscape mode, which is the settings and preferences menu
- Swipe left or right from the edge of the screen – switch between video, photo and time-lapse mode.
- Swipe up from the bottom of the screen – opens the media gallery to playback your footage.
- Press and hold – adjust the exposure setting.
Closing menus is as simple as swiping in the opposite direction.
11. Best GoPro Settings
GoPros can record in various resolutions including 720, 1080P, and even 4K. They can record in various frame rates including 24, 30 and 60. And they can record in different field of vision including linear, wide and super wide.
The best GoPro settings which you should start with are as follows. Resolution = 1080P, frame rate = 30 fps, Field of View = Linear. These are what most vloggers and experienced GoPro users normally stick to. Feel free to experiment with this according to your personal taste.
12. Time Lapse & Time Warp
Time Lapse is a fairly standard feature on video cameras, which you will find on most quality video cameras these days. It’s a great way to condense a 40
GoPro’s have time-lapse, but then take it one step further with the GoPro Hero7 Black. That’s when GoPro introduced the Time Warp mode. Time Warp is time-lapse on steroids; it uses amazing image stabilization to give amazingly stable results time lapse whilst walking.
Time Warp is accessed from the same menu as time
13. GoPro Looping
Looping is a clever feature to continually record the same scene continuously, so as to preserve memory space and not fill up your micro SD card. It’s great if you want to catch only the moment that you want, like the moment a marlin bursts through the water to take your bait. Looping is easy to set up and works best when your GoPro is mounted firmly on a tripod or other mount
Tip: Read this article to learn all about GoPro Looping.
14. Protune
Protune gives you full control over your GoPro video settings like color control, ISO limit, exposure, microphone settings and more. Yet it is simple to use. The catch is, it’s only really very experienced photographers who will benefit from this clever feature.
For beginners, I recommend you leave Protune alone and just leave the GoPro video settings in auto mode. It’s plenty smart enough to take perfect footage.
Tip: Read this article to master GoPro ProTune settings.
15. GoPro Passwords
Finding and resetting your password can be a major headache when you don’t know how to do it. Your password is also necessary for pairing to the GoPro app via Wi-Fi. This is particularly true for older GoPros, as the newer models are quite easy to find. Read this article to get the full lowdown on finding and resetting passwords.
Tip: Read this article to master your GoPro password.
16. Using Wi-Fi with GoPro
One of the best things about GoPros is the ability to download footage to your smartphone or tablet via Wi-Fi. This would normally be done through the proprietary GoPro app, which is free and very simple to use. I usually download all my video via Wi-Fi to my iPad, it’s simple and mostly seamless.
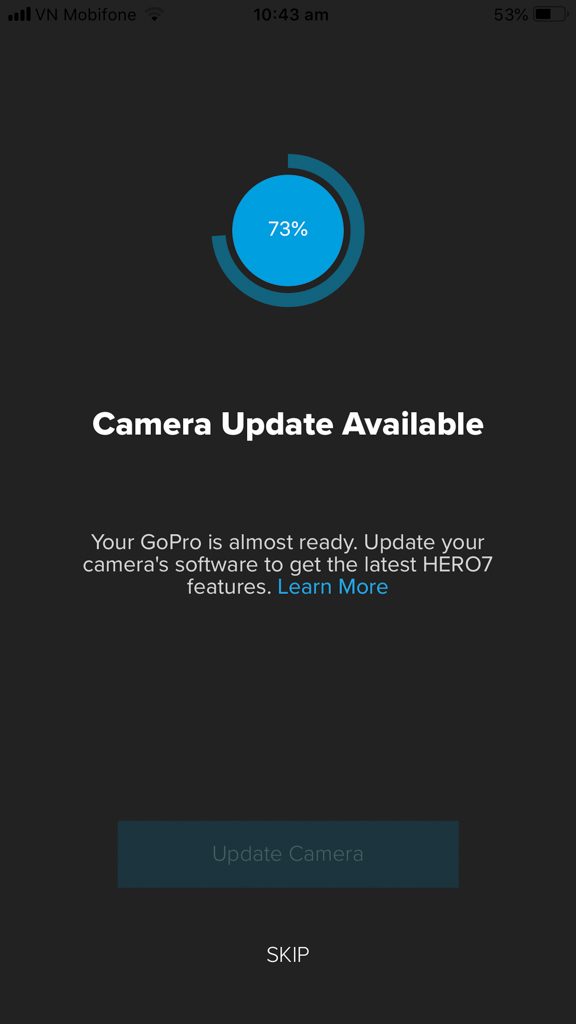
17. Updating GoPro Firmware
It pays to update your firmware from time to time on your GoPro. Occasionally they release a new version, which may be to add features or to remove bugs. All you need to do is click the update firmware option when you’re connected to the GoPro app, and it’s all taken care of. Once connected to Wi-Fi, just select Update Firmware from the app and it’s done.
18. GoPro App
The GoPro App is awesome. Not only does it allow you to control your GoPro remotely it also allows you to have a bigger screen to view your frame live. The app allows you to download all your video from the GoPro camera via Wi-Fi.
You can update most of the GoPro settings from this app, and you can even update the firmware. When you’re done you can view all of your footage in playback mode.
19. Quik App
The GoPro Quik app is one of those apps that automatically edits and produces awesome video clips for you. This is a perfect companion app for GoPro for beginners and pro’s alike. Quik feeds off the footage downloaded into the GoPro App and allows you to instantly share your footage in any popular aspect ratio or format. It’s specifically designed to share quickly on social media, and it works amazingly well. Perfect for Instagram
20. GoPro Voice Control
Imagine you have your GoPro action camera mounted to the front of your surfboard. How do you turn it on? By voice commands of course. Just by saying “GoPro Start Recording” your GoPro will begin recording for you. And “GoPro Stop Recording” to stop recording. There are quite a few other commands as well. You can toggle this feature on or off from the GoPro dashboard (refer gestures above).
21. How to Edit GoPro Videos
Once you have all your footage safely onto your tablet or computer, you will then need to edit and produce your videos. Whilst the Quik app is great for quickly producing video and adding heaps of effects, there are times when you want more control. Perhaps you want to show all the footage together in one move. Here are your best options for how to edit
- Top End: Final Cut Pro X (Apple) or Adobe Premiere Elements
are the benchmark pro-editing systems. Both are not cheap, but it’s what pro YouTubers would normally use. These apps will give you full control and then some. - Mid-Range: LumoFusion: This is an amazing app which works especially well on iPads. You can have a high level of control as you edit your footage right there on your iPad. It costs a little, but it
‘ s well worth it. - Low Range: iMovie (Apple) is a great option for starting out. It’s free, easy to use, and doesn’t take long to produce a nice looking video.
The Sky is the Limit
There are so many GoPro tips and tricks to take your GoPro video to the next level and beyond. Follow us for more great tips, as we will be publishing a library of tips, tricks and GoPro tutorial lessons to help you on your way to GoPro mastery. Happy videoing!
Would you like a free copy of our Ultimate Bucket List?
Not sure where to travel to next? We have created the Ultimate Bucket List to help you plan your next trip. 1170 awesome travel destinations in 167 countries. And we want you to have it for FREE.


