There are so many archaeological sites in Athens that you could easily spend weeks trying to see them all. But for those on a shorter holiday, you need to select the best of Athens sites to see in a short space of time. Here’s our advice on how to visit the 7 best Athens historical sites.
Note: This post may contain affiliate links. Please read our disclosure policy for more information.
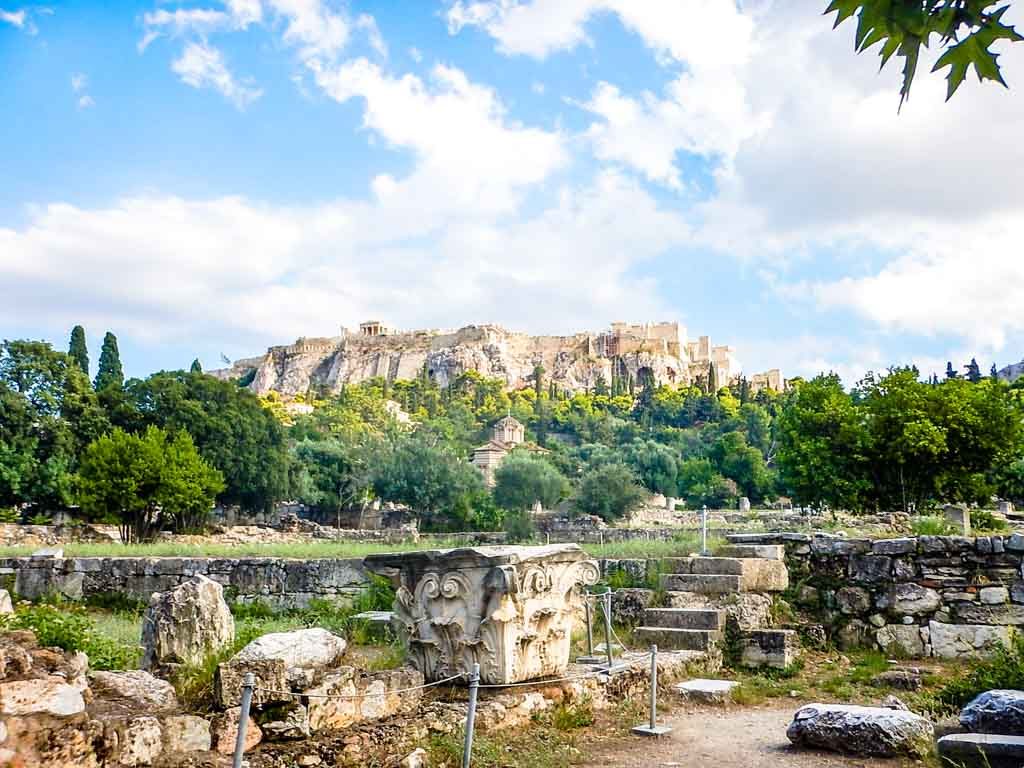
Ancient Agora with the Acropolis backdrop
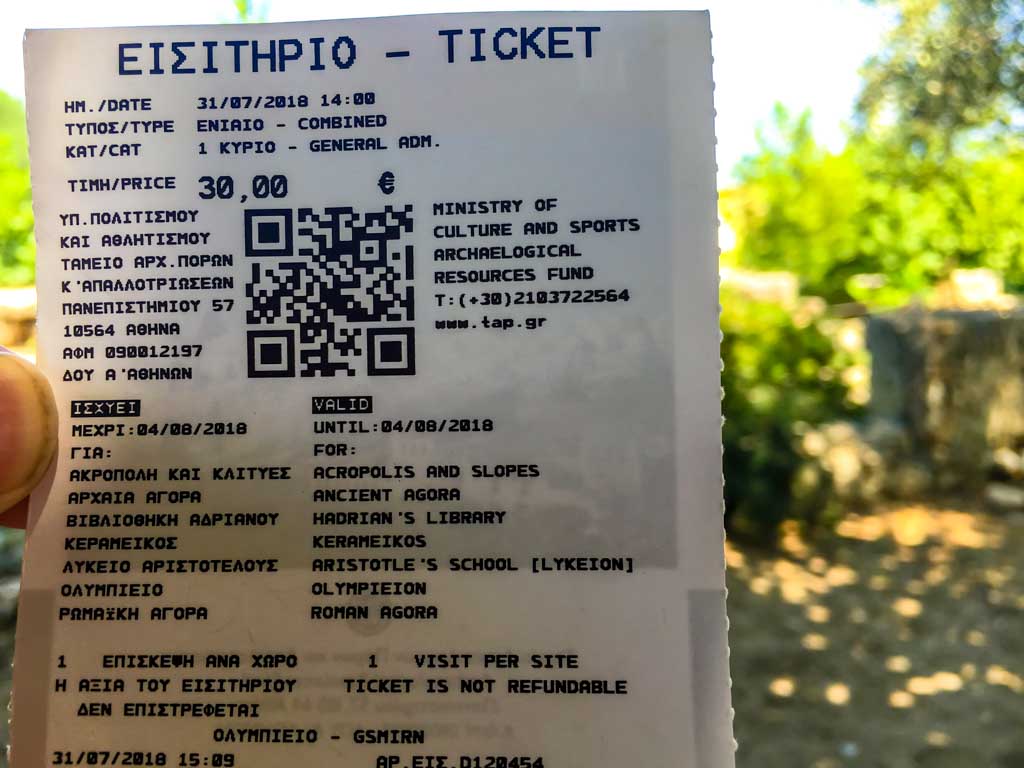
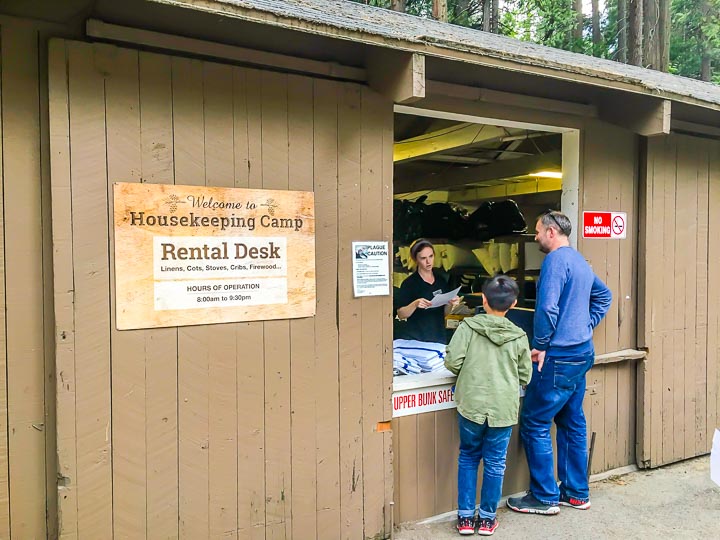
Combined Ticket for the 7 Best Athens Historical Sites
The best thing you can do in Athens is to purchase the combined ticket to see the top 7 attractions. This ticket will take you straight to all the best places to visit in Athens. On our visit in 2018 peak season, the ticket cost 30 Euros and is valid for 5 days. However, from 1st November to 31st March the price is reduced to 15 Euros.
Not only does this ticket save you a substantial amount on individual entry fees, but it is also a good incentive to get around and see all 7 archaeological sites. They are all amazing and well worth a visit.
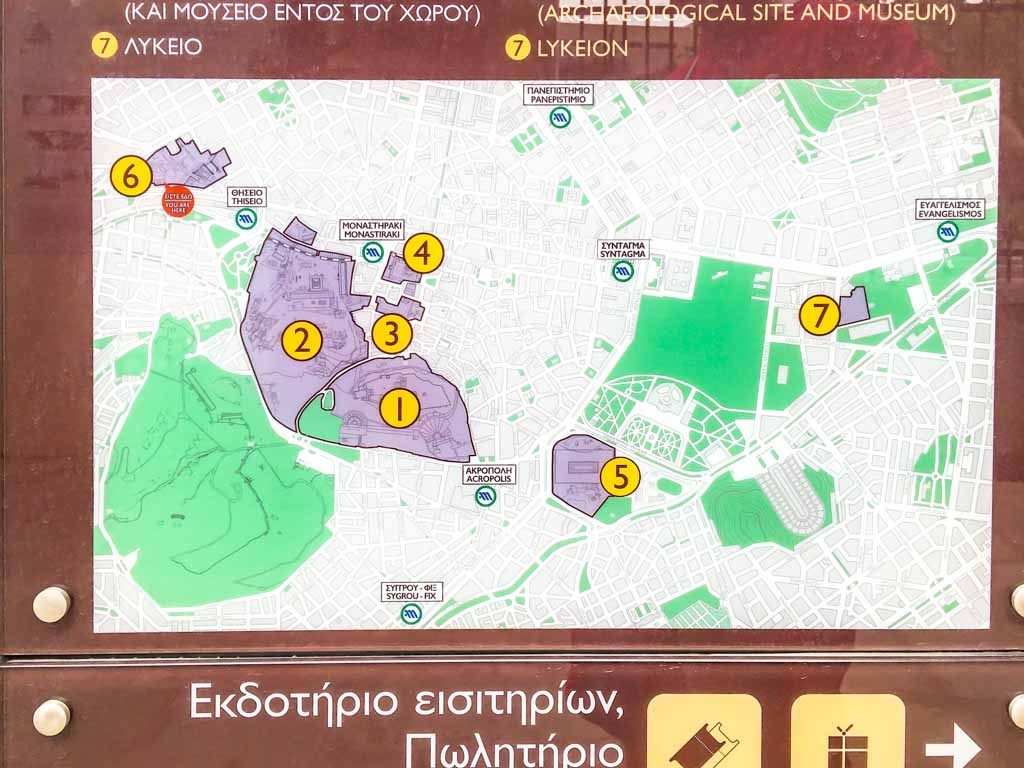
Check out this Athensattractions map to show you each of these historic sites, plus one bonus site.
1. Acropolis and its Slopes
You can’t visit central Athens without “not seeing” the ancient Acropolis. This is the most prominent of all Athens ruins. It is perched right up on top of a hill, such that you can see the Acropolis from all over central Athens. But you really need to take the walk to the top to appreciate it properly. Good thing that Acropolis Athens tickets are included in your combined ticket.
The Acropolis is a World Heritage Site and was even a finalist for the New 7 Wonders of the World listings. This site is world famous and worthy of any bucket list. It is the one site that should not be missed when in Athens.
The strenuous walk up to Acropolis
You should definitely walk up to the top of Acropolis if you are physically able. Be warned, it is quite strenuous and requires lots of stairs. But the views at the top are spectacular. And you will be treated to many amazing historic sites along the way.
The amphitheatre at Acropolis
Here are just a few of the sites you will see.
At the centre of the Acropolis is the Parthenon, the large rectangular ruin built way back in 447 BC.
The Old Temple of Athena, built in around 525 BC, sits next to the Parthenon.
Areopagus Hill, where St.Paul the apostle stood to teach the new religion of Christianity in the 1st century. You can actually stand where St.Paul stood and taught.
Odeon of Herodes Atticus is an amphitheatre built in 161 AD on the slopes of the Acropolis.
Spectacular 360-degree views over Athens and surrounding coastline.
The rock where St.Paul preached in the 1st century
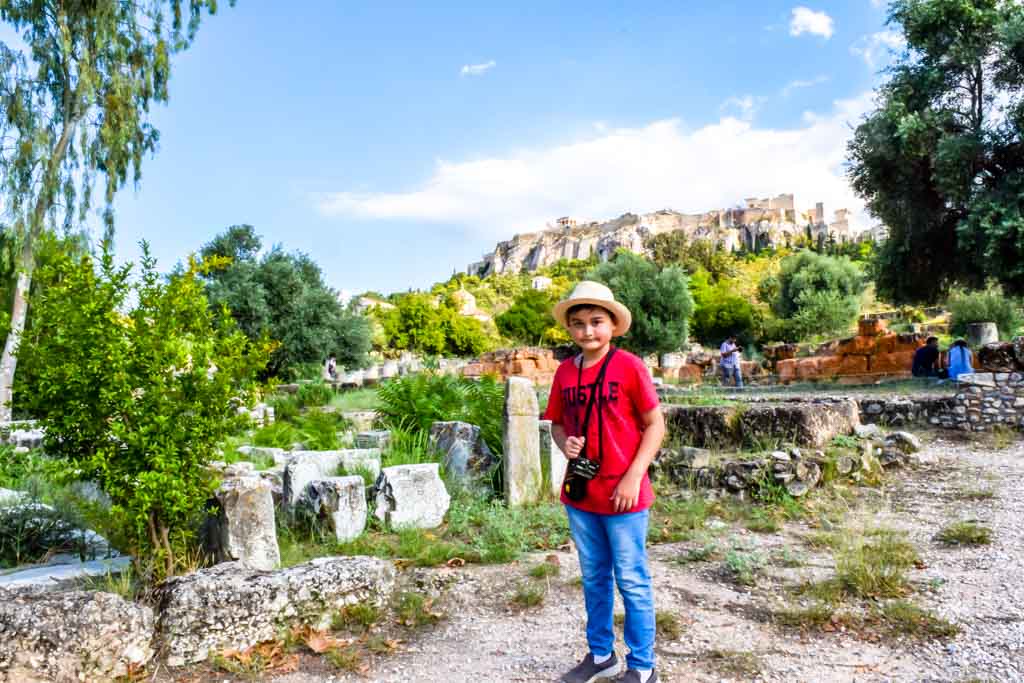
This is the second-best site to see after the Acropolis. It is an expansive collection of ancient Athens ruins on the northwest slope of the Acropolis. You could easily spend half a day wandering through this amazing site, so give yourself plenty of time.
Exploring Ancient Agora
The word Agora roughly translates as a gathering place and is at the heart of Ancient Athens. Most of the historical ruins in the Ancient Agora of Athens date back to around 4th century BC.
The most intact and interesting attraction here is the Temple of Hephaisteion. Built-in 449 BC, this is one of the biggest of all ancient Athens monuments which can be seen from all over the central city area.
The Temple of Hephaisteion
As you leave Ancient Agora you will be met with a vast area of cafes and restaurants. On a nice summer day, you can catch some authentic Greek food and music in one of the prettiest locations I’ve seen.
3. Roman Agora
To the North of Acropolis is the Roman Agora. This is a much smaller site compared to Ancient Agora. It is conveniently located only about 2-3 minutes walk from Monastiraki Square and Station in downtown Athens.
Roman Agora
You only need an hour to see this small site. Not a lot of the buildings are still intact, mostly ruined with fragments remaining. There is however one fully intact structure which you cannot miss, the Tower of the Winds.
The Tower of the Winds was built around 50 BC and is a 12m tall octagonal clock tower built out of marble. They say it’s the worlds first meteorological station. Visitors are able to go inside this tower and fully appreciate the ancient history of Athens.
The Tower of the winds
4. Hadrian’s Library
This site is a stone’s throw from the Roman Agora, and right on the edge of Monastiraki square. Once again the site is relatively small and can be seen in an hour.
Hadrian’s Library complex
The library itself was built in AD 132 by the Roman Emperor Hadrian. Surrounding the library are 3 churches, built in the 5th, 7th, and 12th centuries AD.
5. Olympeion
We found this to be one of the more picturesque sites. Also called the Temple of Olympian Zeus, this is the place to go for some spectacular photos. The massive temple is in the centre of Athens and was dedicated to the king of all Gods, Zeus.
Part of the Temple of Zeus
The temple itself is 44m wide and 110m long and is surrounded by a series of giant columns. The building was completed in the 2nd century AD, over 600 years after the massive project began! 21 of the original 104 columns are still standing.
6. Kerameikos
This is a rambling collection of historical ruins and cemeteries. The area was known as the Potters Quarter of ancient Athens (the name is similar to the word Ceramic). Here you will find many great examples of ancient life in the city. You need about 2 hours to see this site.
The Potter’s Quarter
Of particular interest to me was the Road to Plato’s Academy. This ancient road is 1600 meters long and runs through the Kerameikos site. It is lined with the tombs of prominent people from ancient Athens. It is a very moving experience to stand on a site of such historical significance.
The Road to Plato’s Academy
7. Lykeion
This site is famous for the Aristotle School of Philosophy. This was founded by Aristotle himself in 335 BC. There is also a temple dedicated to Zeus the wolf-god.
The site is a little out of the way, and a little far to walk from the other sites. We chose to catch the Athens Sightseeing bus there (hop-on-hop-off bus). There’s a bus stop nearby.
The site itself is probably the least interesting of the other 6 sites and should only take an hour or so to see. Nevertheless, it is still one of the most important of all Athens historical sites.
The fascinating Aristotle School of Philosophy
While you are in the area there are quite a few interesting museums within walking distance. These are relatively cheap to enter and well worth a look. Be sure to check these out. I also recommend a great little restaurant/cafe behind the Christian Museum.
Athens War Museum
Byzantine and Christian Museum
National History Museum
Bonus Attraction: Panathenaic Stadium
I wanted to include this amazing stadium because it is such a cool place to visit, especially for kids. I think it’s one of the best of Athensattractions, unfortunately, it’s not included in the 7-sites combined ticket.
Don’t worry, the entrance fee is only about 5 euros. And it’s easily accessible with a hop-on-hop-off bus stop at the front.
Inside the Panathenaic. Stadium museum tunnel
Panathenaic Stadium is the only white marble stadium in the world. In fact, it’s the only stadium in the world built entirely of marble. It was built around 330 BC and is one of the main historic attractions in Athens. It is also where the first modern Olympic Games were held.
You can also hire an audio commentary device and take a guided tour around the entire stadium. It will take about an hour, and is an engaging and fascinating experience. Near the end of the tour, you are walked through an ancient tunnel to an underground museum.
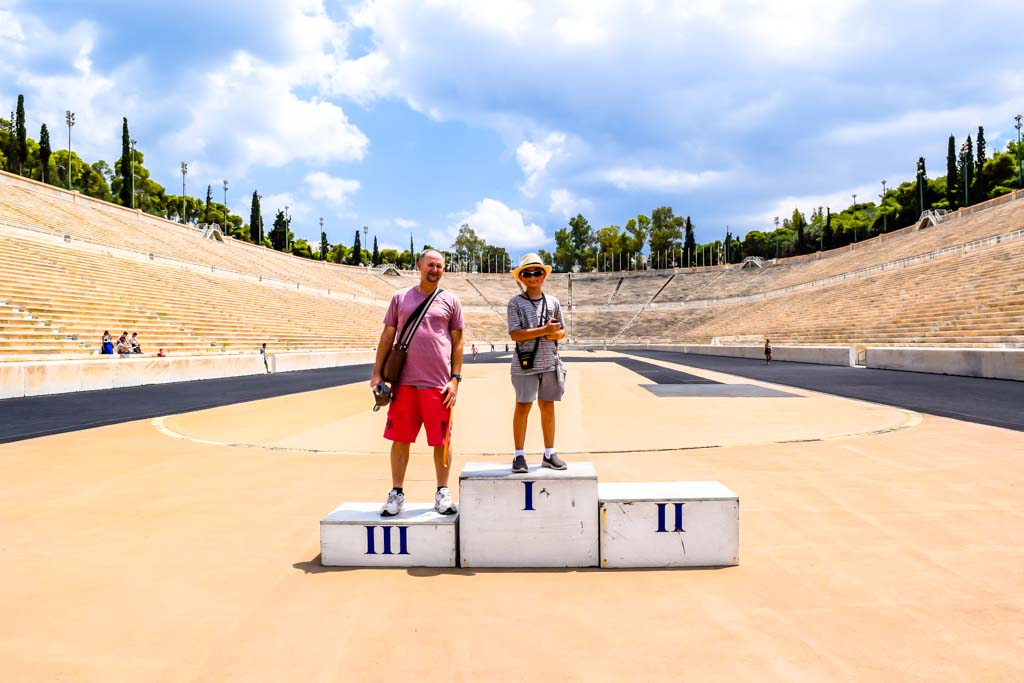
A popular activity is to have a running race on an actual Olympic track, then stand on the podium for an amazing photo. This is an excellent way to conclude your tour of the best Athens Historical Sites.
The Olympic podium
Where to Buy Tickets
Each of these 7 historic attractions has a ticketing booth at the front entrance, where you can pay 30 euros for the 7 attraction combined ticket. This is the easiest way to purchase tickets. It’s quick and it’s easy.
How to Get There
Most of the attractions are reachable by the Athens Metro, the local train system. The below map shows where the Metro stations are in relation to the Athens historic sites.
5 of the 7 attractions are a short walk from Monastiraki Station, which is located in the Monastiraki square. This is the best place to start.
Location of Metro Stations
To reach historic attraction #7 you have several options:
Athens is such a surprising city with so much to see. As you move between the top 7 Athens ruins you will notice countless other historical sites you would love to see, if you had the time. There is just so much to see in Athens.
Would you like a free copy of our Ultimate Bucket List?
Not sure where to travel to next? We have created the Ultimate Bucket List to help you plan your next trip. 1170 awesome travel destinations in 167 countries. And we want you to have it for FREE.
When recording holiday videos, my traditional options are GoPro, iPhone or a camcorder. But recently I have started to use a Nikon D5300 DSLR camera to record high definition video with pleasing results. Read on to learn my recommended DSLR setup for video.
Why Use a DSLR Camera for Video
The main reason to use a DSLR Setup for video is to get the look of a cinema camera. That means getting a quality video with a shallow depth of field. This is typically the effect of having a crisp and focused subject in the foreground, with background slightly blurry.
How to get a Shallow Depth of Field
A shallow depth of field is achieved by using a large aperture setting in your video, to give you the shallow depth of field. This is also known as the f-stop.
Ideally to get that sought after crisp foreground blurry background you want a small f-stop… around f2.8 is the ultimate, although most popular lenses won’t let you go below around f3.5.
Working in Aperture Control mode is the best for controlling the depth of field. Normally you would set the aperture to the desired setting before recording, then focus on the subject in the foreground, then start recording video.
Movie Settings
On the Nikon D5300 DSLR camera the main video settings are as follows:
Frame Size / Frame Rate
1920 x 1080 / 60 frames per second
1280 x 720 / 60 frames per second
1920 x 1080 / 30 frames per second
640 x 424 / 30 frames per second
1920 x 1080 / 24 frames per second
Movie Quality
High
Medium
Low
Recommended Settings
Frame Size / Frame Rate = 1920 x 1080 / 30 frames per second
Movie Quality = High
How to Record Video
The basic sequence is similar for the most video I shoot:
Turn camera power on
Rotate the zoom ring to open the lens
Set up the tripod or hand-held positioning
Open the LCD display and adjust the screen to best position
Select the mode on the main dial
If using Aperture control mode, select the desired f-stop setting
Activate video mode by turning the live view lever on
Focus on the subject
Start recording
Obviously this is much more complicated than using a GoPro or iPhone, however, the sequence does get considerably faster with practice when all these steps become second nature. It’s all about having control.
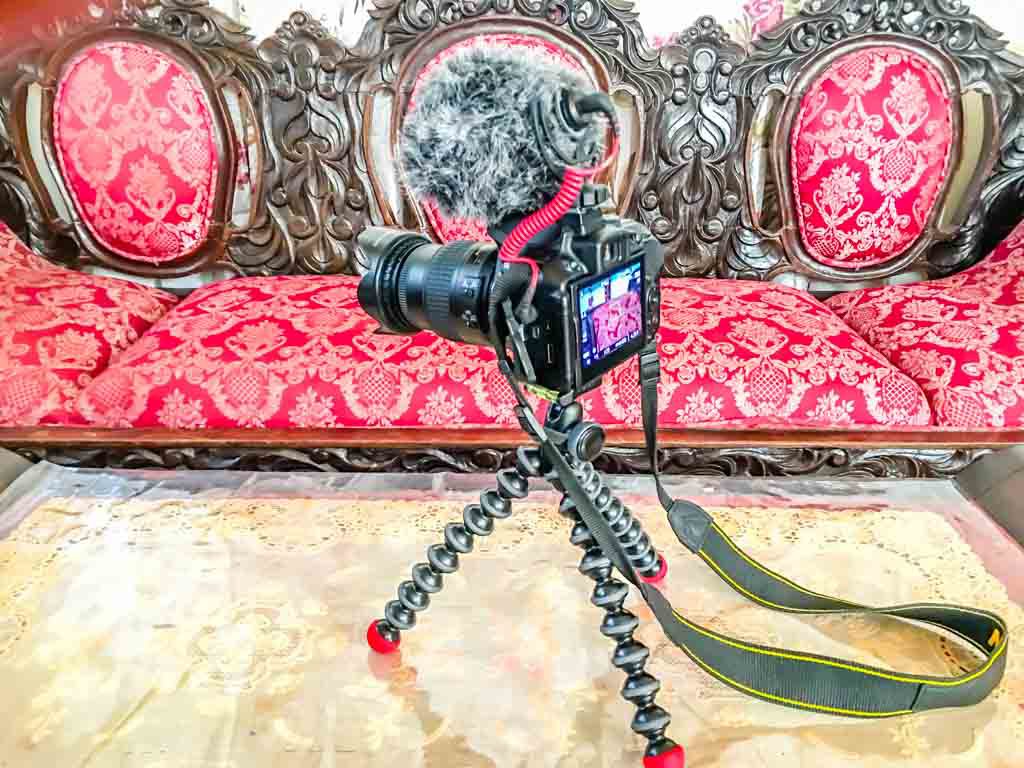
Here’s how the full setup looks
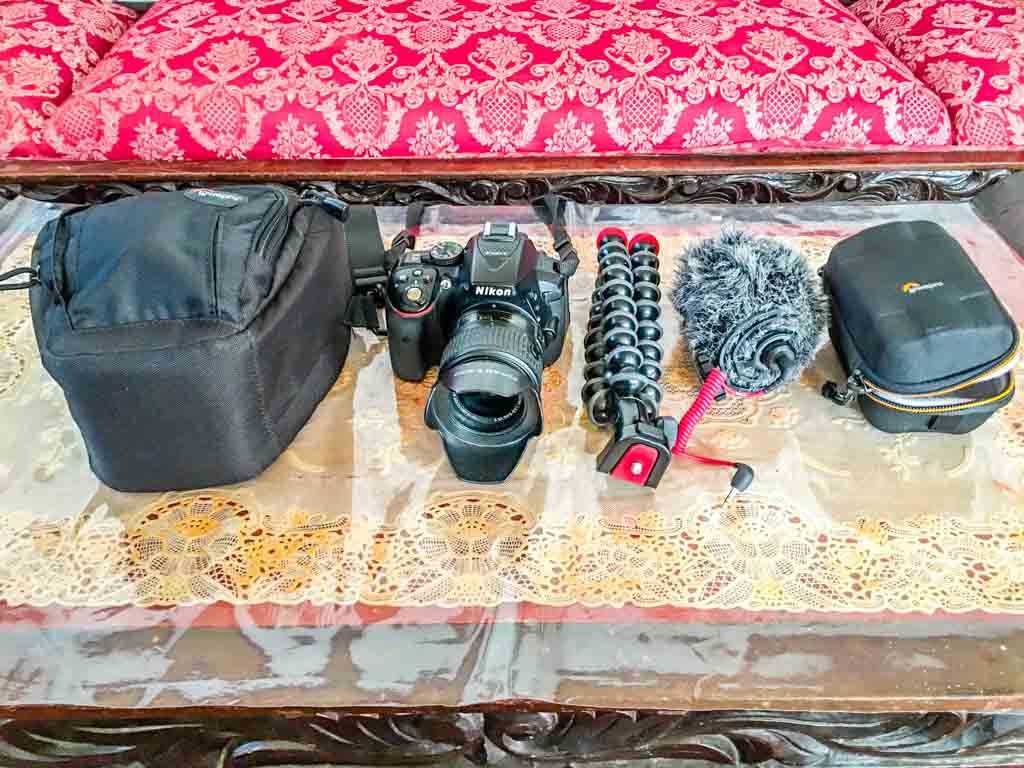
Accessories
Here’s the equipment you will need to have a quality DSLR setup for video recording.
The Nikon D5300 DSLR camera can record audio directly from the camera, but as with most cameras, you need an external microphone to get decent audio. For one thing, the in-built microphones pick up the servo motors during auto-focus, which sounds terrible.
I prefer Rode external microphones. Not only are they moderately priced, but they also give professional results when used properly. My preferred microphone is a Rode Video Micro, the compact version of the on-camera microphone.
You will get even higher quality audio using the more expensiveRode VideoMic Pro or VideoMic Pro+ shotgun microphones, however, these add to the overall bulk of your video setup.
The microphone clamps right onto the Flash Hot Shoe of the Nikon D5300 DSLR camera, and plugs into the 3.5mm jack on the side of the camera. It doesn’t get much simpler than that!
Tripod
I find that the GorillaPod 5K (DSLR model) gets me through most situations, and is much more compact than a traditional tripod. Whatever version you go for, a tripod is an absolute necessity for quality video recording.
If you really want a professional set up then go for a tripod with a fluid head for smooth video panning. You won’t go wrong with the Manfrotto Video Tripod, it’s what the pro’s use.
The one that I am really lusting after is the Manfrotto Fluid Video Monopod. This is nearly as good as a tripod but more portable, and with a much smaller footprint.
For those times when you don’t have a tripod handy, it’s important to use a solid stance and camera grip whenever possible. Locking the elbows into the ribs is a good technique to steady the video.
Also, try not breathing while shooting short clips, or breathing lightly. An even better solution is to find a solid surface like a table to sit the DSLR camera upon.
Mini-HDMI Cable
This is great for playing your video straight from your DSLR camera to a high definition TV. Not only do these help you to see how you are going with your recordings, but you can edit or delete unwanted videos.
Advantages of Using DSLR for Video
The larger sensor size found on DSLR cameras. This is going to lead to better quality images, even if you just leave it in full auto mode.
Taking DSLR quality photos during a video session is easy because the camera is right there in your hands. It’s literally as simple as hitting the shutter button to take a photo because the video record button is different from the photograph shutter button.
The cinematic quality of the footage, due to the control you have over the depth of field. A skilled DSLR photographer will be able to achieve many more impressive effects as well.
The DSLR setup has a WOW factor because it looks so professional. When people see the external microphone with the dead cat rigged to the flash mount, they will be impressed by this pro looking rig. For even more WOW factor add the Manfrotto fluid head monopod.
The cost has come down dramatically for DSLR cameras. I have seen brand new Nikon D3300 DSLR cameras in Malaysia for around the US $250, complete with 2 lens kit! These cameras are cheaper now than most alternatives, including the humble iPhone.
Disadvantages of Using DSLR for Video
It’s not waterproof. Using GoPro’s and later model smartphones comes with the benefits of being waterproof, or at least splash-proof. Alas with the Nikon D5300 DSLR camera, if you get hit by a rain shower your camera may well be destroyed.
It’s not shockproof. Don’t get me wrong, the Nikon D5300 DSLR camera is a robust camera and can take its fair share of knock and bumps. But you wouldn’t want to drop the camera for fear of damaging it. You need to take much more care than if you were using a GoPro.
DSLR is a bulky setup. It’s not so much of an issue for easy shoots, but this setup is not really suitable for a long hike through rough terrain. That’s better left for a GoPro or a compact camera.
Complexity is certainly another challenge. All DSLR cameras do take some time to master. You could of course just leave it in full auto mode and let the camera take over, but that kind of defeats the purpose of using a DSLR camera. It’s all about gaining control over your shots by making adjustments to get the desired look.
How does the DSLR Video Setup Perform?
Overall this setup performs quite well without getting too technical, just by learning some basic settings like aperture control and focus modes. There is a learning curve attached, and I do recommend taking a short course or reading an instructional book on how to use a DSLR for photography. I highly recommend the book Nikon D5300: From Snapshots to Great Shots. This book even has a video section in it.
If you are interested in shooting some truly professional-quality video I strongly suggest you try using this simple DSLR setup for video. Persevere and you will become a DSLR VIDEO PRO.
Here’s my full kit including cases
Would you like a free copy of our Ultimate Bucket List?
Not sure where to travel to next? We have created the Ultimate Bucket List to help you plan your next trip. 1170 awesome travel destinations in 167 countries. And we want you to have it for FREE.
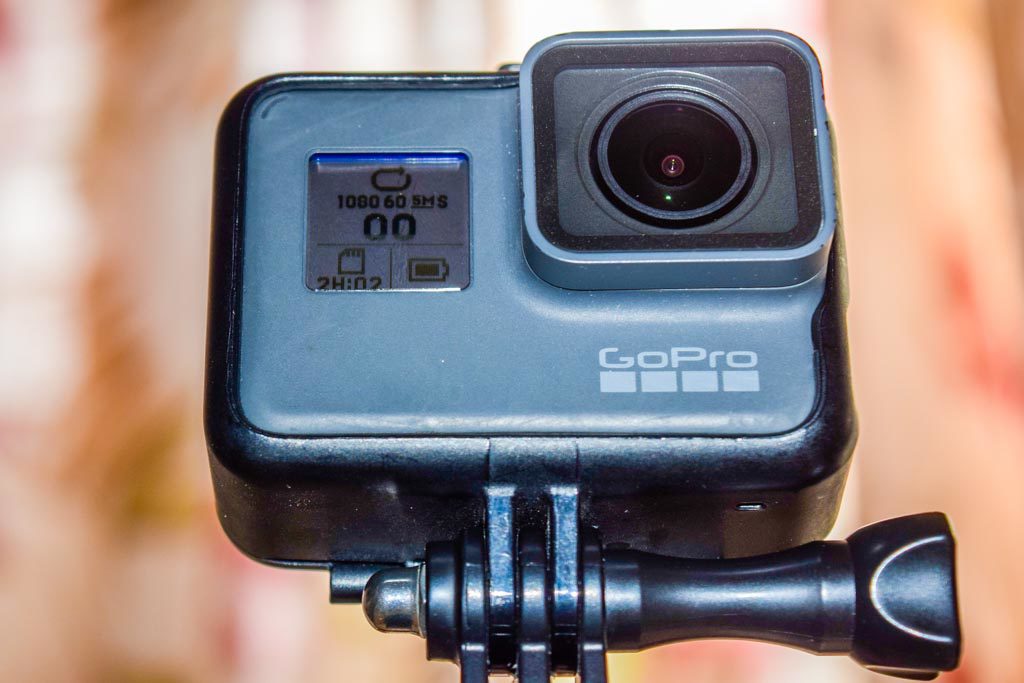
On my GoPro Hero7 Black, I was often baffled by the Video Looping Mode that often appeared. Read on for one of the most surprising GoPro tips you will read, the GoPro Looping Video.
Note: This post may contain affiliate links. Please read our disclosure policy for more information.
What is a GoPro Looping Video?
In normal video mode, when your GoPro SD card (memory card) runs out of space you are unable to do any further video recording. However in the looping mode, when your GoPro SD Card runs out of space it will over-write the video at the start of the SD card so you can continue recording.
The Go Pro looping feature is for when you want your camera to record long periods of a boring video, but only save the moments that you want. After that special moment arrives you simply stop recording.
It’s All About the Interval
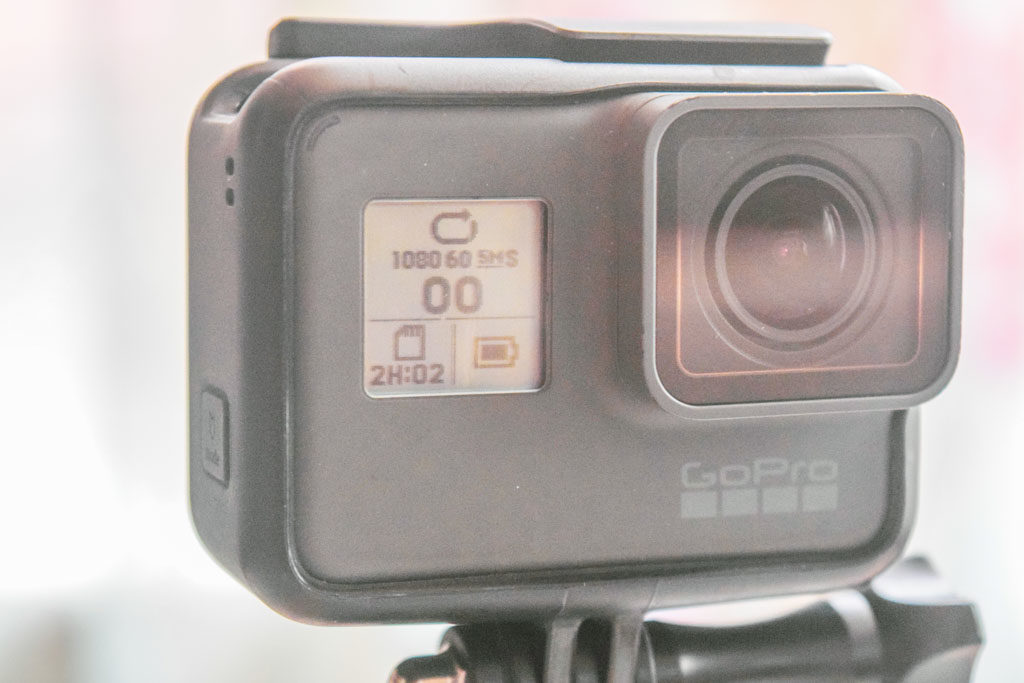
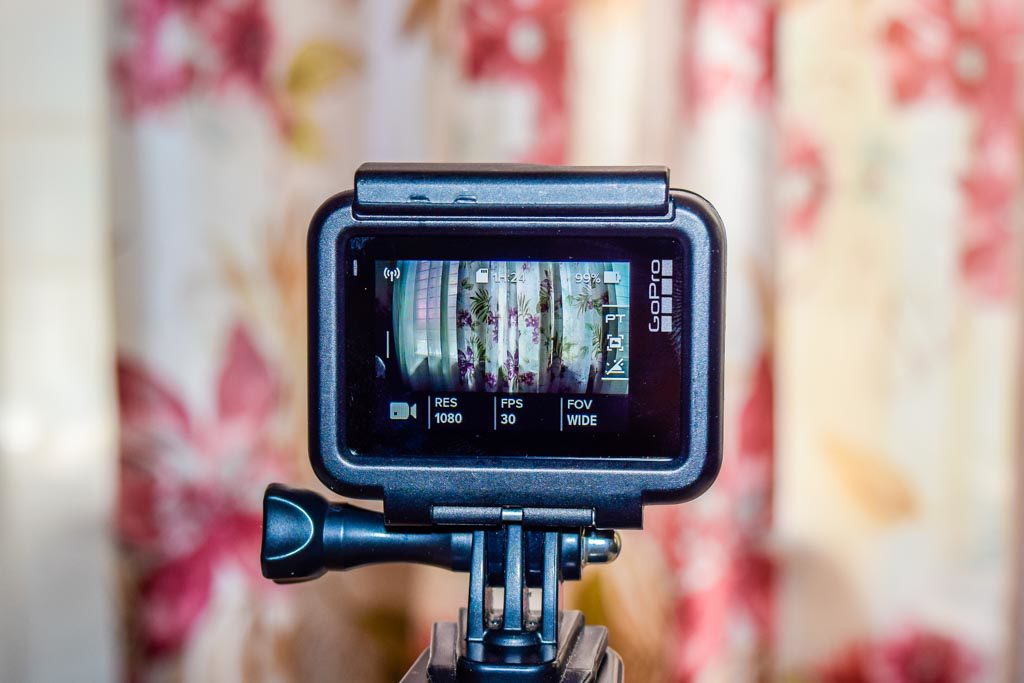
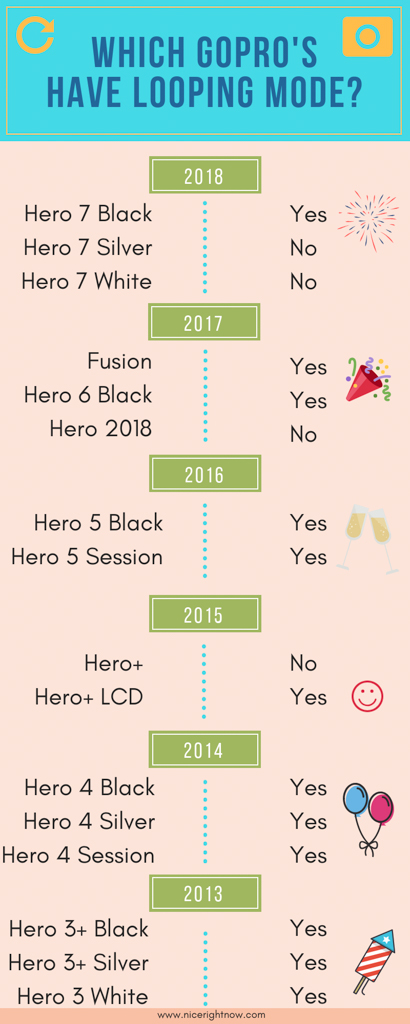
In GoPro video looping, the interval refers to how long you want to record your video until it goes back to the start and over-writes your previous footage. On GoPro Hero7 Black looping the default looping settings are 1080P 60fps at 5 minutes interval. Sadly, looping is not available in 4K, 2.7K, 4:3 and 480p.
This GoPro is in Looping Mode
When to Use GoPro Looping?
Why would I want to over-write my precious video at the beginning of my SD card, I hear you ask? Here are a few reasons why.
Birthday
You have a big surprise birthday planned for a friend. You want to record the look on their face when they burst through the door and everybody yells “surprise”.
So you set up the GoPro on a tripod, aim it at the front door in GoPro loop recording mode. Now it doesn’t matter if they arrive in 5 minutes or 3 hours time, you will still catch the special moment.
Fishing
You are on dream marlin fishing holiday and want to capture the moment the huge fish launches into the air with your bait in its mouth. So you aim the GoPro at the bait using GoPro Looping mode and keep on fishing. The moment the fish strikes you will have this amazing footage captured.
Children
You are watching your child trying to pull off their first-ever cartwheel stunt. They keep trying over and over again. You know they will land one soon, but it’s taking a while.
No fear, for you have the GoPro trained on your child, in looping mode. You are definitely going to record that special moment when it happens.
Car Racing
You’re at the speedway track, and want to record one of the big pile-ups that sometimes happen. And the events that led up to the pile-up. Just activate GoPro video looping and you are sure to get the lead-up, the crash, and the aftermath.
Snowboarding
You’re trying to pull off a Snowboarding stunt, and want to capture that one time you pulled it off perfectly. You have a GoPro attached to your helmet, and thanks to your looping GoPro you just keep on snowboarding until you land that rad stunt.
So What’s the Catch?
You can’t use ProTune with a looping video GoPro. ProTune is the set of advanced controls which allow you to easily optimize your footage quality. However fear not, you can successfully record without it.
If you have old footage on your SD card it is possible you may over-write it. Therefore Go Pro looping is much safer if your SD card is empty, then there’s no chance of over-writing older footage. Note that you can set GoPro Looping Video to a maximum length of 5, 20, 60 or 120 minutes or MAX. This should save your other footage on your SD card, however, I still recommend using a clean SD card.
Looping is not available in 4K, 2.7K, 4:3 and 480p. Well not on my GoPro Hero7 Black anyway.
Video Stabilization is not available for GoPro Loop recording. No Problem if you’re set up on a tripod. Note that tripods are highly recommended for looping video.
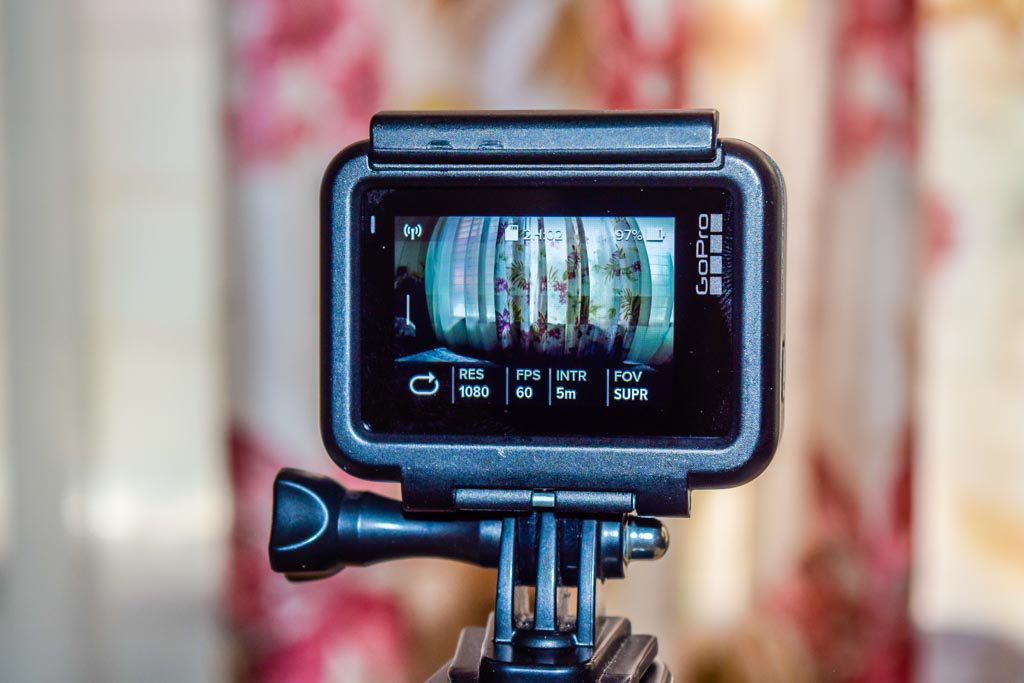
In Video Mode, not Looping
How to Activate GoPro Video Looping
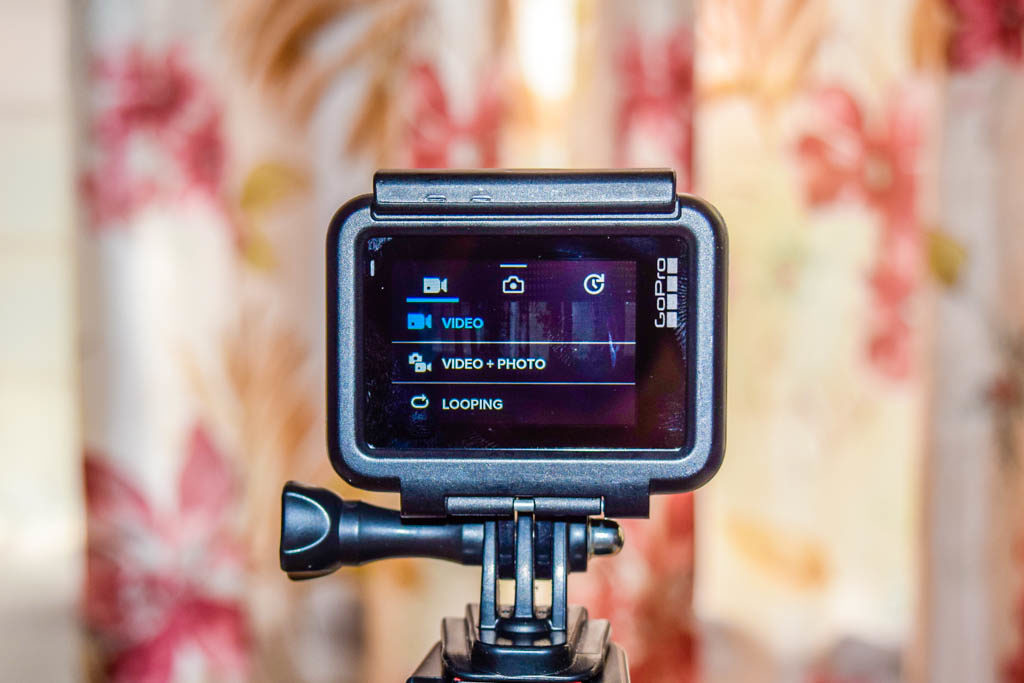
Your GoPro’s Video Mode contains 3 capture modes:
Video
Video + Photo
Looping
3 Different Modes
To Activate Looping Mode
Ensure your GoPro is in Video recording mode.
Press the video camera icon, in the lower-left part of the screen.
Press the Looping option.
The Video icon in the lower-left part of the screen is now replaced with a looping icon.
Looping Mode Icon in Lower Left of Screen
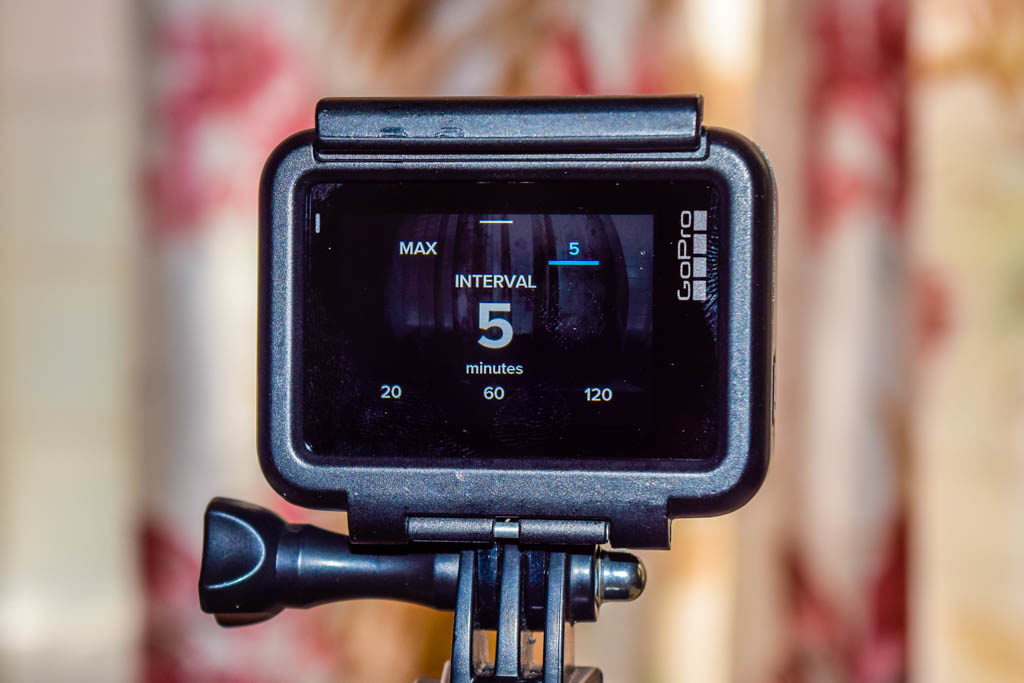
To Change the Interval
Ensure your GoPro is in Looping mode.
Press the INTR field on the bottom of the screen. The default is 5 minutes.
Select the desired interval, 5, 20, 60, 120 minute or MAX. when Max is selected, the recording will continue until the memory card is full, then start over-writing
Changing the Interval
GoPro Tool Bag
So there is one more trick to add to your ever-increasing GoPro tool bag. GoPro’s are incredibly versatile little action cameras, and the GoPro looping mode gives you one more dimension that you don’t find on other cameras. I hope you do enjoy your GoPro looping and capture that special surprise moment.
Happy Looping
Would you like a free copy of our Ultimate Bucket List?
Not sure where to travel to next? We have created the Ultimate Bucket List to help you plan your next trip. 1170 awesome travel destinations in 167 countries. And we want you to have it for FREE.
I remember the day I excitedly unboxed my first GoPro, only to realise I had no idea how to work a GoPro. I really need some GoPro help, and fast! And that’s why we’ve compiled this GoPro Tips For Beginners cheat sheet.
GoPro User Manual
Why didn’t you just read the GoPro user manual, I hear you ask. The GoPro camera may look like a simple little action camera, but it is jam-packed with features and technology. The manual is a super in-depth GoPro guide, with every little detail covered.
The GoPro User Manual is well over 100 pages long, and it takes quite a lot of reading to get through. Bring on the GoPro Tips for Beginners Cheat Sheet!
How to Use a GoPro
This camera cheat sheet will not show you how to use a GoPro camera. We’ll get to that later, in upcoming blogs.
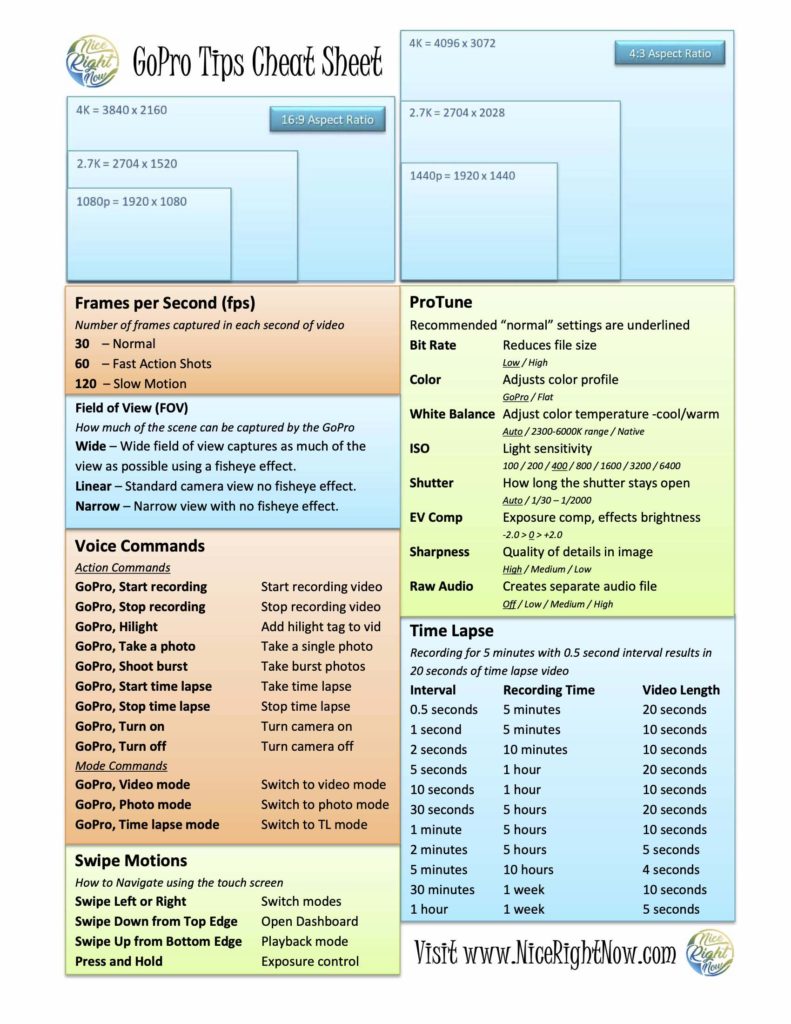
You will find some basic GoPro instructions on this GoPro for Beginners Cheat Sheet. Here are the topics we cover in this GoPro for Beginners Cheat Sheet.
Frames Per Second – Number of frames captured in each second of video for normal, action or slow-motion video
Field of View – How much of the scene can be captured by the GoPro – wide, linear or narrow.
Voice Commands – There 12 standard voice commands to control your GoPro.
Swipe Motions – 4 swipe motions used to control the touch screen.
ProTune – Recommended settings for 8 of the Protune features.
Time Lapse – A table of interval, recording time and video length.
Download Printable GoPro Cheat Sheet
If you would like to download a printable GoPro for Beginners Cheat Sheet in PDF format, click on the below link.
You are guaranteed to be blown away by Fantasmic Disneyland, perhaps the most amazing light and sound spectacular that you will ever witness. But did you realise you have 13 different options to see Fantasmic!
Note: This post may contain affiliate links. Please read our disclosure policy for more information.
What is Fantasmic Disneyland?
Fantasmic is one of the most amazing outdoor stages and fireworks show ever staged. It is based on Mickey Mouse’s hit movie Fantasia, where Mickey plays the lead role as the Sorcerer’s Apprentice. Fantasmic is a journey through the imagination of Mickey Mouse which ends up in a giant battle with Disney Villains.
It is essentially a classic tale of good versus evil, with flashy special effects thrown in for good measure. There’s even a massive fire breathing dragon!
The show is a spectacular world of colour including fireworks, laser shows, pyrotechnics, animatronics, mist screens, boat floats, water effects and a host of other amazing special effects.
All shows have a large cast of Disney characters, actors and amazing costumes, in a highly choreographed sight and sound spectacular.
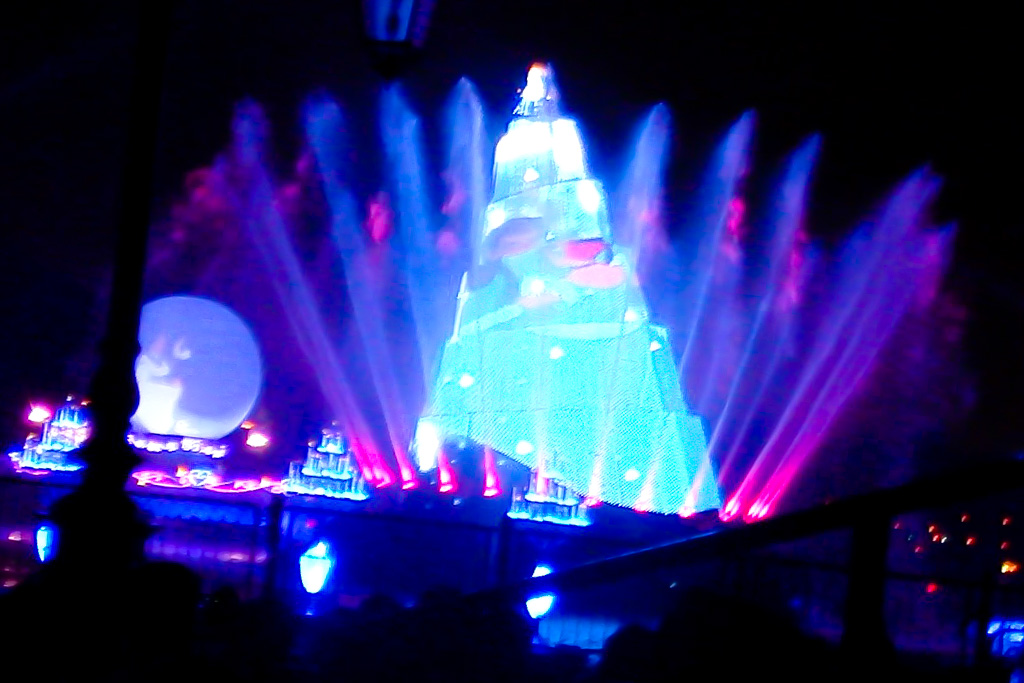
Water show in Tokyo
Where To See Fantasmic!
California Disneyland Resort (since 1992)
Florida Walt Disney World Resort (since 1998)
Tokyo Disney Sea (since 2011)
And here’s a run-down on each of the 3 locations.
California Fantasmic!
Location: Disneyland Park, California. On the Rivers of America waterway, and on a stage across the water on Tom Sawyer Island.
Duration: 27 minutes
Trivia: In January 2016 the California Fantastic closed down for one and a half year. It was worth the wait for the return of Fantastic in July 2017 it had additional scenes added to the show. These were based on Lion King, Aladdin, Tangled and Pirates of the Caribbean.
Dinner and Show:
There are some great dinner and show options available. You will be treated to a 3-course meal by purchasing a Blue Bayou Dining Package or River Belle Terrace Dining Package. You will also get great seating with a FASTPASS included in your ticket. These packages are great options if you want to be assured of a great show.
You can even get a takeaway meal package called the On-The-Go Package at the Hungry Bear Restaurant.
Fastpasses: FASTPASS’s are available and are definitely the way to go if you are not getting a Dining Package. And don’t worry, your Fantasmic FASTPASS won’t interfere with your FASTPASS for rides.
Here are your instructions for getting a FASTPASS:
Get your Fantasmic FASTPASS as soon as you arrive at the park. They are given out first come first served.
Go to the FASTPASS kiosk near Big Thunder Trail, where the Mark Twain riverboat docks.
Pick your Fantastic FASTPASS.
Keep your FASTPASS ticket, then enter the viewing area at least 45 minutes prior to the show.
Watch the Show: Watch the full show by viewing the below YouTube clip.
Find out everything you need to know about California Disney Fantasmic on the Disney website.
Florida Fantasmic!
Location: Disney’s Hollywood Studios, Walt Disney World, Orlando, Florida. Hollywood Hills Amphitheatre located off Sunset Boulevard behind the “Tower of Terror”.
Duration: 26 minutes
Trivia: The Hollywood Hills Amphitheatre is built specifically for the Fantastic spectacular. The stage is much larger than in California, and the amphitheatre can seat 6,900 spectators as well as 3,000 standing room places.
Dinner and Show:
Similar to California, there are some great dinner and show options available. You will be treated to a magnificent meal by purchasing a Hollywood Brown Derby Dining Package, Hollywood & Vine Dining Package, or Mama Melrose’s Ristorante Italiano Dining Package.
You will also get great seating with a VIP seating pass included in your ticket. You get more options for your dining experience in Florida than you do in California. Check out the current prices details here on the Disney Dining Packages website.
— TheHappiestBlog.com (@TheHappiestBlog) July 18, 2017
Fastpasses: FASTPASS+ is available if you are not getting a Dining Package. The FASTPASS+ seating is not quite as good as VIP seating allocated with the Dining Packages, but by all reports, it is still very good.
The FASTPASS+ system in Florida is rather complicated, the good news is that you can book 30 days ahead for your first 3 FASTPASS+ attractions. The easiest way is to download the My Disney Experience app, which can also be used on the day.
Alternatively, head to one of the FASTPLUS+ kiosks inside the park to secure your FASTPLUS+ for Fantastic! in person, but the app is a much more convenient option.
Get the App: To download My Disney Experience App:
Watch the Show: Watch the full show by viewing the below YouTube clip.
Find out all you need to know about Florida Fantasmic on the Disney website.
Tokyo Fantasmic!
Location: Tokyo DisneySea, Mediterranean Harbour.
Duration: 20 minutes
Format: Tokyo DisneySea Fantasmic has a 100% pre-recorded soundtrack. The entire show is on floating boats and barges, instead of a fixed stage like the other 2 American venues.
Trivia: The grand opening 2011 was delayed by 6 weeks due to the devastating Japan earthquake and tsunami hit of 2011.
Dinner and Show:
This option is not available at Tokyo Disney Sea.
Fastpasses: Not required for Tokyo Disney Sea Fantastic. Instead you just find a suitable viewing location somewhere around the Mediterranean Harbour.
Watch the Show: Watch the full show by viewing the below YouTube clip.
Find out all you need to know about Tokyo Disney Sea Fantasmic on the Disney website.
9 Recommendations For Tokyo Fantasmic!
We were fortunate enough to see Fantastic at Tokyo Disney Sea. And what an experience! We rate Tokyo Disney Sea as our favourite Theme Park in the world, and the Fantastic show may well have been our highlight at Tokyo Disney Sea.
Although it was quite uncomfortable for us due to our lack of preparation. Here are some tips which may help to make it more comfortable for you.
Water show in Tokyo
You will need to go to the show at least 45 minutes before it starts to get a good viewing position. Come to think of it, 60 minutes is even better. The only option we had was to sit directly on the concrete paving. There is no standing or crouching allowed, and staff will soon tell you to sit down on the ground if you attempt to crouch or stand.
You should bring a groundsheet. Sitting on a busy Disney concrete footpath is probably not the most hygienic place to sit. The second benefit of a groundsheet is to define the boundaries of your piece of ground, thus stopping the crowds from taking over your spot.
Have some kind of cushion to sit on. Ideally, bring an inflatable cushion into the park. If you don’t bring your own then purchase some kind of a pillow in one of the Disney merchandise shops.
Bring something interesting to pass the time while you wait for the show. Sitting for 45 minutes can be very boring for kids and spoil the experience, better if they have a book or a game to keep them occupied.
Make sure that everyone has a toilet break before the show, it will be at least 90 minutes until the next opportunity.
Bring snacks and a drink. There is unlikely to be an opportunity to purchase snacks once you are seated.
If there is any chance of rain, bring a poncho. Umbrellas will not be allowed as they upset the view for those behind, you will be asked to pull down your umbrella by the ground staff. Note that the show may be cancelled if there is rain, and this may not be revealed until just before the show starts!
Bring some kind of selfie stick or extension pole for capturing your photos or video. You will not be permitted to stand up or crouch to record your memories.
Stick around for the fireworks show! It will most likely be soon after Fantasmic
Here are some Tokyo Fantasmic survival pack suggestions…
13 Unique Options to see Fantasmic!
Here are the options available to see Fantasmic at either of these 3 fantastic Disney parks:
Disneyland Park California – Just turn up for the standby area
Disneyland Park California – FASTPASS
Disneyland Park California – Blue Bayou Dining Package
Disneyland Park California – River Belle Terrace Dining Package
Disneyland Park California – On-The-Go Package at Hungry Bear Restaurant
Florida Walt Disney World – Just turn up
Florida Walt Disney World – FASTPASS+ pre-booking
Florida Walt Disney World – FASTPASS+ on the day – kiosk or app
Florida Walt Disney World – Hollywood Brown Derby Dining Package
Florida Walt Disney World – Hollywood & Vine Dining Package
Florida Walt Disney World – Mama Melrose’s Ristorante Italiano Dining Package
Florida Walt Disney World – Dessert & VIP Viewing Experience
Tokyo Disney Sea – Just turn up
Plan Ahead
As with all Disney theme park visits, it pays to do a little planning ahead. If you plan to see Fantasmic, at least have your strategy worked out. Are you going Dining Package, Fastpass, or simply turning up?
Purchase your tickets in advance if possible, you can pre-purchase you Dinner and Show Package, or in some cases book your FASTPASS ahead. Bring the right gear to make your night comfortable. Do not miss Fantasmic, it may be the most amazing light and sound spectacular you ever see.
Here are some value Disney ticketing options from the ever-awesome tour provider GetYourGuide.com
Would you like a free copy of our Ultimate Bucket List?
Not sure where to travel to next? We have created the Ultimate Bucket List to help you plan your next trip. 1170 awesome travel destinations in 167 countries. And we want you to have it for FREE.
How would you like to take a train ride on an authentic steam-powered locomotive in one of the most popular theme parks in the world? On a Disneyland Railroad way, you can hear the real sounds of an authentic steam train including the whistle. You can also save your feet as you preview many of the Disneyland attractions without having to walk for miles.
Note: This post may contain affiliate links. Please read our disclosure policy for more information.
Which Parks Have a Disneyland Railroad?
There are just 5 Disneyland Railroads in the entire world. Here they are, ranked from longest (at the top) to shortest (at the bottom).
Florida Walt Disney World has the Walt Disney World Railroad (WDWRR) – 3-foot narrow-gauge railway, 1.5 miles (2.4 km) long.
Paris Disneyland Park has the Disney Railroad (DRR) – 3-foot narrow-gauge railway, 1.35 miles (2.2 km) long.
California Disneyland Resort has the Disneyland Railroad (DRR) – 3-foot narrow-gauge railway, 1.2 miles (1.9 km) long.
Tokyo Disneyland has the Western River Railroad (WRR) – 2 foot 6-inch narrow gauge railway, 1.0 miles (1.6 km) long.
Hong Kong Disneyland has the Hong Kong Disneyland Railroad (HKDLRR)– 3-foot narrow-gauge railway, 0.95 miles (1.5 km) long.
So which Disneyland Railroad is the best in the world? Read on for some key facts and comparisons. If you have the time then take a ride on all 5 trains, by clicking on the YouTube links. I’ll give you my opinion at the end.
A beautiful locomotive at Tokyo Disneyland
Disneyland California Resort
Then oldest and finest of all Disney Railroads, this Railroad follows the “Grand Circle Tour” at Anaheim, California. The first thing visitors see when they enter Disneyland California is the Main Street Station, which is a great starting point to see the rest of Disneyland Park. Visitors can board the train and stay on for as long as they want.
This Disney Railroad has undergone 2 recent closures – 3 months in 2004/2005 for refurbishment, then 18 months in 2016/2017 to make way for the new Star Wars Galaxy Edge attraction.
Did You Say Diesel?
You might be surprised to learn that all the California locomotives burn diesel fuel instead of the usual steam locomotive fuel of coal, wood or bunker oil. They are still steam-powered locomotives, however, they produce far less pollution than traditional steam trains. Good on you for thinking Green, Disneyland!
These California Disney Railroad trains make over 13,000 trips per year. Since they started they have covered enough ground to circle the globe more than 150 times.
This Disney Railroad transports a whopping 6.6 million passengers per year, that makes it one of the most popular steam trains on earth. Well, this is the second most popular theme park on earth with around 18 million visitors annually.
Key Facts
Ride duration: 18 minutes
Stations: 4 – Main Street, Frontierland, Mickey’s Toontown, Tomorrowland
Opening Date: July 17, 1955
Number of Trains: 5 trains with varying numbers of passenger cars
Number of Locomotives: 5 – CK Holliday, EP Ripley, Fred Gurley, Ernest S Marsh, Ward Kimball
Attractions you will see on the journey: Main Street Station, Adventureland, Splash Mountain Log Flume, Critter Country, Rivers of America, Frontierland, Mickey’s Toontown Depot, Dark Ride, Tomorrowland Station, Grand Canyon Diorama, Primeval World Diorama, Main Street Station.
Walt Disney Resort World Florida
Florida has the most classic locomotives of all the Disney Railroads, with all 4 trains being built between 1916 and 1928. So if you want to unlock the most authentic steam train experience, Florida is your key.
But you won’t be alone, this busy Disney Railroad transports more than 3.7 million passengers per year! Note that the Magic Kingdom at Walt Disney Resort World is the number 1 theme park in the world, with over 20 million visitors annually.
The trains were purchased from a narrow-gauge railroad in Mexico and were then heavily modified to resemble steam-powered locomotives from the 1880s. With a whole new look, they started work at the Magic Kingdom theme park at Walt Disney World in Florida.
Locomotive #1, Walter E Disney, was named after Walt Disney himself, the man behind Mickey Mouse. This locomotive was sent away for a make-over in 2016 and should return to service in 2019.
Key Facts
Ride duration: 20 minutes
Stations: 3 – Main Street, Fantasyland, Frontierland
Opening Date: October 1, 1978
Number of Trains: 4 trains of 5 passenger cars each
Number of Locomotives: 4 – Walter E Disney, Lilly Belle, Roger E Broggie, Roy O Disney
Attractions you will see on the journey: Main Street Station, Adventureland, Splash Mountain Log Flume, Frontierland Station, Big Thunder Mountain Railroad, Rivers of America, Animatronics and Native Americans, Fantasyland Station, Tomorrowland, Space Mountain Roller Coaster, Main Street Station
Paris Disney Railroad
This railroad is similar to other Disney Railroads, in that the Main Street USA Station is the prominent attraction when you enter the park. It may be the first attraction you experience when you enter Paris Disneyland Park and is the best way to see the park before you start walking around.
Key Facts
Ride duration: 20 minutes
Stations: 4 – Main Street, Frontierland, Fantasyland, Discoveryland
Opening Date: April 12, 1992
Number of Trains: 4 trains of 6 passenger cars each
Number of Locomotives: 4 – George Washington, CK Holliday, WF Cody, Eureka
Attractions you will see on the Journey: Main Street Station, Grand Canyon, Rivers of the Far West, Frontierland Depot, Adventureland, Temple of Peril, Pirates of the Caribbean, Fantasyland, Peter Pan’s Flight, Alice’s Curious Labyrinth, It’s a Small World, Star Tours, Captain EO, Main Street Station.
Tokyo Disneyland Western River Railroad
TDWRR does not circle the entire theme park like the USA versions of Disney Railroads. Instead, it passes mainly through Westernland, with smaller sections passing through Adventureland and Critter Country. As such this railroad has a real Wild West America feel about the journey.
Also, there is only 1 stop on this railroad, due to peculiar Japanese regulations at the time of construction where they would have had to charge fares to passengers on non-fully enclosed cars.
This means that you cannot use the Tokyo Disneyland Western River Railroad as transportation to travel through the park. It’s strictly a scenic railroad.
Key Facts
Ride duration: 15 minutes
Stations: 1 – Adventureland
Opening Date: April 15, 1983
Number of Trains: 4 trains of 3 passenger cars each
Number of Locomotives: 4 – Colorado, Missouri, Rio Grande, Mississippi
Attractions you will see on the journey: Adventureland Station, Western Themed Train Station, Forest with Native Americans, Critter Country, Big Thunder Mountain Railroad, Westernland, Primeval World, Adventureland Station
Hong Kong Disneyland Railroad
HKDLRR is the only Disney Railroad with non-steam powered locomotives. Thanks to the strict emissions standards at Hong Kong (and cost-cutting) diesel locomotives were used instead of steam engines.
The Diesel engines power electric generators, which power electric traction motors, which power the trains. They have hidden speakers to make them sound like a real steam train with all the huffing, puffing, shunting and whistling.
This railroad is similar to California, in that the Main Street Station is the first thing you see when you enter the park. It may be the first attraction you experience when you enter Hong Kong Disneyland and is a great way to see the park before you start walking around.
Key Facts
Ride duration: 15 minutes
Stations: 3 – Main Street, Fantasyland, Tomorrowland
Opening Date: September 12, 2005
Number of Trains: 2 trains of 5 passenger cars each
Number of Locomotives: 3 – Walter E Disney, Roy O Disney, Frank G Wells (spare)
Attractions you will see on the journey: Main Street Station, Adventureland, Jungle River Cruise, Fantasyland, Fantasyland Station, Fantasy Gardens, Mad Hatter Tea Cups, It’s a Small World, The Golden Mickeys, Tomorrowland, Space Mountain, Autopia, Buzz Lightyear Astro Blasters, Little Green Men, Main Street Station.
Which Disneyland Railroad is the Best in the World?
Florida Walt Disney World is my pick for the best Disney Railroad. Not only is it the longest of all Disney Railroads, but it also has the most historic locomotives and passenger cars.
California Disneyland Resort is my pick for the second-best Disney Railroad. Whilst not quite as long as the Florida WDWRR, California does rank highly for historical value. After all, it is the original Railroad and over 60 years old. Also, it includes the “Grand Circle Tour”, and it’s also had a couple of decent make-overs to keep the railroad up to date.
Paris Disneyland Park is another long track and is similar in overall concept and layout to California. That is to say it encircles the entire park, following the “Grand Circle Tour” just like California.
Tokyo Disneyland Railroad is considerably shorter and has the disadvantage of having just a single station. Thus it is purely scenic and not to be used for transportation. I’ve been on this railroad and I’m amazed that it still feels brand new, even though it opened in 1983.
Hong Kong Disneyland is my bottom choice. Sorry Hong Kong but you need to have real steam engines to qualify for a great Disney Railway. That is to say, Hong Kong only has electric trains. I’ve been on this train and it’s very awesome, but the authentic feel of a real steam train is sadly missing.
The first things visitors see entering Hong Kong Disneyland is Main Street Station
Even the worst of the 5 amazing Disney Railroads is an amazing experience that will definitely impress you. These are memories that your family will cherish for the rest of their lives. If you ever have the opportunity to ride on an authentic Disney Railroad, you absolutely must go for this wonderful experience.
Ever thought about getting a Disney Annual Pass? We have a blog comparing all Disney Annual Passes HERE.
Would you like a free copy of our Ultimate Bucket List?
Not sure where to travel to next? We have created the Ultimate Bucket List to help you plan your next trip. 1170 awesome travel destinations in 167 countries. And we want you to have it for FREE.
I’ve been using a GoPro for Vlogging for quite a while now, with mixed results. Initially, I disliked GoPro’s immensely, then after learning a few tricks and adding some inexpensive gear, I grew to love my GoPro. Here are a few simple techniques for using a GoPro as a Vlogging camera, and it really works!
Note: This post may contain affiliate links. Please read our disclosure policy for more information.
Different Styles of Vlogging
There are loads of different styles of Vlogs out there in YouTube land, and they can be simplified into 4 main groups. Which group do you fit into?
Talking Head – In this style of Vlog, the camera is pointing at the subject’s head, talking about a topic or a story.
Instructional – “How to Do” type Vlog involving some kind of demonstration regarding the best way to achieve some end result.
Documentary – Just look towards Travel Vlogs for a great example. These document a place or event.
Reality – A Vlog recorded in the real world, showing events as they are happening. It something as interesting as your life!
Here’s one of my favourite GoPro documentaries.
The below method is great for Talking Head or Instructional type videos, and can easily be adapted to Documentary or Reality Vlogs. I recommend adding a GoPro Gimbal to the setup if you’re doing Documentary or Reality Vlogs, liked the Feiyu G6 Hand-Held Gimbal. It’s simple, cheap, robust and best of all splash-proof.
Alternatively, just get yourself a GoPro Hero7 Black. Known as the gimbal killer, this bad boy has such advanced image stabilisation that you will not require a gimbal. It is the finest compact YouTubers Vlogging camera that money can buy, provided that you add some basic Vlogging accessories. There’s no need to get too fancy here.
Benefits of Using a GoPro for Vlogging
So why on earth would anybody want to use a GoPro as a Vlogging Camera, I hear you ask? Yes, there are better cameras on the market, but there is definitely a place for GoPro’s in the Vlogosphere.
All of those better, more expensive cameras will still require extra Vlogging camera accessories to make them suitable. There is no ‘one-stop-shop’ when it comes to Vlogging, mainly due to audio issues. However, the GoPro can give you results comparable to some high-level cameras at a fraction of the cost.
Extra equipment required is minimal, making GoPro’s suitable for a beginner Vlogging camera. Overall the GoPro is more than adequate for anybody except pro-level Vloggers.
And of course, you can take your GoPro surfing, kayaking, paragliding, or whatever other adventure you want to tackle. It doubles as a rugged waterproof Vlogging Camera. Here are some more reasons why you should consider using a GoPro for Vlogging:
Small Camera Size
The GoPro is so small it fits right there in your pocket, alongside your phone. But if you are a serious GoPro’er, you will want a dedicated bag or case for your gear.
Don’t worry, it only needs to be a small bag or case, since you don’t need much equipment at all. Just big enough for a tripod, microphone and a couple of batteries should do the trick.
Time Lapse and Slo-Mo
Although time-lapse and slow-motion are not standard Talking Head Vlogging techniques, it’s nice to know they’re available if required. It pays to be versatile.
GoPro App
The GoPro App is awesome, it provides full control of your GoPro right from an iPhone. Essentially it’s a fancy remote control, and the smoothest camera app I’ve ever encountered.
Built-in Wi-Fi
Not only does wi-fi allow syncing with the GoPro app for remote control, but it also enables downloading of photos and videos over wi-fi to a mobile device. Pure wireless magic.
Voice Control
Yes, you can control your GoPro Hero5 Black (and all new models) using voice control. Personally, I struggle to get the GoPro to understand my voice reliably for smooth voice control. But then again, Siri doesn’t understand me either. I’m pretty sure GoPro Voice Control works fine for most people.
ProTune
ProTune is a no-nonsense method of controlling the GoPro vital settings. It even has some “magic” settings that just make everything more awesome, automatically.
Menus and User Interface
GoPro’s have come a long way, and now the menu structures and user interface are nothing short of pure genius. No longer do you have to read a user manual; the GoPro built-in menu is so intuitive you can quickly find what you want.
Ok, maybe you do need a little help from time to time. Relax – there are thousands of short instructional videos on YouTube to explain any GoPro question you can think of.
WaterProof
It’s nice to know that a passing shower will not trash your camera. And it’s nicer to know you can take it swimming at the beach. Nicer still that you can take it SCUBA diving to some crazy depths. Read here to learn how waterproof different GoPro models are.
4K Video
This is known as “future-proofing” your video because one day most video will be 4K resolution and above. It’s probably closer than you think, and it’s great to know that your GoPro is a 4K Vlogging camera.
Affordable Vlogging Camera
Compared to some of the fancier compact cameras that pro-level Vloggers use, the GoPro is a very affordable Vlogging camera. Even the flagship GoPro Hero7 Black retails for $340, and you can drop a couple of levels to the GoPro Hero7 White for just $169. This makes GoPro hands down the best budget vlogging camera on the market.
Equipment Required
To successfully set up a GoPro Vlogging Camera you will definitely need to add some extra Vlogging accessories. Thankfully the shopping list is fairly small, and won’t break the bank. Scroll to the end of the post for a complete shopping list for a couple of different options.
Editing Software – I recommend Final Cut Pro X if your budget will allow it, however, any good video editing software will suffice.
Optional Equipment
Case – A small protective case to keep your GoPro, and a larger case to keep all your other gear together.
Spare Batteries – As a minimum have 1 spare battery, making sure it’s always charged as a spare. It doesn’t hurt to have 2 more if you’re “out in the field” for longer periods.
Battery Charger – A dual battery charger is great for a fast charge of both your GoPro batteries.
Gimbal – If you are doing any mobile vlogging such as travel vlogging, a handheld gimbal is a necessity. That is unless you own a GoPro Hero7 Black, which has the latest image stabilization and does not require a gimbal.
Editing Software – LumaFusion is a great option for the iPad, and won’t break the bank.
Recommended Method
Have you ever heard the saying “there’s more than one way to skin a cat”? There is definitely more than one way to use a GoPro as a Vlogging Camera. This is the way I do my GoPro Vlogging. It is a simple, economical and reliable method, and it can work for anyone.
Insert GoPro into The Frame
Putting your GoPro into the external case (called The Frame on the GoPro Hero5 Black) makes it mountable. This means that you can now mount your GoPro onto any of the staggering numbers of GoPro attachment devices. Luckily The Frame comes free with the GoPro.
Mount GoPro onto Tripod
You will want your GoPro mounted firmly on a tripod for the best results. Now that the GoPro is mountable it’s possible to easily mount it onto to the tripod. And the best tripod for GoPros is the Joby GorrillaPod.
Actually, the Joby Gorillapod is the best small tripod for virtually every camera. I suggest you don’t settle for a cheap copy here. Go for the original Joby Gorillapod, they are extremely rugged and reign supreme in the tripod market.
As a bonus, you can also use the Gorilla Pod for a handy selfie stick or carrying device for your GoPro. Relax, as well as being 100% waterproof, it’s completely action proof.
Connect iPhone to GoPro via Wi-Fi
It’s useful to pair the GoPro and iPhone using the phone’s wi-fi network. It’s a very straight forward process, just open the GoPro app and click the camera icon, the GoPro app should guide you through the rest.
If there’s some kind of connection issue, the app is smart enough to help you figure out the issue and fix it.
Check Settings on the GoPro iPhone App
I suggest going with 1080P and 30 frames per second, it’s the normal YouTube standard and won’t use up massive amounts of your precious hard drive memory.
ProTune is another setting which you may wish to use. ProTune is intended for people who intend to spend time doing colour correction in video editing software. ProTune will add editing time and SD card space to your videos. However,
I recommend to just leave ProTune turned off. This will give you the enhanced GoPro Color, and leave the other settings in auto mode.
Here’s a full list of settings I recommend for GoPro Vlogging:
VIDEO SETTINGS
Resolution: 1080
Frames Per Second: 30
Field of Vision: Linear
Video Stabilization: On
Auto Audio Mode Group: Auto
Protune: Off
PROTUNE SETTINGS
If you do decide to turn GoPro ProTune, here are the recommended settings.
White Balance: Auto
Color GoPro Color
Shutter: Auto
ISO Limit: 400 (if the lighting is bright)
EV Comp: 0.0
Sharpness: High
Raw Audio Track: Off
Confirm Video Framing
Check that your shot is framed correctly by checking the image on the GoPro app on your smartphone. Make sure your camera is aligned perfectly horizontally, and the distance is correct to the subject.
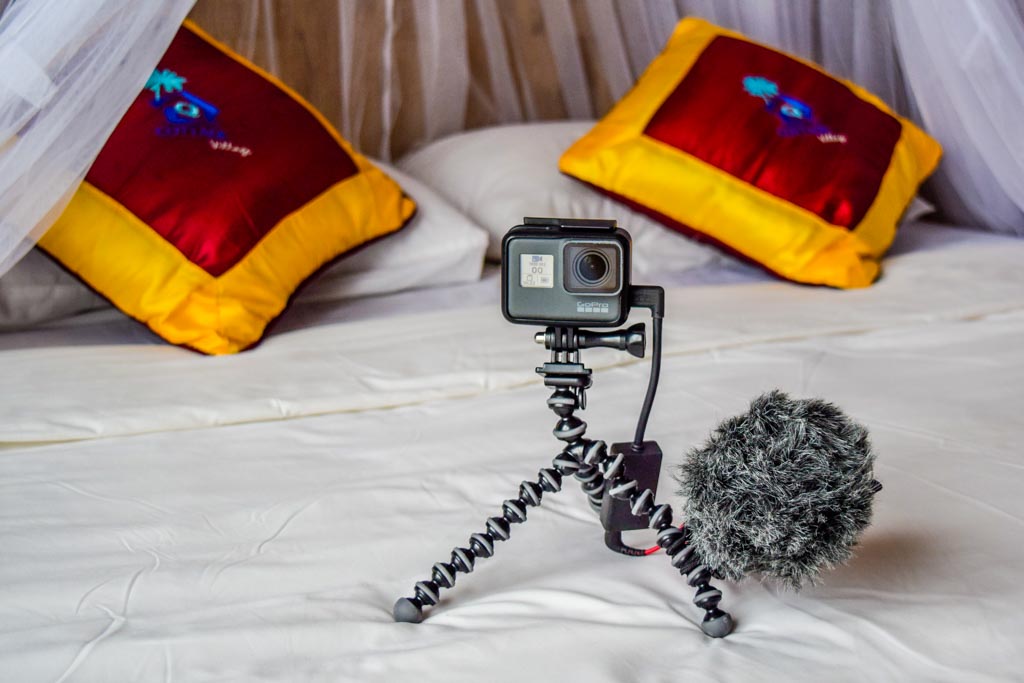
Connect External Microphone to GoPro
Of all Vlogging camera accessories, this is the one that is mandatory. Connecting the microphone is as easy as it sounds. A simple way is to connect the Rode VideoMicro to the Gorilla Pod leg using a simple hair tie. Alternatively, you could attach it to The Frame using double-sided tape.
Note that to connect an external microphone to GoPro you will need to purchase a GoPro Microphone Adaptor. Keep in mind the following:
The GoPro Microphone Adaptor is an expensive little beast. Aftermarket versions are difficult to find for the GoPro Hero7 Black and originals sell for upwards of $50.
Once you remove your little hatch from the GoPro to fit the adaptor, it is no longer waterproof.
GoPro Vlogging setup with an external microphone
Using a Lapel Microphone
Another option is to use a lapel microphone, which can be connected to your smartphone for recording. This can be synchronized later to your video using Final Cut Pro X or some other advanced editing software.
With the Rode SmartLav+, the best result is running the cable up through the inside of your shirt and just poke the microphone head out the top. Being an omnidirectional microphone it doesn’t really matter if your aim is off, it will still pick up your voice clearly.
Start Recording Audio Using Voice Memo iPhone App
Use this method if using a Rode SmartLav+ Lapel Microphone. Voice Memos is a native app on the iPhone, and extremely intuitive. You literally just press record, and that’s it! I love this app.
What is more important is to make sure you have your microphone positioned properly for optimal audio quality. For the Rode SmartLav+, just attach it somewhere near the top of your shirt, point it towards your mouth and you’ll do fine.
It has all the functionality of the brilliant GoPro interface.
All the GoPro functionality is much better laid out on the larger phone screen.
It’s easier to see the video footage more clearly on the larger phone screen.
The GoPro footage can be seen in selfie mode, to ensure the shot is being framed correctly.
The video recording can be started and stopped from the phone.
It has a great setup wizard for connecting to your phone.
It is so smooth and user-friendly, definitely the best camera app I have used.
GoPro Hero5 Black and newer models do have voice activation. By saying “GoPro Start Recording” to your camera, it is supposed to start recording. However, this is hit and miss for me – must be my Australian accent. The trusty GoPro app is 100% reliable, so I’m sticking with that.
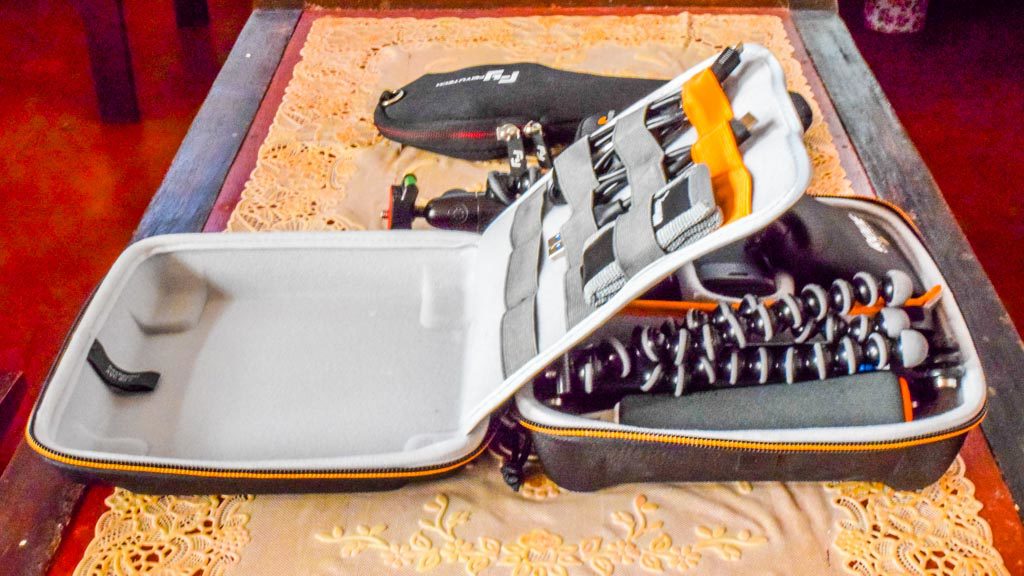
The versatile Lowepro cases
Finish Recording and Pack Up
It’s great to be organized and have a decent camera case or bag to organize your gear in. I favour the Lowepro range of camera cases, they’re rugged and affordable and come in a staggering variety of sizes.
Import Audio to Editing Software (If Using Lapel Microphone)
If using a Rode SmartLav+ microphone through a smartphone you will need to transfer your audio files of the iPhone (or another device) and into the Editing Software such as Final Cut Pro X.
Simply export from the Voice Memos app to my Dropbox or iCloud folders. Then import from the same folder into Final Cut Pro X. There are stacks of other options available in the Voice Memo app… you could even send yourself a text containing the audio file!
First I used Power Director. I love this software, it’s so easy to use. Alas, when I switched from Windows to Mac operating systems the Power Director could not follow me, it’s only made for Windows.
Adobe Premiere Elements
Then I moved to Premiere Elements, which I find quite intuitive and difficult to use. Each to their own but I much prefer Final Cut Pro X, especially if you live in the Apple ecosystem.
Final Cut Pro X
Finally, I moved to Final Cut Pro X, which I am currently using. It’s a breeze to import your footage into Final Cut Pro X, and the sky’s the limit with how far you want to go with editing. It is also quite difficult to use owing to the full professional capabilities of this program, but it’s worth learning.
iMovie
I’ve also spent a lot of time in Apple’s native iMovie software. This is very easy editing software to use and is great for Vloggers just starting out. iMovie will work with just fine for using a GoPro for Vlogging.
LumaFusion
LumaFusion is another great option for editing Vlogs. Actually, LumaFusion for iPad is my go-to app for editing travel Vlogs out on the road, because it is powerful and fast to use, and does not require a laptop.
LumaFusion is available on desktop or iPad and gives close to professional functionality. It is fairly cheap ($20) as far as high-end iPad apps go, and is only about 10% of the cost of Final Cut Pro X.
Video Editing Summary
However, if you want to move up to pro-level then an upgrade to FCPX is highly recommended. The downside (aside from the cost) is that it will double your editing time, but you will have a much better video in the end.
Check out reviews of the best video editing software of 2019 by clicking HERE.
Synchronize Audio and Video Files
Good video editing software is more than capable of syncing your audio files. iMovie is capable of doing some basic manual syncing. Apple’s flagship editing Software Final Cut Pro X is capable of doing fully automated and precise syncing. Other premium software such as Premiere Elements is also capable of automatic syncing.
Personally, I use Final Cut Pro X to sync the files, it’s an easy process once you know-how. It’s very well explained in the below YouTube video.
Some GoPro Mistakes to Avoid
I’ve made a lot of mistakes along the way to learning how to use a GoPro as a vlogging camera. Ask any Vlogger and they will tell you they have some epic failures in the closet. I’m OK with that, it’s a part of learning and improving. So here are some GoPro Vlogging tips.
Don’t use the audio from GoPro Hero5 Black or newer. Ever. The problem is that when the GoPro microphones became waterproof with the release of GoPro Hero5 Black, the audio quality dropped drastically. GoPro Hero4 is still okay in the Audio department when they’re outside of their waterproof casing.
I am still on the fence with GoPro Hero7 Black audio quality, it is much better than the GoPro Hero5 Black. You may find it usable in perfect conditions.
If you do need to use the GoPro audio, be very wary of a selfie stick or any other attached grip device. They will introduce unspeakably loud interference to your audio at the slightest movement.
If you do need to use a grip with your GoPro and still want to use the audio, pan using your wrist, keeping your fingers perfectly still on the grip. Better still, avoid panning altogether. Panning is over-rated.
Avoid using a nude camera, if you plan to use the audio. The slightest movement of your fingers on the GoPro case will introduce horrible noises to your audio.
Avoid walking with your GoPro unless you have a handheld gimbal or GoPro Hero7 Black. It’s the gimbal killer.
Avoid low light conditions. If you must record in low light, ensure you adjust the ISO level in Protune. 1600 is a good setting for low light indoor, however, you will still end up with grainy looking video.
GoPro mounted in Feiyu G5 gimbal
Just Do It
The most sage advice I can give is… Just Do It. You will probably feel like your equipment, knowledge or conditions are not perfect, and feel like putting it off for some time. Yes, this happens to the best Vloggers.
The fact is with Vlogging, the more you do it, the better you get. So procrastinating and studying won’t make you any better at Vlogging. But getting out there and doing it will undoubtedly make you a better Vlogger.
Confidence and skills are improving. Creative juices are flowing. Ideas are bubbling to the surface. Now you are using your GoPro for Vlogging, and it’s looking great.
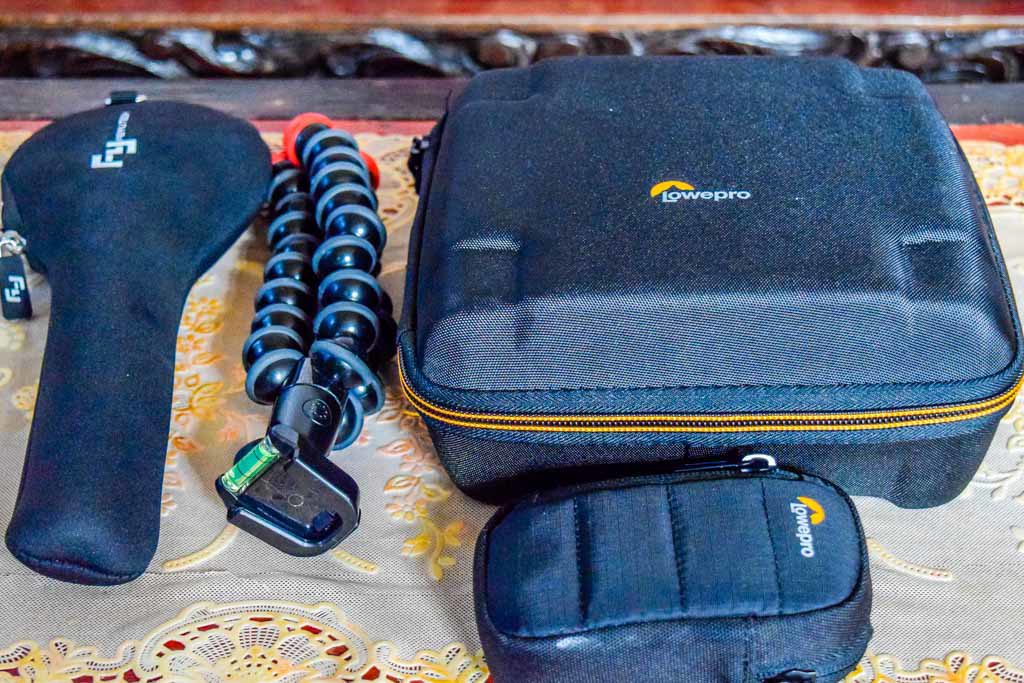
Shopping List – Minimum Requirements
Here’s my essential equipment for using a GoPro as a Vlogging Camera, with Amazon links and 2019 prices.
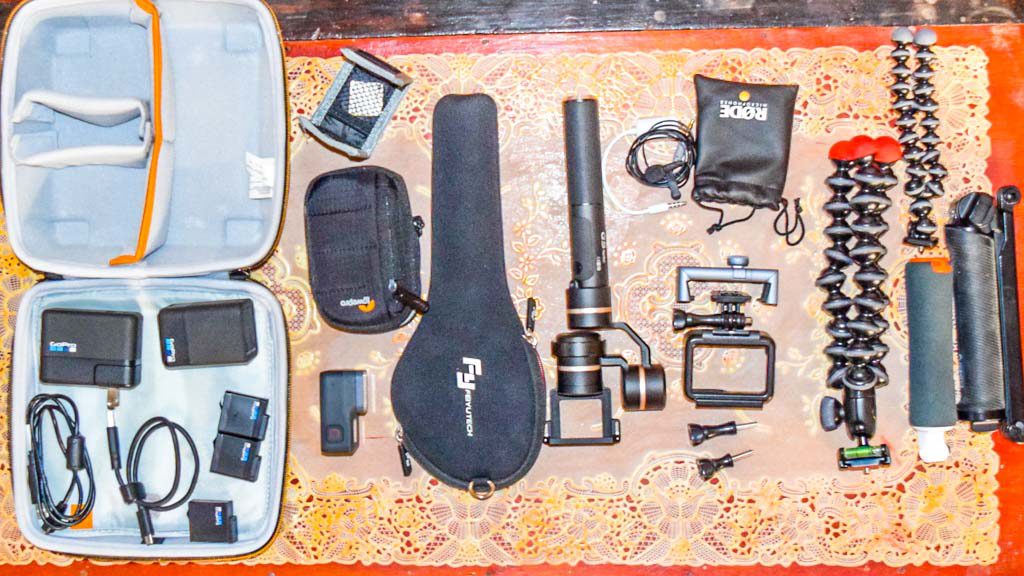
Here are my complete Vlogging and travelling kits with Amazon links and 2019 prices. You will be truly ready for anything with this lot. Note there are a few items listed not mentioned in the above method, but are still useful to keep in the GoPro “ready for anything” kit.
Grand total is $1,293 for everything in my GoPro kit including everything except the kitchen sink. Not bad considering you can easily pay this for a single camera without any Vlogging accessories.
Full Equipment – Ready for Anything
Would you like a free copy of our Ultimate Bucket List?
Not sure where to travel to next? We have created the Ultimate Bucket List to help you plan your next trip. 1170 awesome travel destinations in 167 countries. And we want you to have it for FREE.
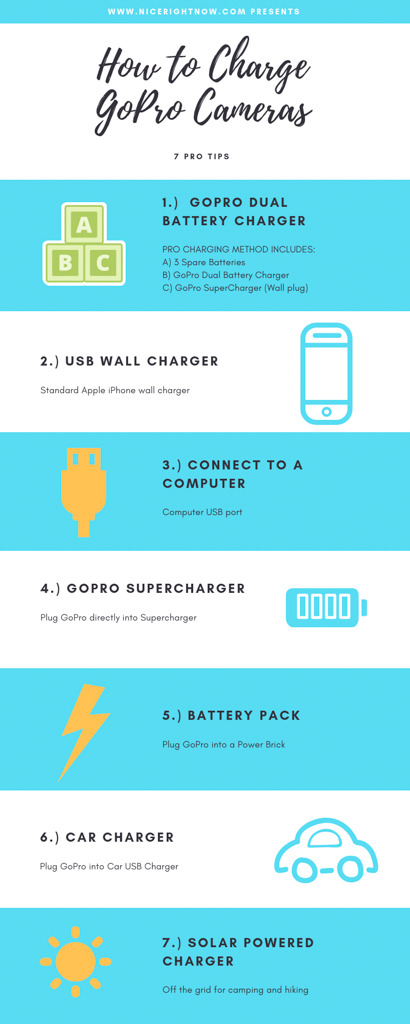
Charging a GoPro is kind of like charging a phone, it’s kind of obvious. Only there are a few more options with GoPro charging. Read on if you want to learn how to charge GoPro Cameras like a Pro.
Method 1: Spare Batteries and GoPro Battery Charger
This is the best pro tip I can give on how to charge GoPro cameras the best way, and it is the method that I recommend. It uses genuine GoPro spare batteries and charging equipment. Sure it costs a little more for extra equipment, but you will be glad you made the investment.
The good news is that spare batteries for the GoPro Hero 5, Hero 6, Hero 7 and Hero 8 are all compatible. So if you purchase spare batteries, then upgrade to a new model GoPro, you can still use those spare batteries. That is great news indeed!
What you will need are:
Spare Batteries – I recommend having a total of 4 batteries.
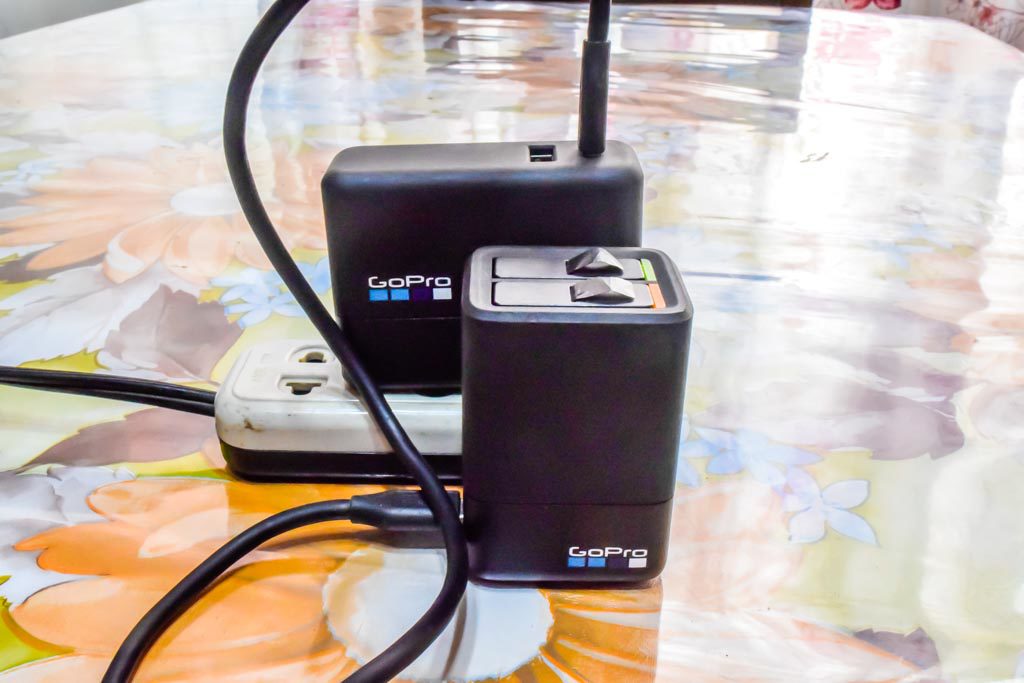
GoPro Dual Battery Charger
GoPro Supercharger (optional)
And here are the reasons I recommend going to the trouble of purchasing this extra gear.
The Supercharger USB-C outlet will charge Go-Pro cameras 20-70% faster than the conventional USB-A charger and comes with a convenient 1.5 foot USB-C to USB-C genuine GoPro charging cable.
4 batteries should give you enough juice for 2 big days of recording, or to fill up 1 x 32GB memory card. You should be able to record about 5GB per battery using 1080 resolution settings. That’s a lot of action footage!
When your battery goes flat, you simply change out the battery with your spare and continue recording.
You can charge quicker by charging 2 batteries simultaneously in the charger. Actually, you could even charge the third battery in your camera at the same time.
If you can’t charge after a day’s shooting, don’t worry… you have enough spare power not to stress about the next day’s shooting.
The Supercharger has 2 USB outlets – USB-A and USB-C. This is super versatile for charging the phone and 2 GoPro batteries at the same time.
Using the Supercharger with the USB-C cable
Of course, I do recommend getting genuine GoPro batteries and charger, this is one area you do not want to skimp on. However, you can probably get away with aftermarket charger cord, as long as they are good quality.
Method 2: USB Wall Charger
Connect the GoPro to a USB wall charger. The normal method by using USB 5 volt/1 amp or 5 volt/2 amp phone charger is ideal. In fact, charging GoPro with iPhone charger is perfectly fine. You can just use the standard Apple iPhone wall charger, or if you want a quicker charge upgrade to the iPad charger.
The advantage here is that you avoid the extra cost of the Pro Method #1.
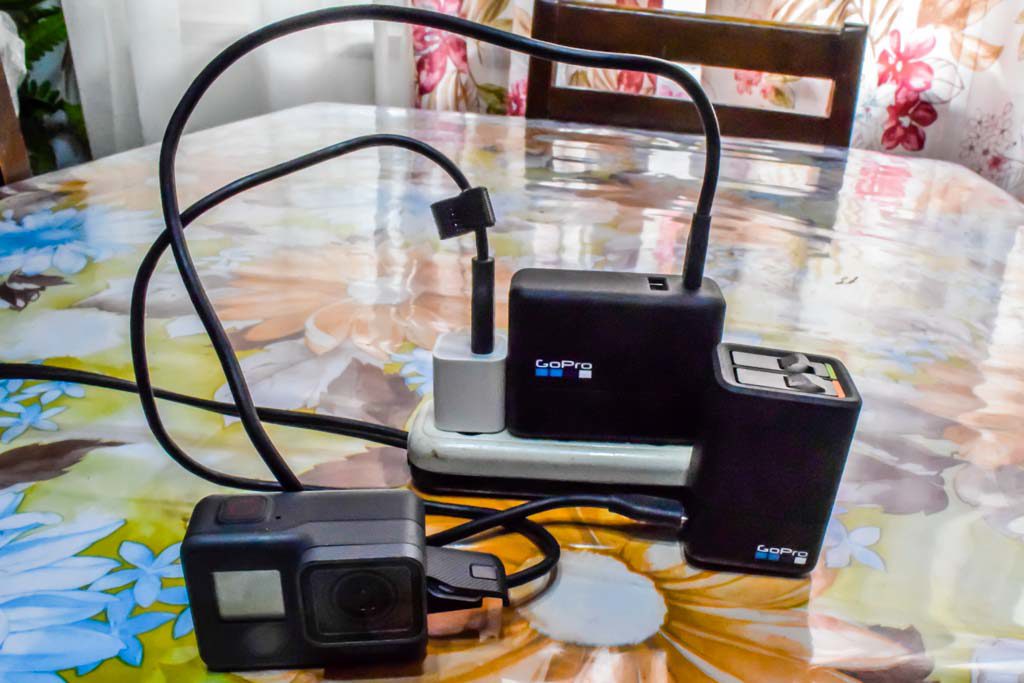
Charging 3 batteries at once
Method 3: Connect to computer
Charging the GoPro is as simple as connecting to the computer’s USB port by using the USB-C cable supplied with the GoPro.
If using a laptop, connect the power to the laptop to ensure it is outputting maximum charge.
Method 4: GoPro Supercharger
Simply plug your GoPro to the Supercharger using the GoPro charger cable, the same as you would plug into a USB wall charger. For this, you should use the genuine GoPro charging cable that came with the Supercharger.
This 27.5-watt charger can charge 20% to 70% faster than a normal USB Wall Charger. This makes for the fastest GoPro charging possible.
Method 5: Battery Pack
Practically every smartphone user seems to have a spare battery pack these days (a.k.a. power bank or power brick). So why not plug your Go-Pro in for a quick charge? The good news is you can charge your phone directly, or charge your batteries separately using the battery charger. No need for GoPro chargers if you have a power brick!
Method 6: Car Charger
This is much the same as charging your smartphone via your car. You have the option of using your car’s USB charger or the cigarette lighter via a USB adaptor.
Method 7: Solar Powered Charger
I can honestly say that I’ve never used this method, however, I’m sure it is a great option for hikers, campers and wildlife enthusiasts. After all, off the grid charging is a necessity for some action photography.
Bonus Method #1: MacBook USB-C Charger
If you own an Apple MacBook or a MacBook Pro with a USB-C charging cable, you are in luck. In 2016 MacBooks started using USB-C for their charging cables. This happens to be the same as the GoPro Dual Battery Charger.
So go right ahead and plug your MacBook charging cable into your GoPro Dual Battery Charger for a whopping 87W of charging power. The GoPro Hero5, 6 or 7 can be also plugged directly into your MacBook USB-C power adaptor using the standard USB-C to USB-C Apple charging cable.
Standard Procedure to Charge GoPro Batteries
You should always follow these steps when charging your GoPro camera directly.
Turn the connections setting off. This will turn off wi-fi, Bluetooth and auto upload.
Unplug any accessories plugged into the GoPro camera.
Turn the GoPro power off.
But if you want to charge like a Pro, read on. All these steps are not necessarily using Pro Method #1.
What Happens While Charging?
The camera status light turns on during charging. When the camera is fully charged the status light will turn off.
When charging one or more of the GoPro’s red LED lights should turn on (flashing) whilst it is charging, to indicate that it is charging.
Note: If you don’t turn the GoPro power off, you will see a charge symbol on the screen instead of a red flashing light.
Red Light indicates charging
Cable Types per GoPro Model:
Naturally, you will use the cable which came with the GoPro. But since losing cables is so easy to do, this guide may help.
There is nothing more frustrating than paying a fortune to arrive at your dream holiday destination, then finding your camera battery is flat. Believe me, I’ve been there done that with my GoPro Hero4 and Hero5 cameras before I invested in the right charging gear. Consequently, I learned the best ways how to charge GoPro cameras so that I never fall into that trap again.
Smart GoPro charging is one of the fundamentals you need to master on your GoPro camera, so you will always have enough power to record your precious memories. If you own a GoPro, how to charge the camera an absolute necessity. So whatever method you choose, just make sure you have a good plan in place and don’t get caught out with a flat GoPro battery.
Would you like a free copy of our Ultimate Bucket List?
Not sure where to travel to next? We have created the Ultimate Bucket List to help you plan your next trip. 1170 awesome travel destinations in 167 countries. And we want you to have it for FREE.
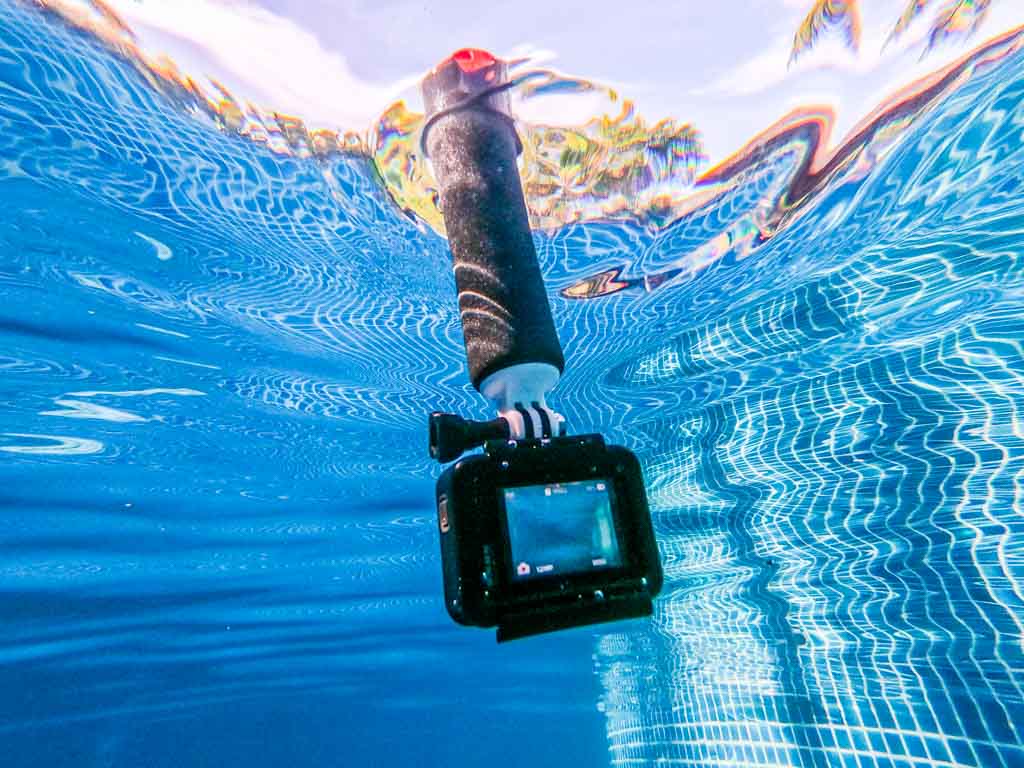
Back in the day, I purchased a Hero4 Silver, thinking I had purchased a fully waterproof camera. Then my poor Hero 4 died a horrible death by drowning. So are GoPros Waterproof? Well… that depends.
Note: This post may contain affiliate links. Please read our disclosure policy for more information.
The Day My Hero 4 Silver Died
Picture a 3 day beach holiday with the family, in an idyllic tropical beach location. Watching the kids playing in sparkling turquoise water, and I decided to record this precious memory up close with my GoPro Hero4 Silver. What a lovely holiday video this would make. So I entered the water with my GoPro, complete with a waterproof casing. It will be fine in the water, right?
Wrong. The GoPro Hero 4 waterproof housing comes with 3 interchangeable rear doors. Non-waterproof, splash-proof and waterproof. I forgot that I had previously removed the waterproof door and fitted the non-waterproof door. I did this to try and get the best audio quality possible, with the least noise-resistant door.
End result: My GoPro Hero4 Silver fitted with waterproof housing had become 100% non-waterproof, thanks to the incorrect rear door being fitted.
Lesson learned: always double-check which rear door you have fitted to your GoPro external housing.
This is where my Hero 4 Silver drowned. RIP GoPro.
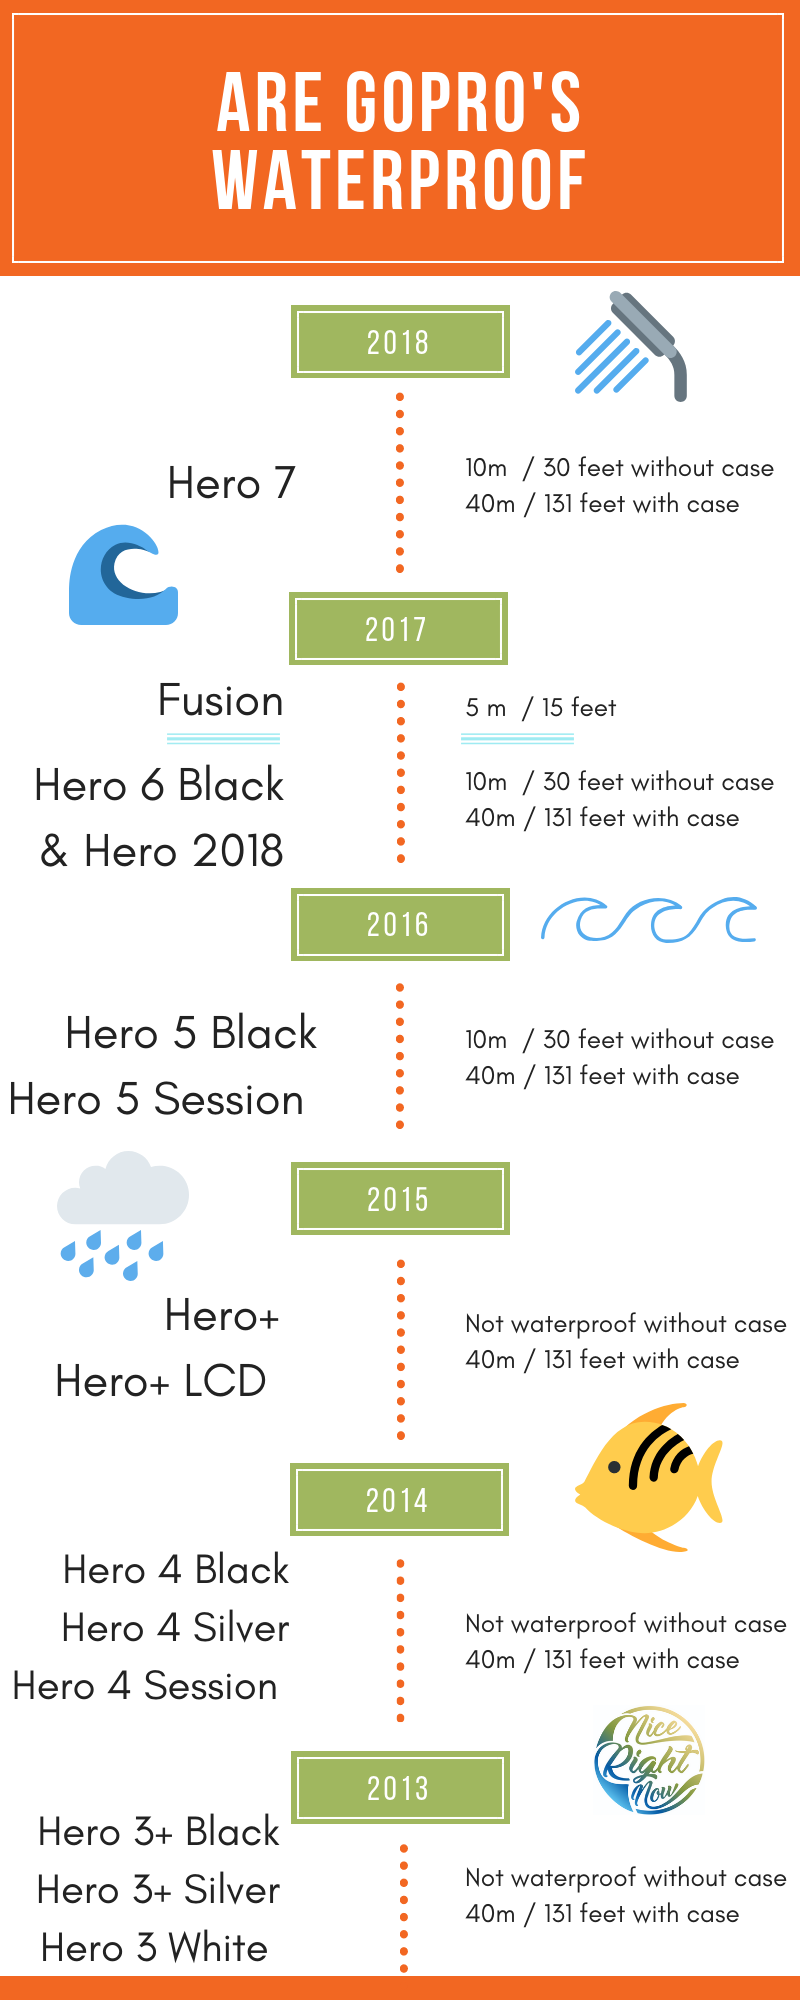
Which GoPros are WaterProof?
So most of you know already that GoPros are waterproof, at least to some extent. But there are some big differences in the waterproof capabilities between models. So then, which GoPro is waterproof, and to what depth? Let us compare GoPro models to find out.
GoPro Hero3
Both the Hero3+ and Hero3 require waterproof housing. The Standard Housing is waterproof to 40m. This housing is easy to fit, and also incorporates the standard mount for attaching accessories to the GoPro. The Standard Housing is a mandatory accessory if you are shooting anywhere near water or moisture.
The Hero4 Black, Hero4 Silver both require a waterproof housing. The Standard Housing is waterproof to 40m. My Hero 4 Silver was supplied with the standard GoPro Hero 4 waterproof housing straight out of the box.
Is the GoPro Hero4 Waterproof Without a Housing?
As with the Hero3, do not take your Hero4 underwater without the waterproof housing. That is unless you want an excuse to buy a newer version because your Hero4 will become useless.
GoPro Hero5
The GoPro Hero5 waterproof depth is 10m / 30′ straight out of the box, with no casing. This is thanks to the revolutionary new one-button design on the Hero5. This was the turning point for GoPro, making it a far superior camera than the Hero4.
GoPro Hero5 Black pool fun
GoPro Hero6
The GoPro Hero6 waterproof depth is 10m / 30′ straight out of the box, with no casing. Actually, Hero6 is the same as the Hero5 in many ways. Same casing many of the same features. It’s hard to tell the 2 apart.
The Hero7 White, Hero7 Silver, and Hero7 Black are all waterproof to a depth of 10m / 30′, straight out of the box. When you’re on a good thing, stick to it.
GoPro Hero8 Black
So what about the awesome new GoPro Hero8 Black? Is Hero8 waterproof? Good news, the Hero8 is waterproof down to a depth of 10m / 30′, straight out of the box.
GoPro Scuba Diving Depth
If you want to take your Hero5, 6, 7 or 8 diving deeper than 10m, then a GoPro underwater case is required. Whilst the underwater case will take it down to 40-45m, the Super Suit Dive Housing will take it down to 60m depth. That’s deeper than most SCUBA divers would ever venture.
Hero5 Session is the same as Hero5 Black – waterproof to 10m / 30′ straight out of the box with no casing.
The new GoPros are waterproof WITHOUT a housing. Not sure how they did that lmao, so sick tho. Just bought them, unboxing video tomorrow?! pic.twitter.com/t4B8uk5UB1
You can use Hero5, Hero6, Hero7 and Hero8 with no casing, and it’s fully waterproof to 10m depth. But if you want to attach any accessories, you will still need a casing. Are you confused yet? Let’s continue with the GoPro camera comparison.
As stated above the Hero5, Hero6, Hero7 and Hero8 are waterproof with no external casing. The problem is, you cannot attach any accessories like a floating hand grip or 3-way grip arm. For that, you will need to attach an external casing, called The Frame.
Thankfully The Frame is supplied with the GoPro straight out of the box. Thankfully The Frame does not interfere with the audio quality as it keeps the microphones exposed. The Frame incorporates the standard GoPro mount at the bottom to attach to all the standard GoPro attachments.
I did attempt to shoot using a naked GoPro Hero5 Black, however, I found that the audio quality was terrible. This was because the slightest movement on The Frame results in horrible interference to the audio recording.
As you rotate or move the camera it is inevitable that you will adjust your fingers slightly on The Frame. This causes horrible sound distortion in the audio quality and renders the audio virtually unusable.
3 Way Pole mounted to The Frame
Pros and Cons of a Waterproof GoPro
The GoPro Hero3 and Hero4 sound deteriorate drastically when you fit the waterproof rear door to the Standard Housing. This is the reason I drowned my Hero4 Silver in the first place, trying to avoid the terrible audio quality reduction of the GoPro underwater case. Thankfully this issue disappears completely with the Hero5 Black and later models.
So the Hero5 Black sounds like the perfect solution right? Wrong. When GoPro redesigned their flagship camera to make it waterproof, they had to change to waterproof microphones. I noticed a sharp drop in audio quality over my previous Hero4 Silver, which had the standard non-waterproof microphones fitted.
Don’t get me wrong, the sound quality is still okay on the Hero5 Black. But it is not brilliant. And it is difficult to fit an external microphone to improve the situation. Note that fitting an external microphone requires removal of the waterproof port cover, which instantly makes the GoPro non-waterproof.
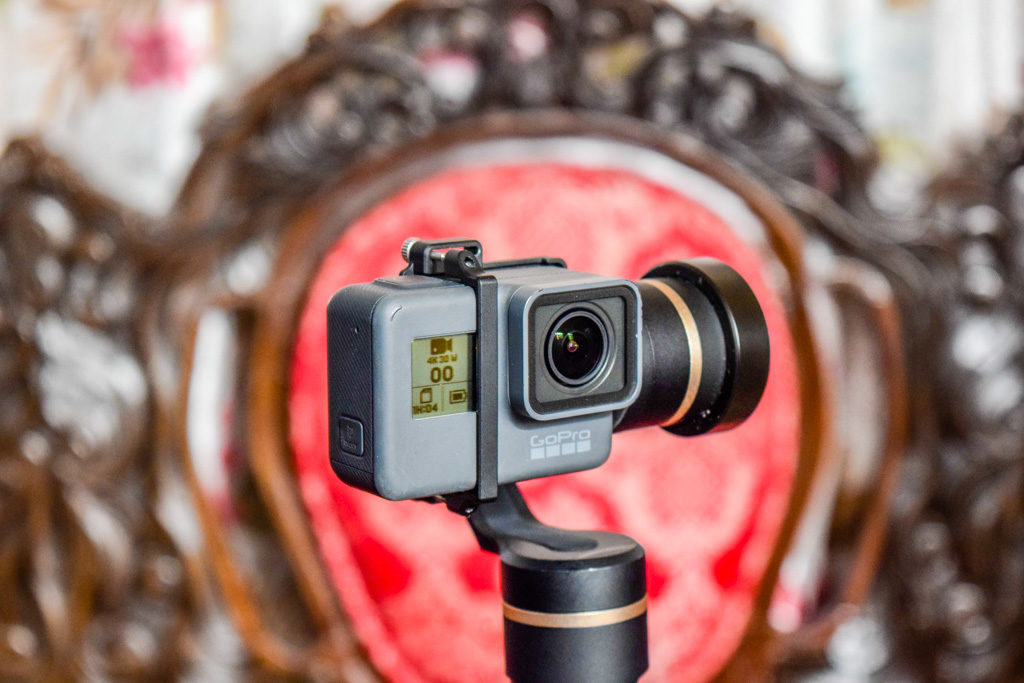
Attaching a Gimbal to Improve Audio Quality
The best solution I have found to fix the terrible Hero5 Black audio quality is to use a FeiyuTech G6 GoPro Gimbal. This removes all interference caused by vibrations transmitted through the camera shell and into the microphones. The audio quality without the FeiyuTech G6 is sometimes close to unusable, but with the gimbal fitted it is drastically improved. But even this has a downside.
If you’re looking for a waterproof gimbal for your GoPro, sorry to disappoint you. The Feiyutech G6 gimbals are splash proof not waterproof. However, if you check out the below video you might think differently. Am I ready to take the FeiyuTech G6 underwater? Definitely not, but I’m not afraid of a little rain.
Tips For Going Waterproof
Now that you’re enjoying the waterproof capabilities of your GoPro, here are a few tips to help you get the best from your camera.
Make sure your camera doors are completely closed. The slightest gap will allow water in and make your GoPro non-waterproof.
Keep the case clean. Just like the lens cover needs to be kept clean to take good footage, so does the case around the lens area.
Make sure you fit the correct (waterproof) back door to your GoPro Hero3 or Hero4 external housing. Fit the wrong one and you will drown your camera as soon as it contacts water.
If you use your camera in the ocean, rinse off the saltwater when you’re finished. This prevents rust from forming on the metal parts of the case and prevents general deterioration of both the camera and the casing.
Check the GoPro underwater case before venturing into the water. It’s especially important to check your GoPro Hero3 or Hero4 case seals are working correctly. Fill up your sink and submerge the GoPro. Does it get wet?
It’s worth mentioning that a GoPro camera doesn’t float on its own. When using a GoPro underwater you will definitely need to attach a floating device like a floating grip or a floaty case.
The GoPro 3-way grip is awesome for splashing around in the shallows. With this epic GoPro selfie stick, waterproof beach videos with friends is a breeze. But be careful, it doesn’t float.
The Floaty will keep your GoPro afloat if you drop it underwater
What Does Underwater Do To Your Footage:
You will see some unusual colour washes when videoing in underwater environments. The new underwater environment adds some natural filters to the light depending on the condition you are filming in. The end result is that your footage may not look as clear as you would expect.
This is where post-production editing software comes in. You will want to adjust the white balance to make your footage look more natural. Here’s a link to a great tutorial on making your underwater footage shine by adjusting the white balance.
More Underwater GoPro Filming Tips
Now that you’re serious about going underwater, see the video below for some more great tips.
What’s the Best GoPro for Underwater?
After doing a GoPro camera comparison, it is clear that those cameras which don’t need an additional underwater case are the best GoPro for underwater. That is, the Hero5, Hero6, Hero7 and Hero8. Each of these is equally waterproof to 10m without a case.
Take the Plunge – GoPro Style
Now that we’ve done the GoPro camera comparison and you know exactly how waterproof yours is, it’s time to take the plunge. Put your case on, attach your floating GoPro device, and go swimming.
You will find that it is remarkably easy to shoot great underwater footage using your GoPro. And you will be once again ecstatic that you purchased this outstanding action camera.
Would you like a free copy of our Ultimate Bucket List?
Not sure where to travel to next? We have created the Ultimate Bucket List to help you plan your next trip. 1170 awesome travel destinations in 167 countries. And we want you to have it for FREE.
Housekeeping Camp Yosemite is the ideal place to take your family when staying in Yosemite National Park. You can wake up to the sound of the rushing water of the Merced River, and the cheerful chirping of the birds. The best thing about camping at Housekeeping is that whilst you are camping outdoors, you avoid the hassle of setting up a tent!
Note: This post may contain affiliate links. Please read our disclosure policy for more information.
Where is Housekeeping Camp?
The camp is located in an ideal location next to the Merced River in the heart of the Yosemite Valley. It is easily accessible by a normal family car. From Housekeeping Camp you have a large range of major tourist attractions within close proximity.
The best thing about the location is the scenery. You have uninterrupted views of Yosemite Falls and Half Dome. When we visited in May the Yosemite Falls were thunderous directly after the snowmelt.
Yosemite Falls as seen from Housekeeping Camp
Facilities at Housekeeping Camp
There are a whopping 266 units in the Housekeeping Camp, which can sleep 6 guests each. The normal layout sleeps 4 people in the 2 bunk beds and a double bed. However, there is room enough for extra bedding in a large tent.
Tents are segregated into standard units and river units. As the name suggests, the river units are next to the Merced River.
Campsite in Housekeeping Camp
Tent Layout
The tents themselves are constructed of 3 sided concrete structures with canvas roofs and privacy curtains. They are also equipped with covered patios, where you will do your dining and chilling out.
Keep in mind that cars can’t be driven up to your tent site unless your site is next to a road. Cars can only be parked roadside. You may have to lug your supplies a short distance, for us, it was about 30m from the car to the tent.
Our cosy campsite in Housekeeping Camp
Each unit is well equipped with almost everything you need to be comfortable. You have shelving, food preparation table, picnic table, chairs, mirror, electrical outlets and lights. Everything but the kitchen sink.
That’s right – you need to walk up to one of the central amenities block to wash your dishes or to get water. Also to use the shower and toilet facilities you will need to walk to one of the central amenities blocks.
A campfire ring is provided at each site. You can purchase packets of firewood at the central store. Fires must be extinguished by 10 pm, so rest assured there will be no all-night campfire parties.
Bear Lockers
All campers must use the bear lockers, which are also provided at each site. It is important to learn the bear essentials – that is the food storage rules.
There are hefty fines if you mess this up, not to mention the inconvenience of a bear trashing your belongings. Basically no food or toiletries are permitted to be stored outside of the lockable bear locker. Especially not in your car.
A Blue Jay bouncing around near our Housekeeping Camp tent
Common Facilities
Shower houses available with restrooms, showers, soap and towels. Other restrooms and shower buildings are scattered throughout Housekeeping Camp.
There is also a well equipped general store. The store has a good variety of camping and hiking supplies, maps and guide books. It also stocks a very good range of souvenirs.
For some, the best thing it sells is to take away food. There is no need to bring any food to Housekeeping Camp because you can purchase delicious hot takeaway food from the store.
Inside the store at Housekeeping Camp
Rental Desk
One of the best features of Housekeeping Camp is the Rental Desk. Here you can rent a wide variety of linen, cots, stoves, cribs and general camping supplies for a very modest fee. ‘First in best dressed’ is the rule here. There is no guarantee that they won’t run out of supplies, so I think it is best to bring your own sleeping bags.
We visited the rental desk to pick up chairs and bedding at Housekeeping Camp
An example of the rental fees is chairs, which we rented for $2 each.
Things to do at Housekeeping Camp
Roasting marshmallows by the campfire was probably our favourite activity – a classic camping favourite.
You can rent rafts across the road and float down the river past your campsite. Beware, the Merced River is icy cold, which is often fed by melting snow.
Use the free shuttle bus connecting housekeeping camp with other parts of the Yosemite Valley for your sight-seeing. The buses depart every 20 minutes or so, and the bus stop is just across the road from Housekeeping Camp. Oh, did I mention that they are free!
Here comes the Yosemite shuttle bus!
There are sandy beaches along the Merced River, which is perfect for taking the family to the beach! It’s a beautiful river, one which you could quite happily sit next to and chill out.
Essential Items to Pack
Here is our suggested packing list of essential items at Housekeeping Camp:
To book your very own tent at Housekeeping Camp head on over to the Travel Yosemite site. I strongly suggest you get in very early to avoid disappointment. I’m talking 6-12 months ahead.
These tents get booked out very early, they are very popular. Housekeeping Camp is seasonal, generally open from April to October depending on weather conditions. And it’s not that expensive, we paid $116 for a one-night stay.
I can honestly say that staying at Housekeeping Camp was one of the highlights of our visit to Yosemite. If you have small kids who don’t do a lot of camping, this will be a magical experience. It is many times more memorable than staying in a standard hotel room and will create memories that last a lifetime for you and your family.
Would you like a free copy of our Ultimate Bucket List?
Not sure where to travel to next? We have created the Ultimate Bucket List to help you plan your next trip. 1170 awesome travel destinations in 167 countries. And we want you to have it for FREE.