
When recording holiday videos, my traditional options are GoPro, iPhone or a camcorder. But recently I have started to use a Nikon D5300 DSLR camera to record high definition video with pleasing results. Read on to learn my recommended DSLR setup for video.
Why Use a DSLR Camera for Video
The main reason to use a DSLR Setup for video is to get the look of a cinema camera. That means getting a quality video with a shallow depth of field. This is typically the effect of having a crisp and focused subject in the foreground, with background slightly blurry.
How to get a Shallow Depth of Field
A shallow depth of field is achieved by using a large aperture setting in your video, to give you the shallow depth of field. This is also known as the f-stop.
Ideally to get that sought after crisp foreground blurry background you want a small f-stop… around f2.8 is the ultimate, although most popular lenses won’t let you go below around f3.5.
Working in Aperture Control mode is the best for controlling the depth of field. Normally you would set the aperture to the desired setting before recording, then focus on the subject in the foreground, then start recording video.
Movie Settings
On the Nikon D5300 DSLR camera the main video settings are as follows:
Frame Size / Frame Rate
- 1920 x 1080 / 60 frames per second
- 1280 x 720 / 60 frames per second
- 1920 x 1080 / 30 frames per second
- 640 x 424 / 30 frames per second
- 1920 x 1080 / 24 frames per second
Movie Quality
- High
- Medium
- Low
Recommended Settings
- Frame Size / Frame Rate = 1920 x 1080 / 30 frames per second
- Movie Quality = High
How to Record Video
The basic sequence is similar for the most video I shoot:
- Turn camera power on
- Rotate the zoom ring to open the lens
- Set up the tripod or hand-held positioning
- Open the LCD display and adjust the screen to best position
- Select the mode on the main dial
- If using Aperture control mode, select the desired f-stop setting
- Activate video mode by turning the live view lever on
- Focus on the subject
- Start recording
Obviously this is much more complicated than using a GoPro or iPhone, however, the sequence does get considerably faster with practice when all these steps become second nature. It’s all about having control.
Accessories
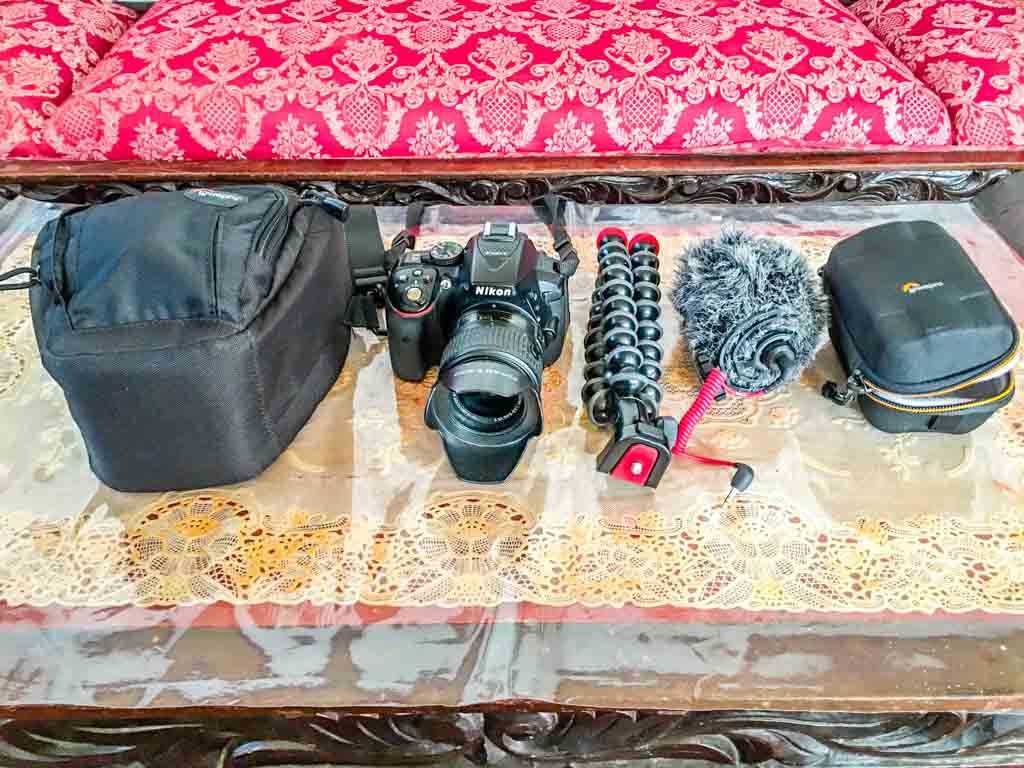
Here’s the equipment you will need to have a quality DSLR setup for video recording.
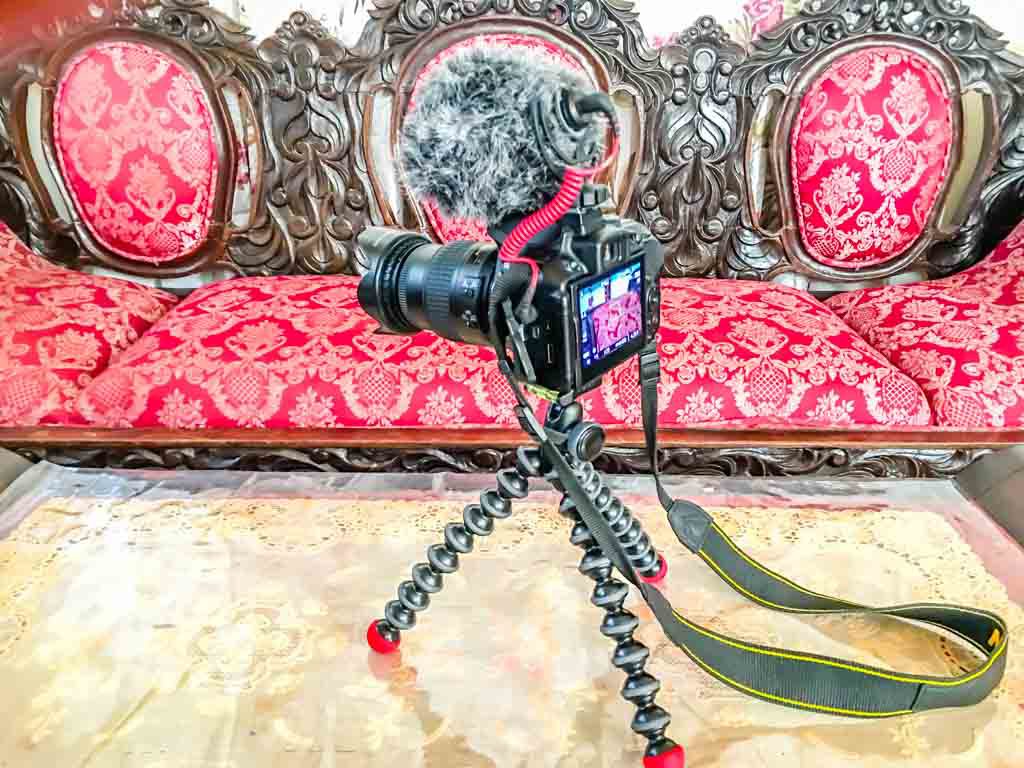
- Nikon D5300 DSLR camera
- Rode VideoMicro Compact on-camera microphone
- Gorillapod 5K – DSLR Tripod
- Mini-HDMI to HDMI cable
Sound
The Nikon D5300 DSLR camera can record audio directly from the camera, but as with most cameras, you need an external microphone to get decent audio. For one thing, the in-built microphones pick up the servo motors during auto-focus, which sounds terrible.
I prefer Rode external microphones. Not only are they moderately priced, but they also give professional results when used properly. My preferred microphone is a Rode Video Micro, the compact version of the on-camera microphone.
You will get even higher quality audio using the more expensiveRode VideoMic Pro or VideoMic Pro+ shotgun microphones, however, these add to the overall bulk of your video setup.
The microphone clamps right onto the Flash Hot Shoe of the Nikon D5300 DSLR camera, and plugs into the 3.5mm jack on the side of the camera. It doesn’t get much simpler than that!
Tripod
I find that the GorillaPod 5K (DSLR model) gets me through most situations, and is much more compact than a traditional tripod. Whatever version you go for, a tripod is an absolute necessity for quality video recording.
If you really want a professional set up then go for a tripod with a fluid head for smooth video panning. You won’t go wrong with the Manfrotto Video Tripod, it’s what the pro’s use.
The one that I am really lusting after is the Manfrotto Fluid Video Monopod. This is nearly as good as a tripod but more portable, and with a much smaller footprint.
For those times when you don’t have a tripod handy, it’s important to use a solid stance and camera grip whenever possible. Locking the elbows into the ribs is a good technique to steady the video.
Also, try not breathing while shooting short clips, or breathing lightly. An even better solution is to find a solid surface like a table to sit the DSLR camera upon.
Mini-HDMI Cable
This is great for playing your video straight from your DSLR camera to a high definition TV. Not only do these help you to see how you are going with your recordings, but you can edit or delete unwanted videos.
Advantages of Using DSLR for Video
- The larger sensor size found on DSLR cameras. This is going to lead to better quality images, even if you just leave it in full auto mode.
- Taking DSLR quality photos during a video session is easy because the camera is right there in your hands. It’s literally as simple as hitting the shutter button to take a photo because the video record button is different from the photograph shutter button.
- The cinematic quality of the footage, due to the control you have over the depth of field. A skilled DSLR photographer will be able to achieve many more impressive effects as well.
- The DSLR setup has a WOW factor because it looks so professional. When people see the external microphone with the dead cat rigged to the flash mount, they will be impressed by this pro looking rig. For even more WOW factor add the Manfrotto fluid head monopod.
- The cost has come down dramatically for DSLR cameras. I have seen brand new Nikon D3300 DSLR cameras in Malaysia for around the US $250, complete with 2 lens kit! These cameras are cheaper now than most alternatives, including the humble iPhone.
Disadvantages of Using DSLR for Video
- It’s not waterproof. Using GoPro’s and later model smartphones comes with the benefits of being waterproof, or at least splash-proof. Alas with the Nikon D5300 DSLR camera, if you get hit by a rain shower your camera may well be destroyed.
- It’s not shockproof. Don’t get me wrong, the Nikon D5300 DSLR camera is a robust camera and can take its fair share of knock and bumps. But you wouldn’t want to drop the camera for fear of damaging it. You need to take much more care than if you were using a GoPro.
- DSLR is a bulky setup. It’s not so much of an issue for easy shoots, but this setup is not really suitable for a long hike through rough terrain. That’s better left for a GoPro or a compact camera.
- Complexity is certainly another challenge. All DSLR cameras do take some time to master. You could of course just leave it in full auto mode and let the camera take over, but that kind of defeats the purpose of using a DSLR camera. It’s all about gaining control over your shots by making adjustments to get the desired look.
How does the DSLR Video Setup Perform?
Overall this setup performs quite well without getting too technical, just by learning some basic settings like aperture control and focus modes. There is a learning curve attached, and I do recommend taking a short course or reading an instructional book on how to use a DSLR for photography. I highly recommend the book Nikon D5300: From Snapshots to Great Shots. This book even has a video section in it.
If you are interested in shooting some truly professional-quality video I strongly suggest you try using this simple DSLR setup for video. Persevere and you will become a DSLR VIDEO PRO.
Would you like a free copy of our Ultimate Bucket List?
Not sure where to travel to next? We have created the Ultimate Bucket List to help you plan your next trip. 1170 awesome travel destinations in 167 countries. And we want you to have it for FREE.


