
I’ve been using a GoPro for Vlogging for quite a while now, with mixed results. Initially, I disliked GoPro’s immensely, then after learning a few tricks and adding some inexpensive gear, I grew to love my GoPro. Here are a few simple techniques for using a GoPro as a Vlogging camera, and it really works!
Note: This post may contain affiliate links. Please read our disclosure policy for more information.
Different Styles of Vlogging
There are loads of different styles of Vlogs out there in YouTube land, and they can be simplified into 4 main groups. Which group do you fit into?
- Talking Head – In this style of Vlog, the camera is pointing at the subject’s head, talking about a topic or a story.
- Instructional – “How to Do” type Vlog involving some kind of demonstration regarding the best way to achieve some end result.
- Documentary – Just look towards Travel Vlogs for a great example. These document a place or event.
- Reality – A Vlog recorded in the real world, showing events as they are happening. It something as interesting as your life!
Here’s one of my favourite GoPro documentaries.
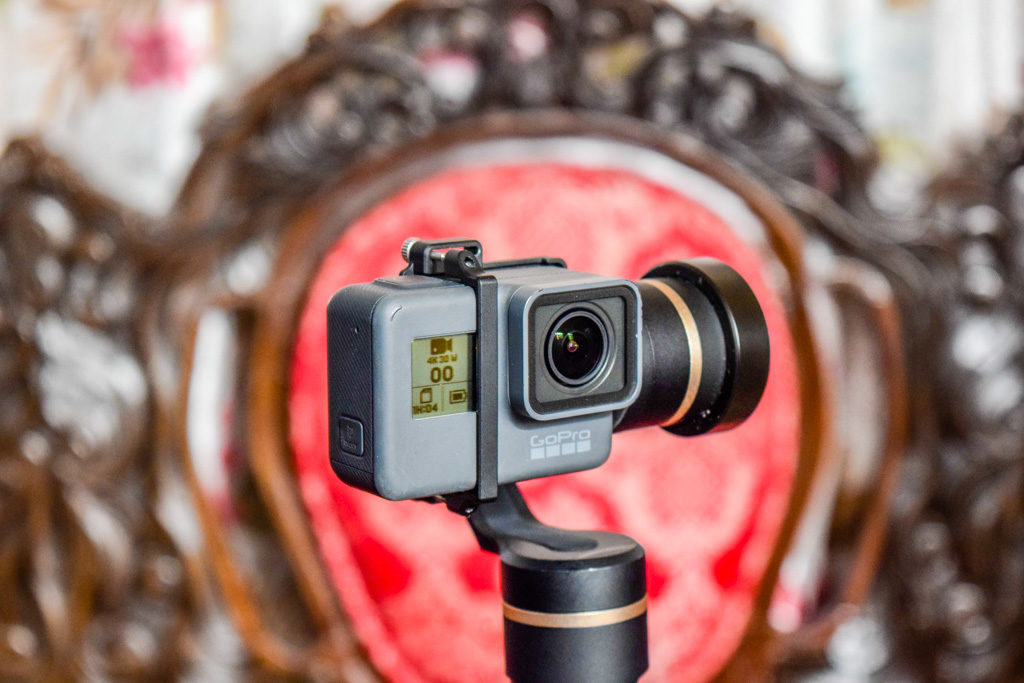
The below method is great for Talking Head or Instructional type videos, and can easily be adapted to Documentary or Reality Vlogs. I recommend adding a GoPro Gimbal to the setup if you’re doing Documentary or Reality Vlogs, liked the Feiyu G6 Hand-Held Gimbal. It’s simple, cheap, robust and best of all splash-proof.
Alternatively, just get yourself a GoPro Hero7 Black. Known as the gimbal killer, this bad boy has such advanced image stabilisation that you will not require a gimbal. It is the finest compact YouTubers Vlogging camera that money can buy, provided that you add some basic Vlogging accessories. There’s no need to get too fancy here.
Benefits of Using a GoPro for Vlogging
So why on earth would anybody want to use a GoPro as a Vlogging Camera, I hear you ask? Yes, there are better cameras on the market, but there is definitely a place for GoPro’s in the Vlogosphere.
All of those better, more expensive cameras will still require extra Vlogging camera accessories to make them suitable. There is no ‘one-stop-shop’ when it comes to Vlogging, mainly due to audio issues. However, the GoPro can give you results comparable to some high-level cameras at a fraction of the cost.
Extra equipment required is minimal, making GoPro’s suitable for a beginner Vlogging camera. Overall the GoPro is more than adequate for anybody except pro-level Vloggers.
And of course, you can take your GoPro surfing, kayaking, paragliding, or whatever other adventure you want to tackle. It doubles as a rugged waterproof Vlogging Camera. Here are some more reasons why you should consider using a GoPro for Vlogging:
Small Camera Size
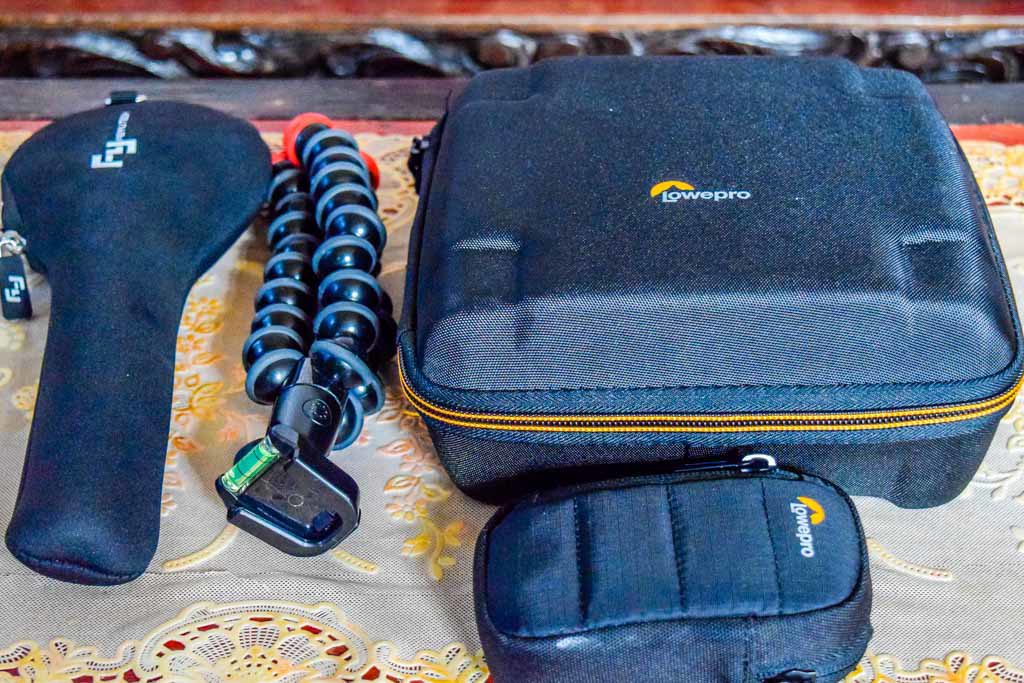
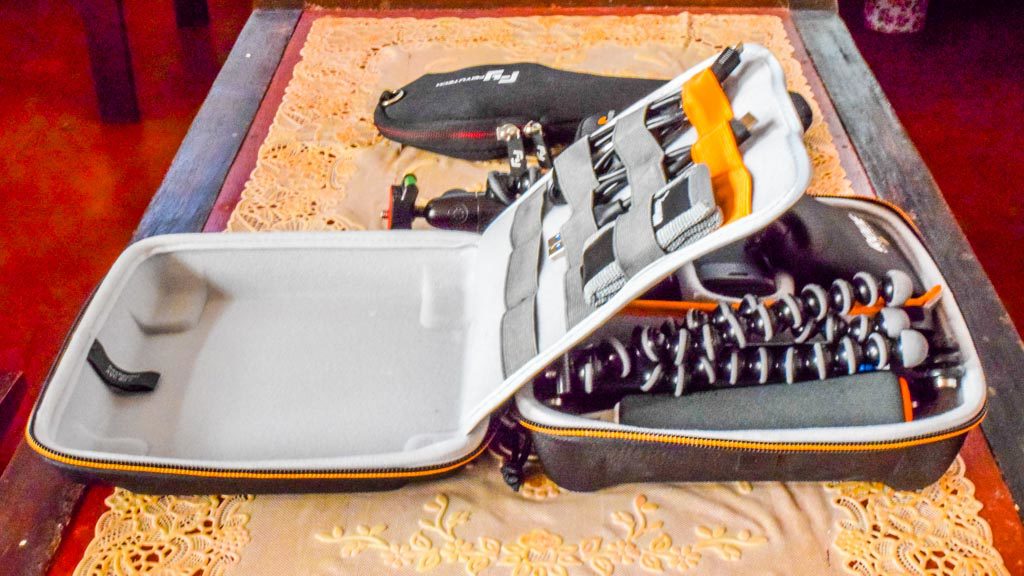
The GoPro is so small it fits right there in your pocket, alongside your phone. But if you are a serious GoPro’er, you will want a dedicated bag or case for your gear.
Don’t worry, it only needs to be a small bag or case, since you don’t need much equipment at all. Just big enough for a tripod, microphone and a couple of batteries should do the trick.
Time Lapse and Slo-Mo
Although time-lapse and slow-motion are not standard Talking Head Vlogging techniques, it’s nice to know they’re available if required. It pays to be versatile.
GoPro App
The GoPro App is awesome, it provides full control of your GoPro right from an iPhone. Essentially it’s a fancy remote control, and the smoothest camera app I’ve ever encountered.
Built-in Wi-Fi
Not only does wi-fi allow syncing with the GoPro app for remote control, but it also enables downloading of photos and videos over wi-fi to a mobile device. Pure wireless magic.
Voice Control
Yes, you can control your GoPro Hero5 Black (and all new models) using voice control. Personally, I struggle to get the GoPro to understand my voice reliably for smooth voice control. But then again, Siri doesn’t understand me either. I’m pretty sure GoPro Voice Control works fine for most people.
ProTune
ProTune is a no-nonsense method of controlling the GoPro vital settings. It even has some “magic” settings that just make everything more awesome, automatically.
Menus and User Interface
GoPro’s have come a long way, and now the menu structures and user interface are nothing short of pure genius. No longer do you have to read a user manual; the GoPro built-in menu is so intuitive you can quickly find what you want.
Ok, maybe you do need a little help from time to time. Relax – there are thousands of short instructional videos on YouTube to explain any GoPro question you can think of.
WaterProof
It’s nice to know that a passing shower will not trash your camera. And it’s nicer to know you can take it swimming at the beach. Nicer still that you can take it SCUBA diving to some crazy depths. Read here to learn how waterproof different GoPro models are.
4K Video
This is known as “future-proofing” your video because one day most video will be 4K resolution and above. It’s probably closer than you think, and it’s great to know that your GoPro is a 4K Vlogging camera.
Affordable Vlogging Camera
Compared to some of the fancier compact cameras that pro-level Vloggers use, the GoPro is a very affordable Vlogging camera. Even the flagship GoPro Hero7 Black retails for $340, and you can drop a couple of levels to the GoPro Hero7 White for just $169. This makes GoPro hands down the best budget vlogging camera on the market.
Equipment Required
To successfully set up a GoPro Vlogging Camera you will definitely need to add some extra Vlogging accessories. Thankfully the shopping list is fairly small, and won’t break the bank. Scroll to the end of the post for a complete shopping list for a couple of different options.
Essential Equipment
- GoPro – I recommend GoPro Hero7 Black or newer. We have a great GoPro Comparison Chart for you to compare the different models.
- Smartphone GoPro App – To use as the remote control for the GoPro, and preview screen.
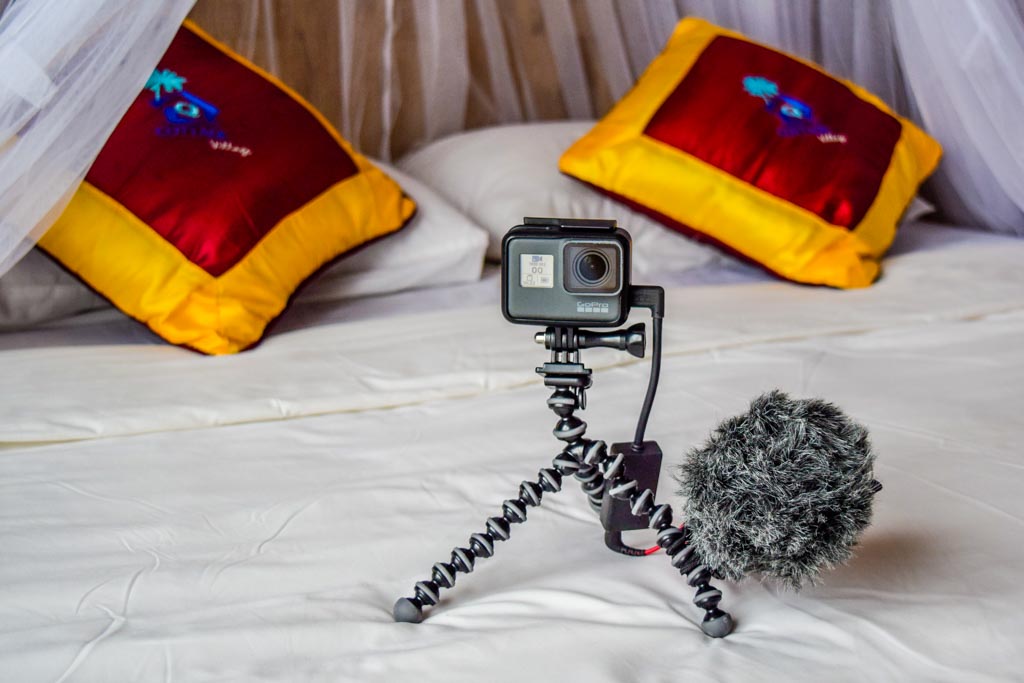
- Joby Gorillapod – Tripod to stabilize the GoPro.
- External Microphone – Rode SmartLav+ or Rode VideoMicro – Professional grade microphones at an affordable price.
- GoPro Microphone Adaptor – Required to plug the external microphone into the GoPro.
- Editing Software – I recommend Final Cut Pro X if your budget will allow it, however, any good video editing software will suffice.
Optional Equipment
- Case – A small protective case to keep your GoPro, and a larger case to keep all your other gear together.
- Spare Batteries – As a minimum have 1 spare battery, making sure it’s always charged as a spare. It doesn’t hurt to have 2 more if you’re “out in the field” for longer periods.
- Battery Charger – A dual battery charger is great for a fast charge of both your GoPro batteries.
- Gimbal – If you are doing any mobile vlogging such as travel vlogging, a handheld gimbal is a necessity. That is unless you own a GoPro Hero7 Black, which has the latest image stabilization and does not require a gimbal.
- Editing Software – LumaFusion is a great option for the iPad, and won’t break the bank.
Recommended Method
Have you ever heard the saying “there’s more than one way to skin a cat”? There is definitely more than one way to use a GoPro as a Vlogging Camera. This is the way I do my GoPro Vlogging. It is a simple, economical and reliable method, and it can work for anyone.
Insert GoPro into The Frame
Putting your GoPro into the external case (called The Frame on the GoPro Hero5 Black) makes it mountable. This means that you can now mount your GoPro onto any of the staggering numbers of GoPro attachment devices. Luckily The Frame comes free with the GoPro.
Mount GoPro onto Tripod
You will want your GoPro mounted firmly on a tripod for the best results. Now that the GoPro is mountable it’s possible to easily mount it onto to the tripod. And the best tripod for GoPros is the Joby GorrillaPod.
Actually, the Joby Gorillapod is the best small tripod for virtually every camera. I suggest you don’t settle for a cheap copy here. Go for the original Joby Gorillapod, they are extremely rugged and reign supreme in the tripod market.
As a bonus, you can also use the Gorilla Pod for a handy selfie stick or carrying device for your GoPro. Relax, as well as being 100% waterproof, it’s completely action proof.
Connect iPhone to GoPro via Wi-Fi
It’s useful to pair the GoPro and iPhone using the phone’s wi-fi network. It’s a very straight forward process, just open the GoPro app and click the camera icon, the GoPro app should guide you through the rest.
If there’s some kind of connection issue, the app is smart enough to help you figure out the issue and fix it.
Check Settings on the GoPro iPhone App
I suggest going with 1080P and 30 frames per second, it’s the normal YouTube standard and won’t use up massive amounts of your precious hard drive memory.
ProTune is another setting which you may wish to use. ProTune is intended for people who intend to spend time doing colour correction in video editing software. ProTune will add editing time and SD card space to your videos. However,
I recommend to just leave ProTune turned off. This will give you the enhanced GoPro Color, and leave the other settings in auto mode.
Here’s a full list of settings I recommend for GoPro Vlogging:
VIDEO SETTINGS
- Resolution: 1080
- Frames Per Second: 30
- Field of Vision: Linear
- Video Stabilization: On
- Auto Audio Mode Group: Auto
- Protune: Off
PROTUNE SETTINGS
If you do decide to turn GoPro ProTune, here are the recommended settings.
- White Balance: Auto
- Color GoPro Color
- Shutter: Auto
- ISO Limit: 400 (if the lighting is bright)
- EV Comp: 0.0
- Sharpness: High
- Raw Audio Track: Off
Confirm Video Framing
Check that your shot is framed correctly by checking the image on the GoPro app on your smartphone. Make sure your camera is aligned perfectly horizontally, and the distance is correct to the subject.
Connect External Microphone to GoPro
Of all Vlogging camera accessories, this is the one that is mandatory. Connecting the microphone is as easy as it sounds. A simple way is to connect the Rode VideoMicro to the Gorilla Pod leg using a simple hair tie. Alternatively, you could attach it to The Frame using double-sided tape.
Note that to connect an external microphone to GoPro you will need to purchase a GoPro Microphone Adaptor. Keep in mind the following:
- The GoPro Microphone Adaptor is an expensive little beast. Aftermarket versions are difficult to find for the GoPro Hero7 Black and originals sell for upwards of $50.
- Once you remove your little hatch from the GoPro to fit the adaptor, it is no longer waterproof.
Using a Lapel Microphone
Another option is to use a lapel microphone, which can be connected to your smartphone for recording. This can be synchronized later to your video using Final Cut Pro X or some other advanced editing software.
With the Rode SmartLav+, the best result is running the cable up through the inside of your shirt and just poke the microphone head out the top. Being an omnidirectional microphone it doesn’t really matter if your aim is off, it will still pick up your voice clearly.
Start Recording Audio Using Voice Memo iPhone App
Use this method if using a Rode SmartLav+ Lapel Microphone. Voice Memos is a native app on the iPhone, and extremely intuitive. You literally just press record, and that’s it! I love this app.
What is more important is to make sure you have your microphone positioned properly for optimal audio quality. For the Rode SmartLav+, just attach it somewhere near the top of your shirt, point it towards your mouth and you’ll do fine.
Tip: Check the Rode SmartLav+ website for technical specifications.
Tip: Give the Rode Record app a try. You can download it HERE for Apple.
Start Recording Video Using GoPro App
I love the GoPro app for several reasons:
- It has all the functionality of the brilliant GoPro interface.
- All the GoPro functionality is much better laid out on the larger phone screen.
- It’s easier to see the video footage more clearly on the larger phone screen.
- The GoPro footage can be seen in selfie mode, to ensure the shot is being framed correctly.
- The video recording can be started and stopped from the phone.
- It has a great setup wizard for connecting to your phone.
- It is so smooth and user-friendly, definitely the best camera app I have used.
GoPro Hero5 Black and newer models do have voice activation. By saying “GoPro Start Recording” to your camera, it is supposed to start recording. However, this is hit and miss for me – must be my Australian accent. The trusty GoPro app is 100% reliable, so I’m sticking with that.
Finish Recording and Pack Up
It’s great to be organized and have a decent camera case or bag to organize your gear in. I favour the Lowepro range of camera cases, they’re rugged and affordable and come in a staggering variety of sizes.
Import Audio to Editing Software (If Using Lapel Microphone)
If using a Rode SmartLav+ microphone through a smartphone you will need to transfer your audio files of the iPhone (or another device) and into the Editing Software such as Final Cut Pro X.
Simply export from the Voice Memos app to my Dropbox or iCloud folders. Then import from the same folder into Final Cut Pro X. There are stacks of other options available in the Voice Memo app… you could even send yourself a text containing the audio file!
Import Video to Editing Software.
I have so far owned 3 premium video editing software programs: Power Director, Premiere Elements and Final Cut Pro X.
Power Director
First I used Power Director. I love this software, it’s so easy to use. Alas, when I switched from Windows to Mac operating systems the Power Director could not follow me, it’s only made for Windows.
Adobe Premiere Elements
Then I moved to Premiere Elements, which I find quite intuitive and difficult to use. Each to their own but I much prefer Final Cut Pro X, especially if you live in the Apple ecosystem.
Final Cut Pro X
Finally, I moved to Final Cut Pro X, which I am currently using. It’s a breeze to import your footage into Final Cut Pro X, and the sky’s the limit with how far you want to go with editing. It is also quite difficult to use owing to the full professional capabilities of this program, but it’s worth learning.
iMovie
I’ve also spent a lot of time in Apple’s native iMovie software. This is very easy editing software to use and is great for Vloggers just starting out. iMovie will work with just fine for using a GoPro for Vlogging.
LumaFusion
LumaFusion is another great option for editing Vlogs. Actually, LumaFusion for iPad is my go-to app for editing travel Vlogs out on the road, because it is powerful and fast to use, and does not require a laptop.
LumaFusion is available on desktop or iPad and gives close to professional functionality. It is fairly cheap ($20) as far as high-end iPad apps go, and is only about 10% of the cost of Final Cut Pro X.
Video Editing Summary
However, if you want to move up to pro-level then an upgrade to FCPX is highly recommended. The downside (aside from the cost) is that it will double your editing time, but you will have a much better video in the end.
Check out reviews of the best video editing software of 2019 by clicking HERE.
Synchronize Audio and Video Files
Good video editing software is more than capable of syncing your audio files. iMovie is capable of doing some basic manual syncing. Apple’s flagship editing Software Final Cut Pro X is capable of doing fully automated and precise syncing. Other premium software such as Premiere Elements is also capable of automatic syncing.
Personally, I use Final Cut Pro X to sync the files, it’s an easy process once you know-how. It’s very well explained in the below YouTube video.
Some GoPro Mistakes to Avoid
I’ve made a lot of mistakes along the way to learning how to use a GoPro as a vlogging camera. Ask any Vlogger and they will tell you they have some epic failures in the closet. I’m OK with that, it’s a part of learning and improving. So here are some GoPro Vlogging tips.
- Don’t use the audio from GoPro Hero5 Black or newer. Ever. The problem is that when the GoPro microphones became waterproof with the release of GoPro Hero5 Black, the audio quality dropped drastically. GoPro Hero4 is still okay in the Audio department when they’re outside of their waterproof casing.
- I am still on the fence with GoPro Hero7 Black audio quality, it is much better than the GoPro Hero5 Black. You may find it usable in perfect conditions.
- If you do need to use the GoPro audio, be very wary of a selfie stick or any other attached grip device. They will introduce unspeakably loud interference to your audio at the slightest movement.
- If you do need to use a grip with your GoPro and still want to use the audio, pan using your wrist, keeping your fingers perfectly still on the grip. Better still, avoid panning altogether. Panning is over-rated.
- Avoid using a nude camera, if you plan to use the audio. The slightest movement of your fingers on the GoPro case will introduce horrible noises to your audio.
- Avoid walking with your GoPro unless you have a handheld gimbal or GoPro Hero7 Black. It’s the gimbal killer.
- Avoid low light conditions. If you must record in low light, ensure you adjust the ISO level in Protune. 1600 is a good setting for low light indoor, however, you will still end up with grainy looking video.
Just Do It
The most sage advice I can give is… Just Do It. You will probably feel like your equipment, knowledge or conditions are not perfect, and feel like putting it off for some time. Yes, this happens to the best Vloggers.
The fact is with Vlogging, the more you do it, the better you get. So procrastinating and studying won’t make you any better at Vlogging. But getting out there and doing it will undoubtedly make you a better Vlogger.
Confidence and skills are improving. Creative juices are flowing. Ideas are bubbling to the surface. Now you are using your GoPro for Vlogging, and it’s looking great.
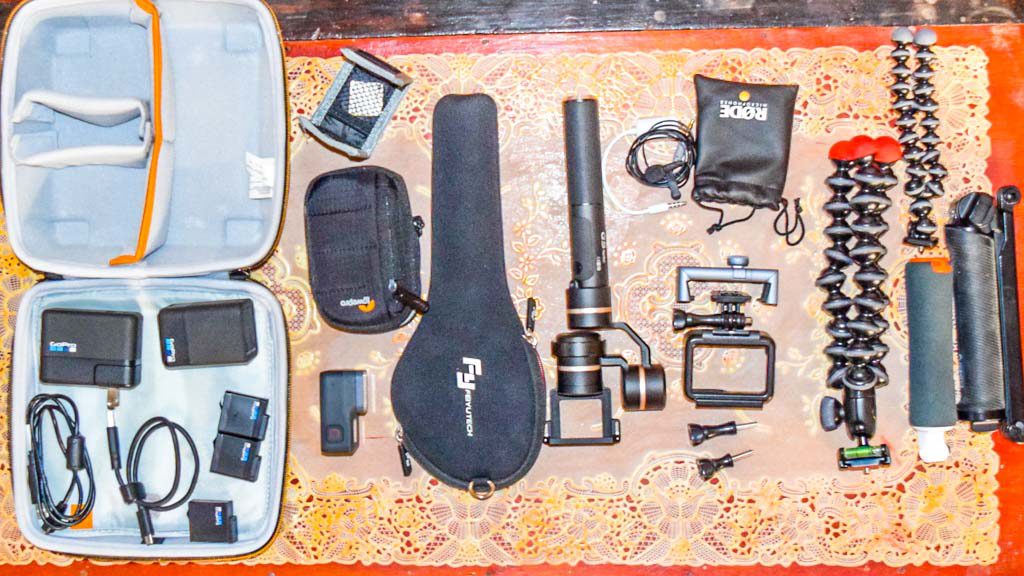
Shopping List – Minimum Requirements
Here’s my essential equipment for using a GoPro as a Vlogging Camera, with Amazon links and 2019 prices.
- GoPro Hero7 Black ($340)
- Rode SmartLav+ ($65)
- Rode VideoMicro ($60)
- GoPro Microphone Adaptor ($50)
- Joby Gorillapod Small ($15)
- Apps – iMovie and Voice Memos (free)
Grand total is $530. Not bad.
Complete Shopping List – “Ready for Anything”
Here are my complete Vlogging and travelling kits with Amazon links and 2019 prices. You will be truly ready for anything with this lot. Note there are a few items listed not mentioned in the above method, but are still useful to keep in the GoPro “ready for anything” kit.
- GoPro Hero7 Black ($340)
- Final Cut Pro X ($300)
- LumaFusion App ($20)
- Feiyu G6 Hand-Held Gimbal ($147)
- Rode SmartLav+ ($65)
- Rode VideoMicro ($60)
- GoPro Microphone Adaptor ($50)
- GoPro 3 Way Grip ($30)
- iPhone Tripod Adaptor Clamp ($27)
- GoPro Dual Battery Charger includes one spare battery ($49)
- GoPro Supercharger (wall charger) ($40)
- Joby GorillaPod Large ($32)
- GoPro Floaty Grip ($20)
- GoPro Casey Hard Case ($30)
- GoPro Spare Battery ($16)
- Sandisk Extreme 32GB Micro SDHC – spare SD card ($10)
- Joby Gorillapod Small ($15)
- Lowepro Soft Case ($9)
- GoPro Spare Screw Set ($17)
- Mac Headphone & Microphone Adaptor ($10)
- Foldable SD Card Holder ($6)
- LumaFusion iPad app ($20)
Grand total is $1,293 for everything in my GoPro kit including everything except the kitchen sink. Not bad considering you can easily pay this for a single camera without any Vlogging accessories.
Would you like a free copy of our Ultimate Bucket List?
Not sure where to travel to next? We have created the Ultimate Bucket List to help you plan your next trip. 1170 awesome travel destinations in 167 countries. And we want you to have it for FREE.


